CB Dynamics 365 Seamless Attachment Extractor Online Documentation
1 General
The Dynamics 365 cloud storage is expensive. The SharePoint document cloud storage is much cheaper, and there are also other options available, like Azure Blob.
1.1 Main Goal
CB Dynamics Seamless Attachment Extractor is a service that aims to help you avoid high costs on Dynamics 365 cloud storage by extracting files from Dynamics 365 into external file storage. The service supports several types of file storage options (SharePoint, Azure Blob Storage, Azure File Storage).
Both Dynamics CRM 2016 and Dynamics 365 are supported. Throughout this manual, all mentions of Dynamics 365 can be applied to Dynamics CRM 2016 as well.
1.2 Key Features
CB Dynamics 365 Seamless Attachment Extractor features include:
- Extraction of files from Dynamics 365 to an external file storage
- Transparent extraction to users and other integration tools - users continue to work with the Dynamics 365 files as they are used to
- File encryption/decryption on the fly
- File compression/decompression on the fly
- Various types of file external storage (SharePoint, Azure Blob Storage, Azure File Storage)
- Files are not flowing through any third-party service – they are uploaded from / downloaded to the Dynamics 365 plugin sandbox itself and never leave your control
- Provided as a cloud service - no need to install
- Modern Authentication (Server-to-Server OAuth3 Azure Active Directory based authentication)
2 How it Works
CB Dynamics 365 Seamless Attachment Extractor consists of 3 basic components:
- Connecting Software SaaS Portal (here)
- CB Dynamics 365 Seamless Attachment Extractor cloud service
- Dynamics 365 Solution package – CBSeamlessAttachments
Connecting Software SaaS Portal takes care of configuration, subscription management, and monitoring.
CB Dynamics 365 Seamless Attachment Extractor cloud service is responsible for running the initial extraction pass of your already existing files. It triggers a workflow action in the Dynamics solution package, which then uploads the documents to your desired file storage directly from your Dynamics instance
NOTE:
Your files are not flowing through our services.
Dynamics 365 Solution package contains a plugin that registers all the steps that are handling file operations in Dynamics 365. When one of those steps occurs, the plugin directly handles it by uploading or downloading the requested file from/to the external file storage and presenting it seamlessly to the user. The solution also contains custom workflow actions that are triggered by our cloud service to force extraction of pre-existing files (this is called the "first iteration").
WARNING:
This service manipulates essential business documents. We are not responsible for recovering them to the initial state in case of any misconfiguration of the service. Please test the service in your test environment first and create backups before implementing it in the production environment.
3 System Requirements
- Internet access to our portal here
- Single Dynamics 365 user – with permissions mentioned in chapter 1.2.a (login and password) [only supported for on-premise Dynamics 365], or an application user if modern authentication is used with the permissions mentioned in chapter 6.1.2.a
- Single SharePoint user – member of owners group for the SharePoint web/site with which it is going to be working (login and password), if extracting to SharePoint
- Dynamics 365 must be accessible outside your network (from Microsoft Azure Cloud)
- Properly working Microsoft Dynamics 365 Sandbox Processing Service in on-premise Dynamics 365 (our solution contains the Dynamics plugin running in sandbox isolation mode)
4 Purchase and First Steps
To purchase CB Dynamics 365 Seamless Attachment Extractor, visit our webpage https://www.connecting‑software.com. and choose CB Dynamics 365 Seamless Attachment Extractor from the Products menu as shown below in figure 1.
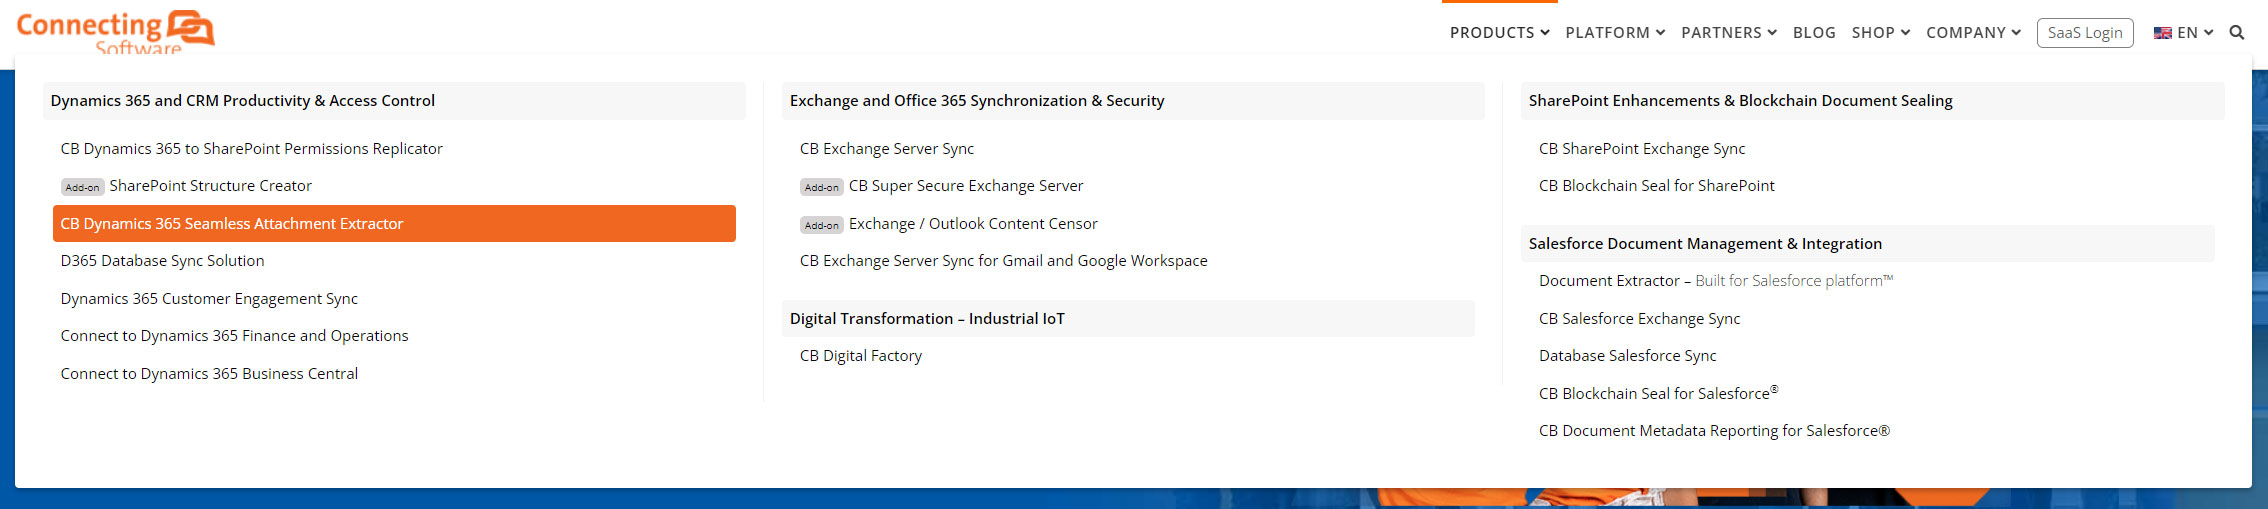
Figure 1: Connecting Software Homepage
From the CB Dynamics 365 Seamless Attachment Extractor product page shown below in Figure 2, click on the Pricing tab to view the pricing page with the available purchase plans as shown in Figure 3.
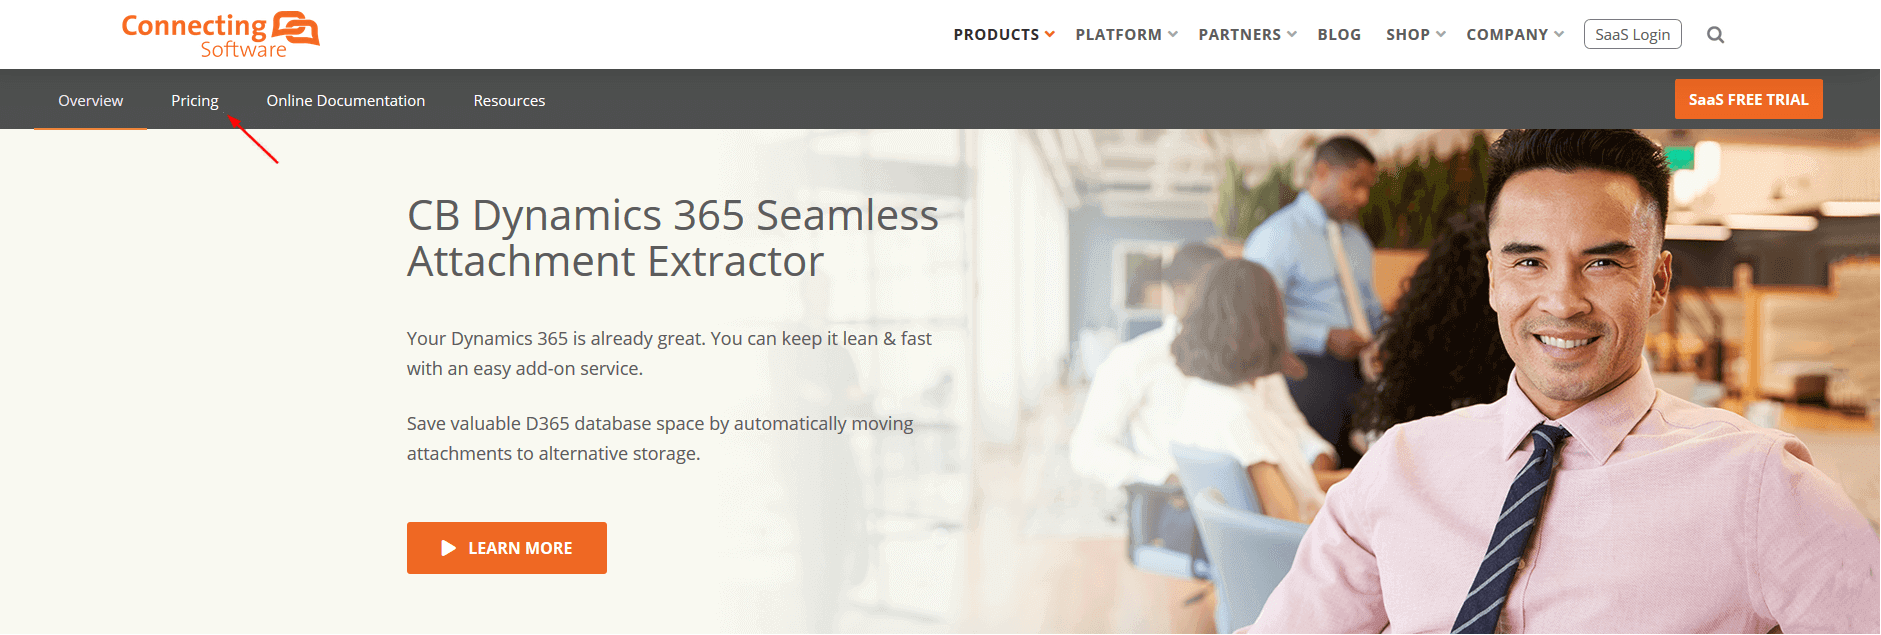
Figure 2 – CB Dynamics 365 Seamless Attachment Extractor page
Click on SaaS Free Trial to get your free trial and test the product first or you go ahead to purchase a paid subscription by clicking the appropriate Buy Now button (see Figure 3).
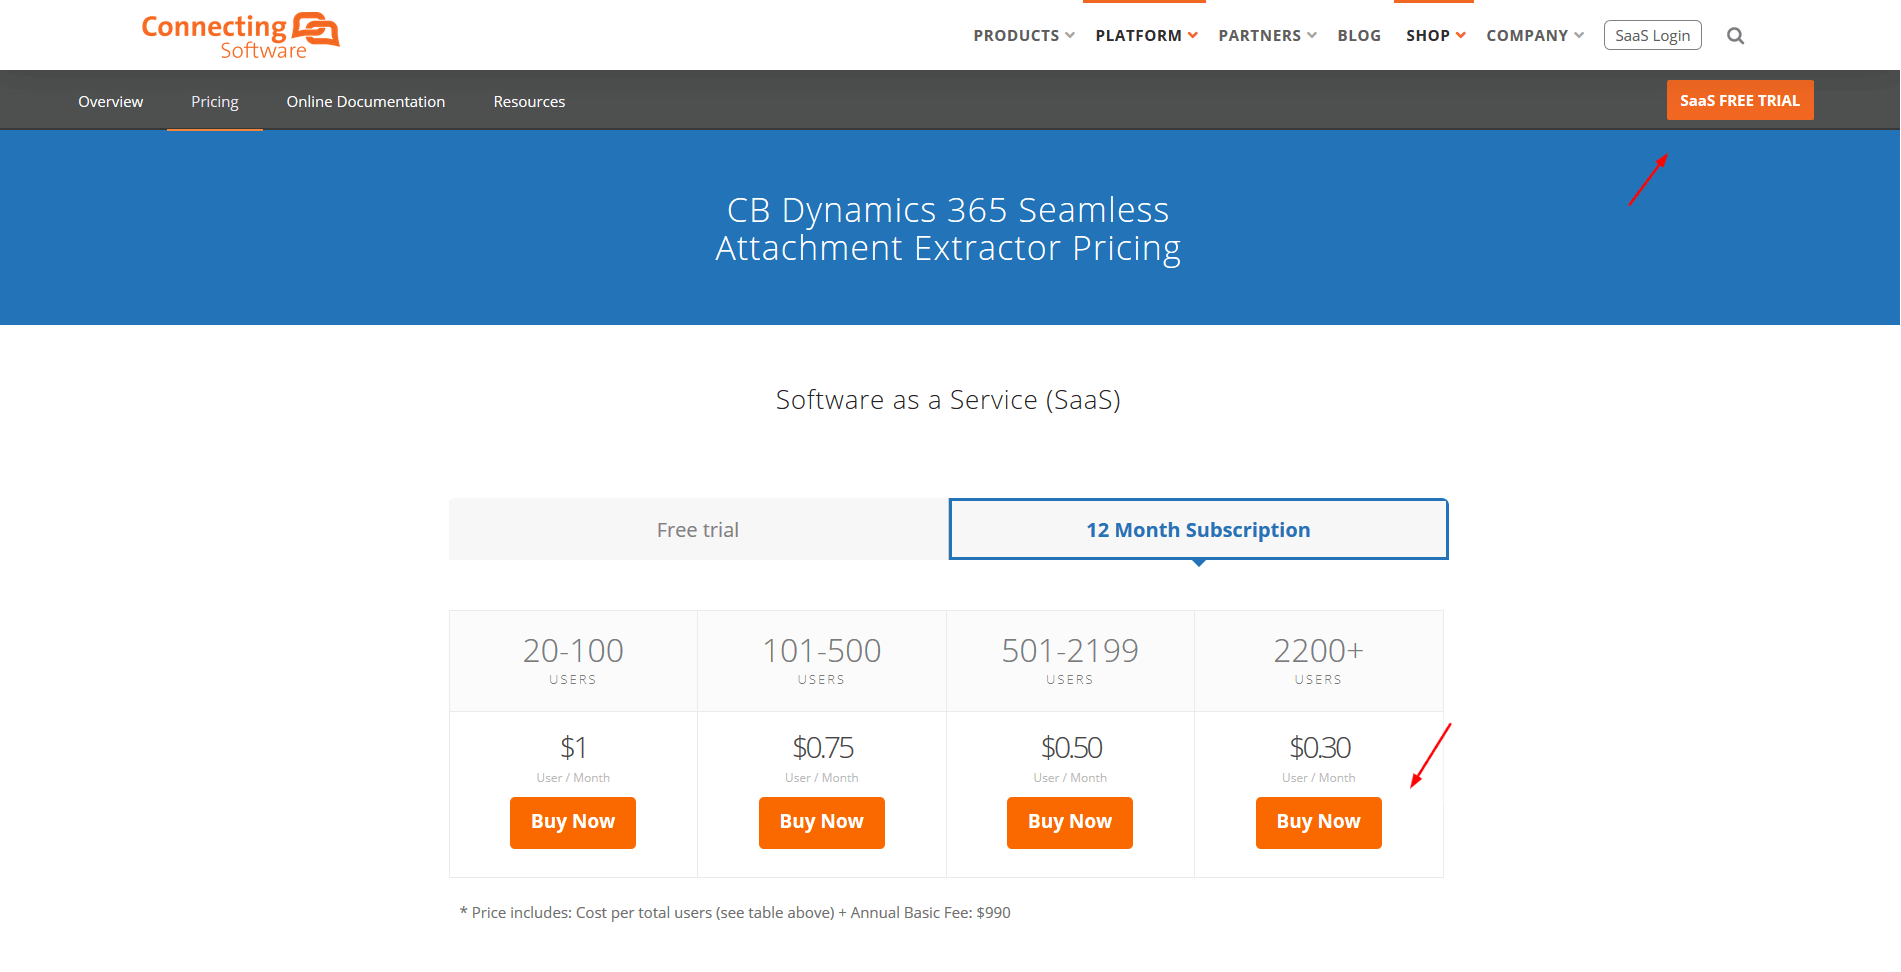
Figure 3 – CB Dynamics 365 Seamless Attachment Extractor Pricing Page
In both cases, you will need to click Add to Cart to add the product to your cart (Figure 4).
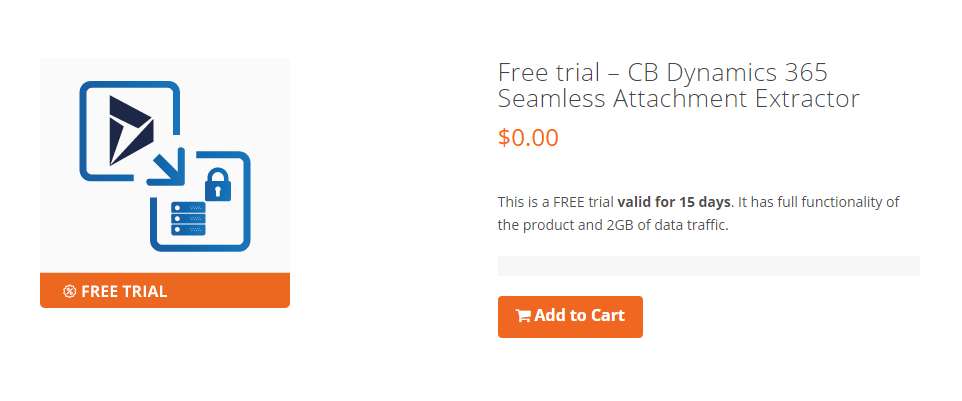
Figure 4 – CB Dynamics 365 Seamless Attachment Extractor Free Trial
Complete your purchase profile and click on the Next Step button (Figure 5). If you miss any required field, it will be marked red, and you will need to fill it in before proceeding.
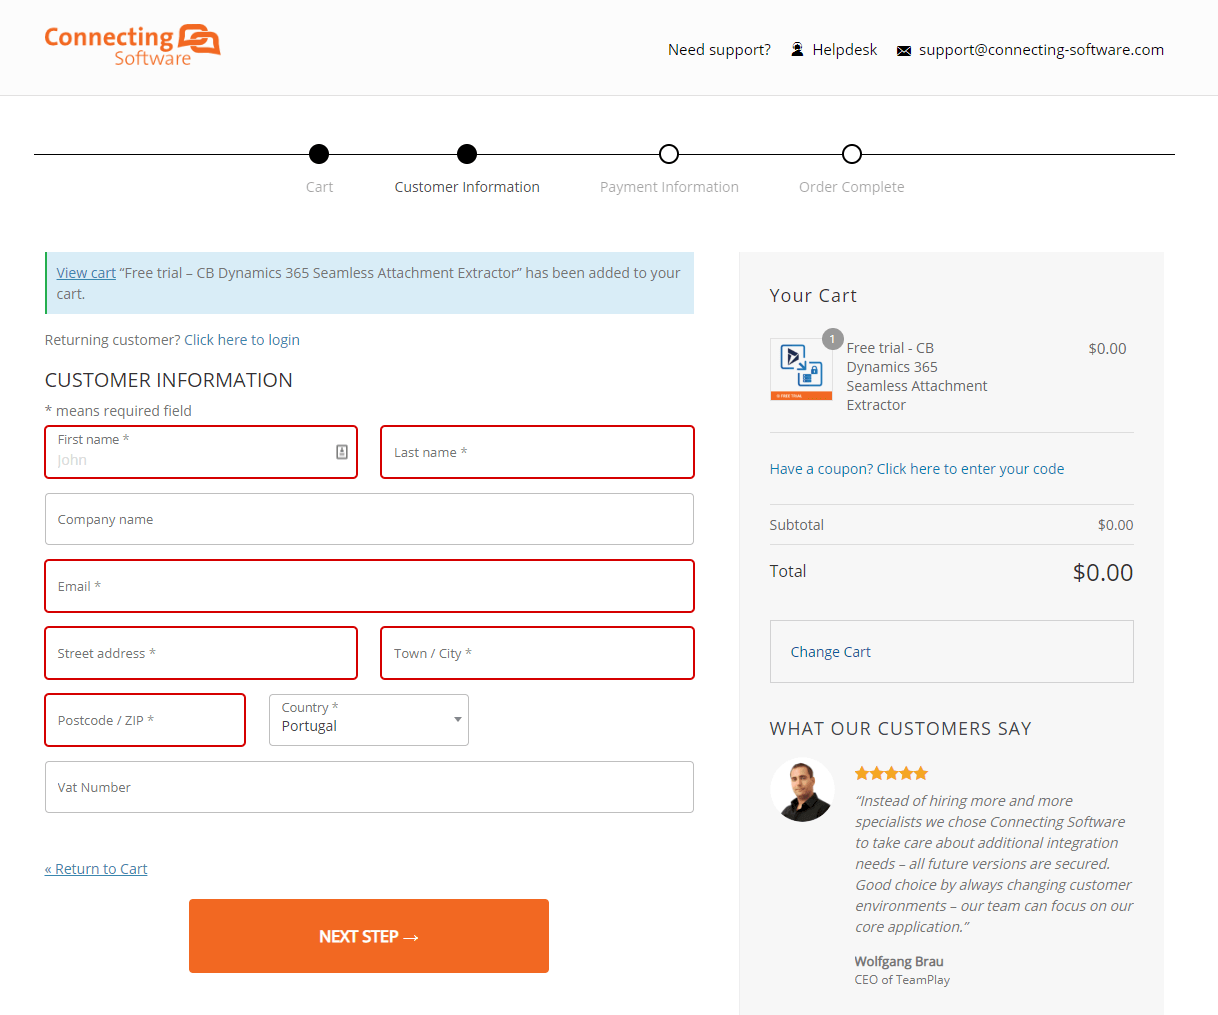
Figure 5 – Starting the order of CB Dynamics 365 Seamless Attachment Extractor
On the final screen, you can enter any relevant order notes, indicate if you wish to receive news from us and, most importantly, you can finalize your order by clicking on the Place Order Now button (Figure 6).
NOTE:
If you have shopped with us before, please log in and enter your details by clicking the link on top Click here to log in before clicking Place Order Now.
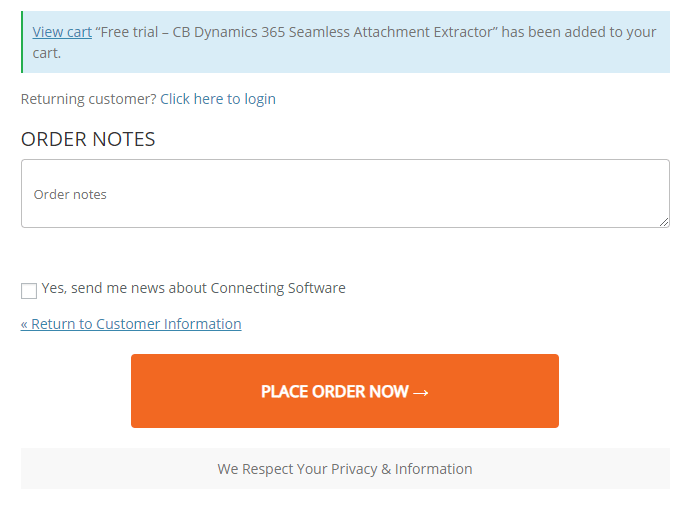
Figure 6 - Placing the order of CB Dynamics 365 Seamless Attachment Extractor
You will see an order confirmation on the screen (Figure 7).
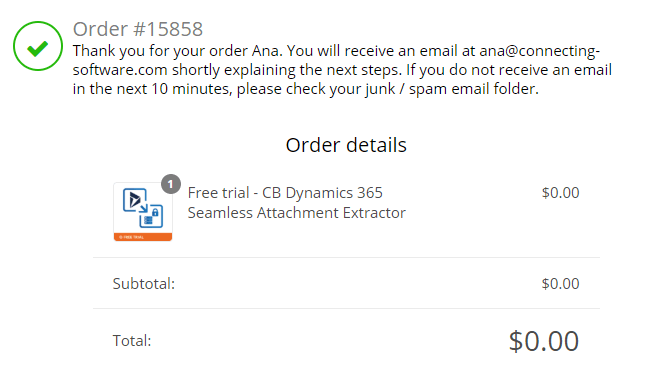
Figure 7 - Order Confirmation shown on the screen
You will get 2 emails from us: an order confirmation email and an activation email.
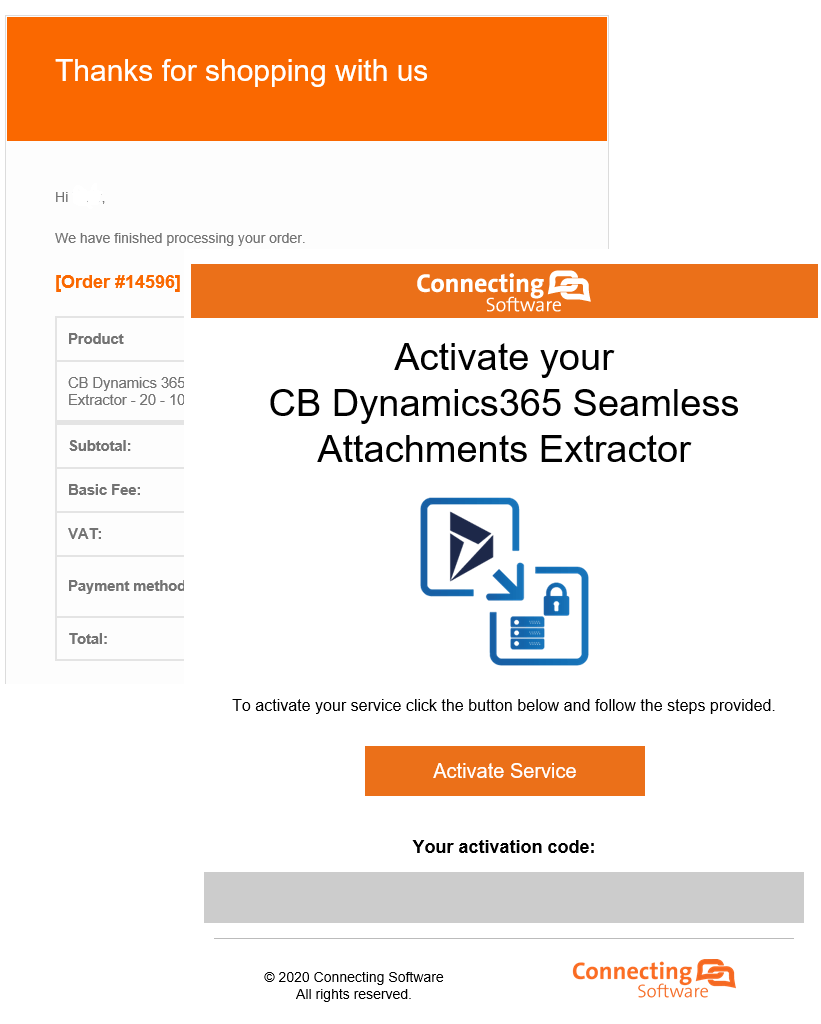 Figure 8: Order confirmation and activation emails
Open the activation email (the subject of this email is Service Activation Code Instructions). Click the Activate Service button to open the SaaS Portal and proceed with the configuration and activation of your CB Dynamics 365 Seamless Attachment Extractor (Figure 9). The configuration wizard automatically starts from the point described in section 6.1.1 for a first installation.
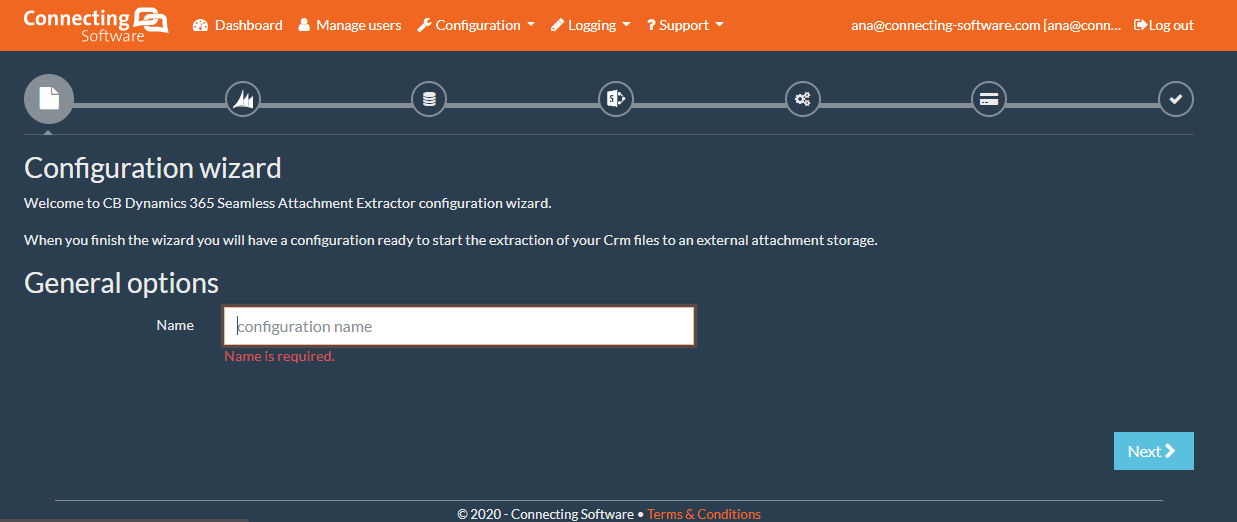
Figure 9: Configuration wizard started from activation email of a trial
5 Login to your SaaS Portal Account
If you want to start from the SaaS portal home page (Figure 10), the URL is SaaS portal. Note that the background of the page changes, rotating between the different products available, so it might look different from what you see in Figure 10, but that is not relevant.
From this page you will need to:
- Log in to your SaaS portal account if you have one already or
- Create a new account.
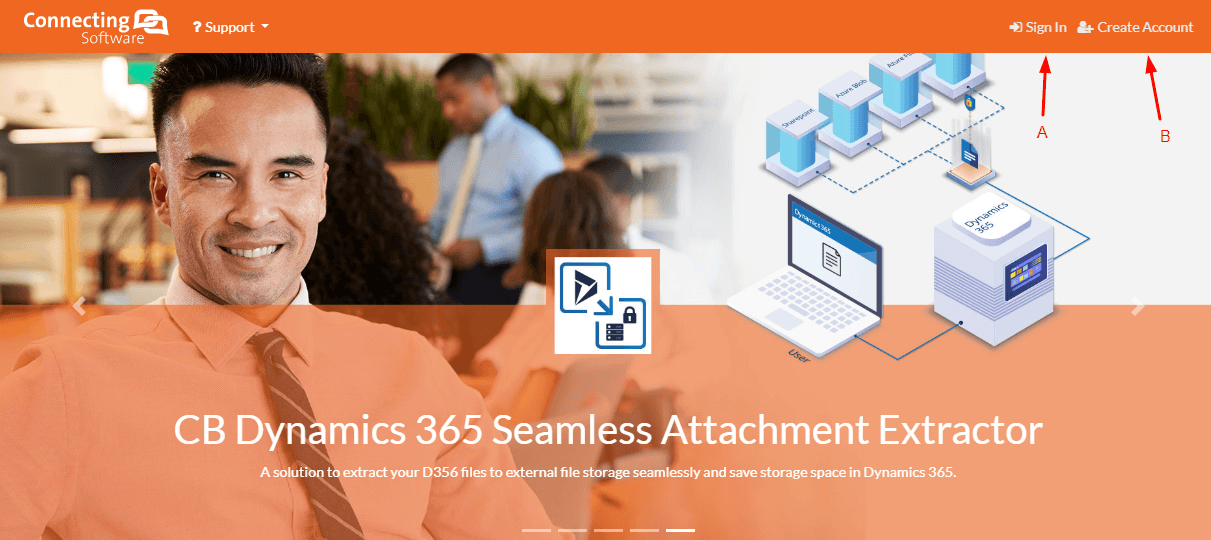
Figure 10 – SaaS Home Page
If you choose option A you will be prompted to enter your username and password (Figure 11).

Figure 11 - Login
If you choose option B, you will be presented with the fields you need to fill in to create an account (Figure 12). All fields, except Company Name, are required and need to be filled in to activate the Create account button.
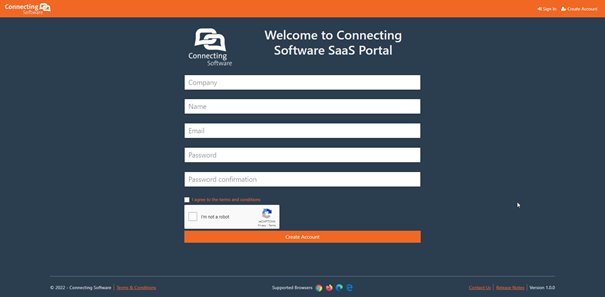
Figure 12 - Create Account
NOTE:
The password must be at least 6 characters long.
After logging in, you will be directed to the dashboard (Figure 13)
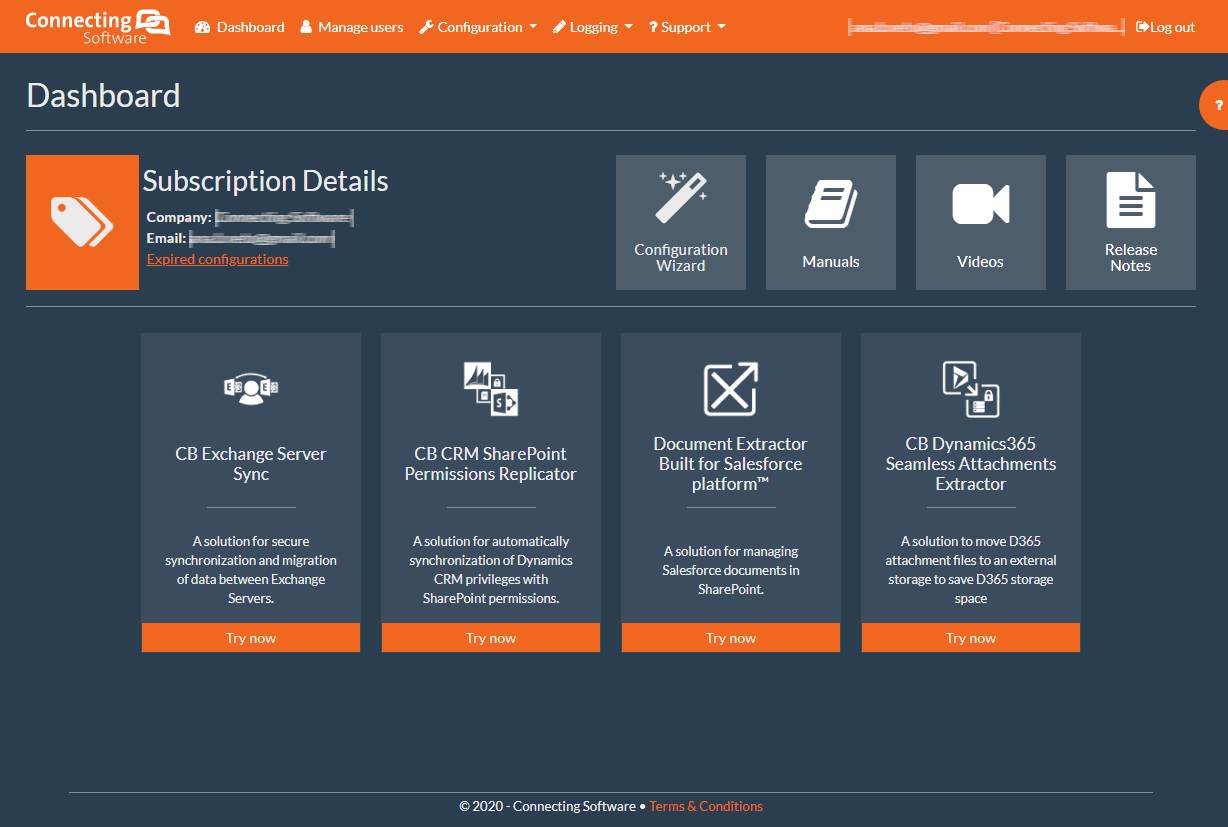
Figure 13 - Dashboard after the first login
The dashboard will look different after the initial configuration is done and we will focus on how to navigate it in section 7. For now, you should start by configuring your CB Dynamics 365 Seamless Attachment Extractor using the procedure described in section 6.
6 Configuration
6.1 Using the Configuration Wizard
The CB Dynamics 365 Seamless Attachment Extractor wizard is a streamlined way of configuring the extraction process.
If you enter via the activation email, you will be redirected to the configuration wizard. If you want to get there from the dashboard, you can always access the wizard through the quick links section (Figure 14).
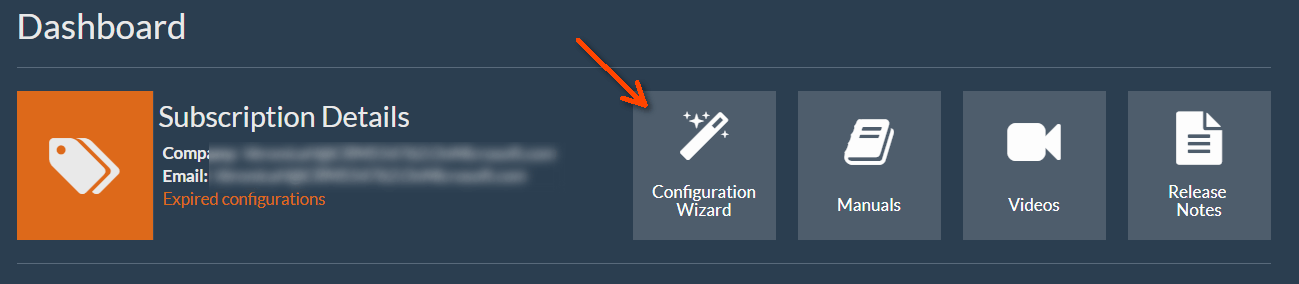
Figure 14 – Dashboard quick links section
If you have done a configuration before, when you enter in the wizard, you will be first asked about if you’re aiming to use the new activation token in a new configuration, or to use it in an existing configuration (Figure 15).
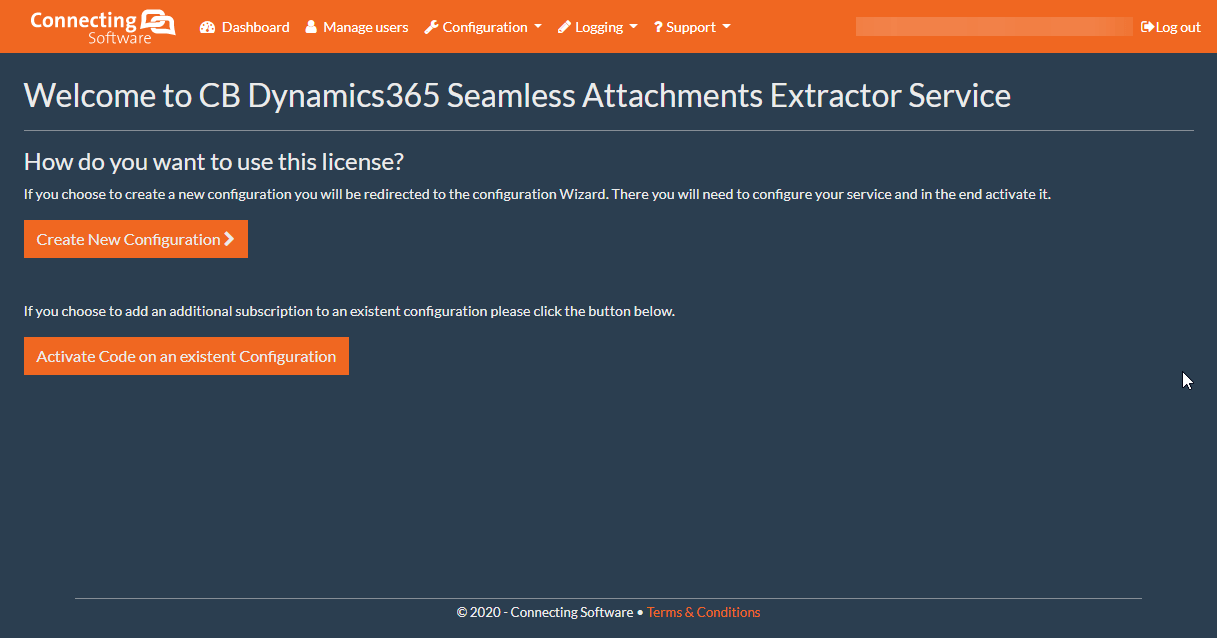
Figure 15 - Configuration Wizard - Welcome page
By clicking on Create New Configuration, you will be guided through all the necessary steps to configure this service, as described in the rest of this section.
6.1.1 Naming the Configuration
Every configuration needs to have a meaningful name to identify it. In the first step (Figure 16) you will need to give it a name.
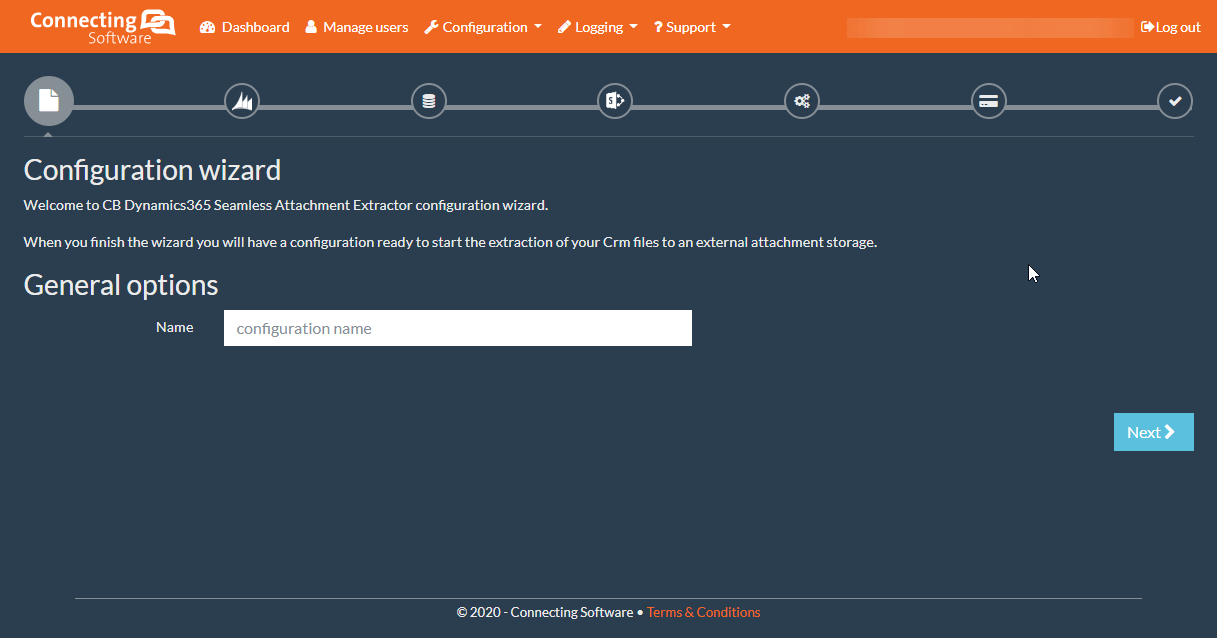
Figure 16 - Configuration Wizard - Configuration name
Then, click on the Next button to proceed to the configuration of the connection to your Dynamics 365.
6.1.2 Configuring the Connection to Dynamics 365
6.1.2.a Required permissions for service/application user security role
CB Dynamics365 Seamless Attachment Extractor requires a security role which meets minimum these permissions:
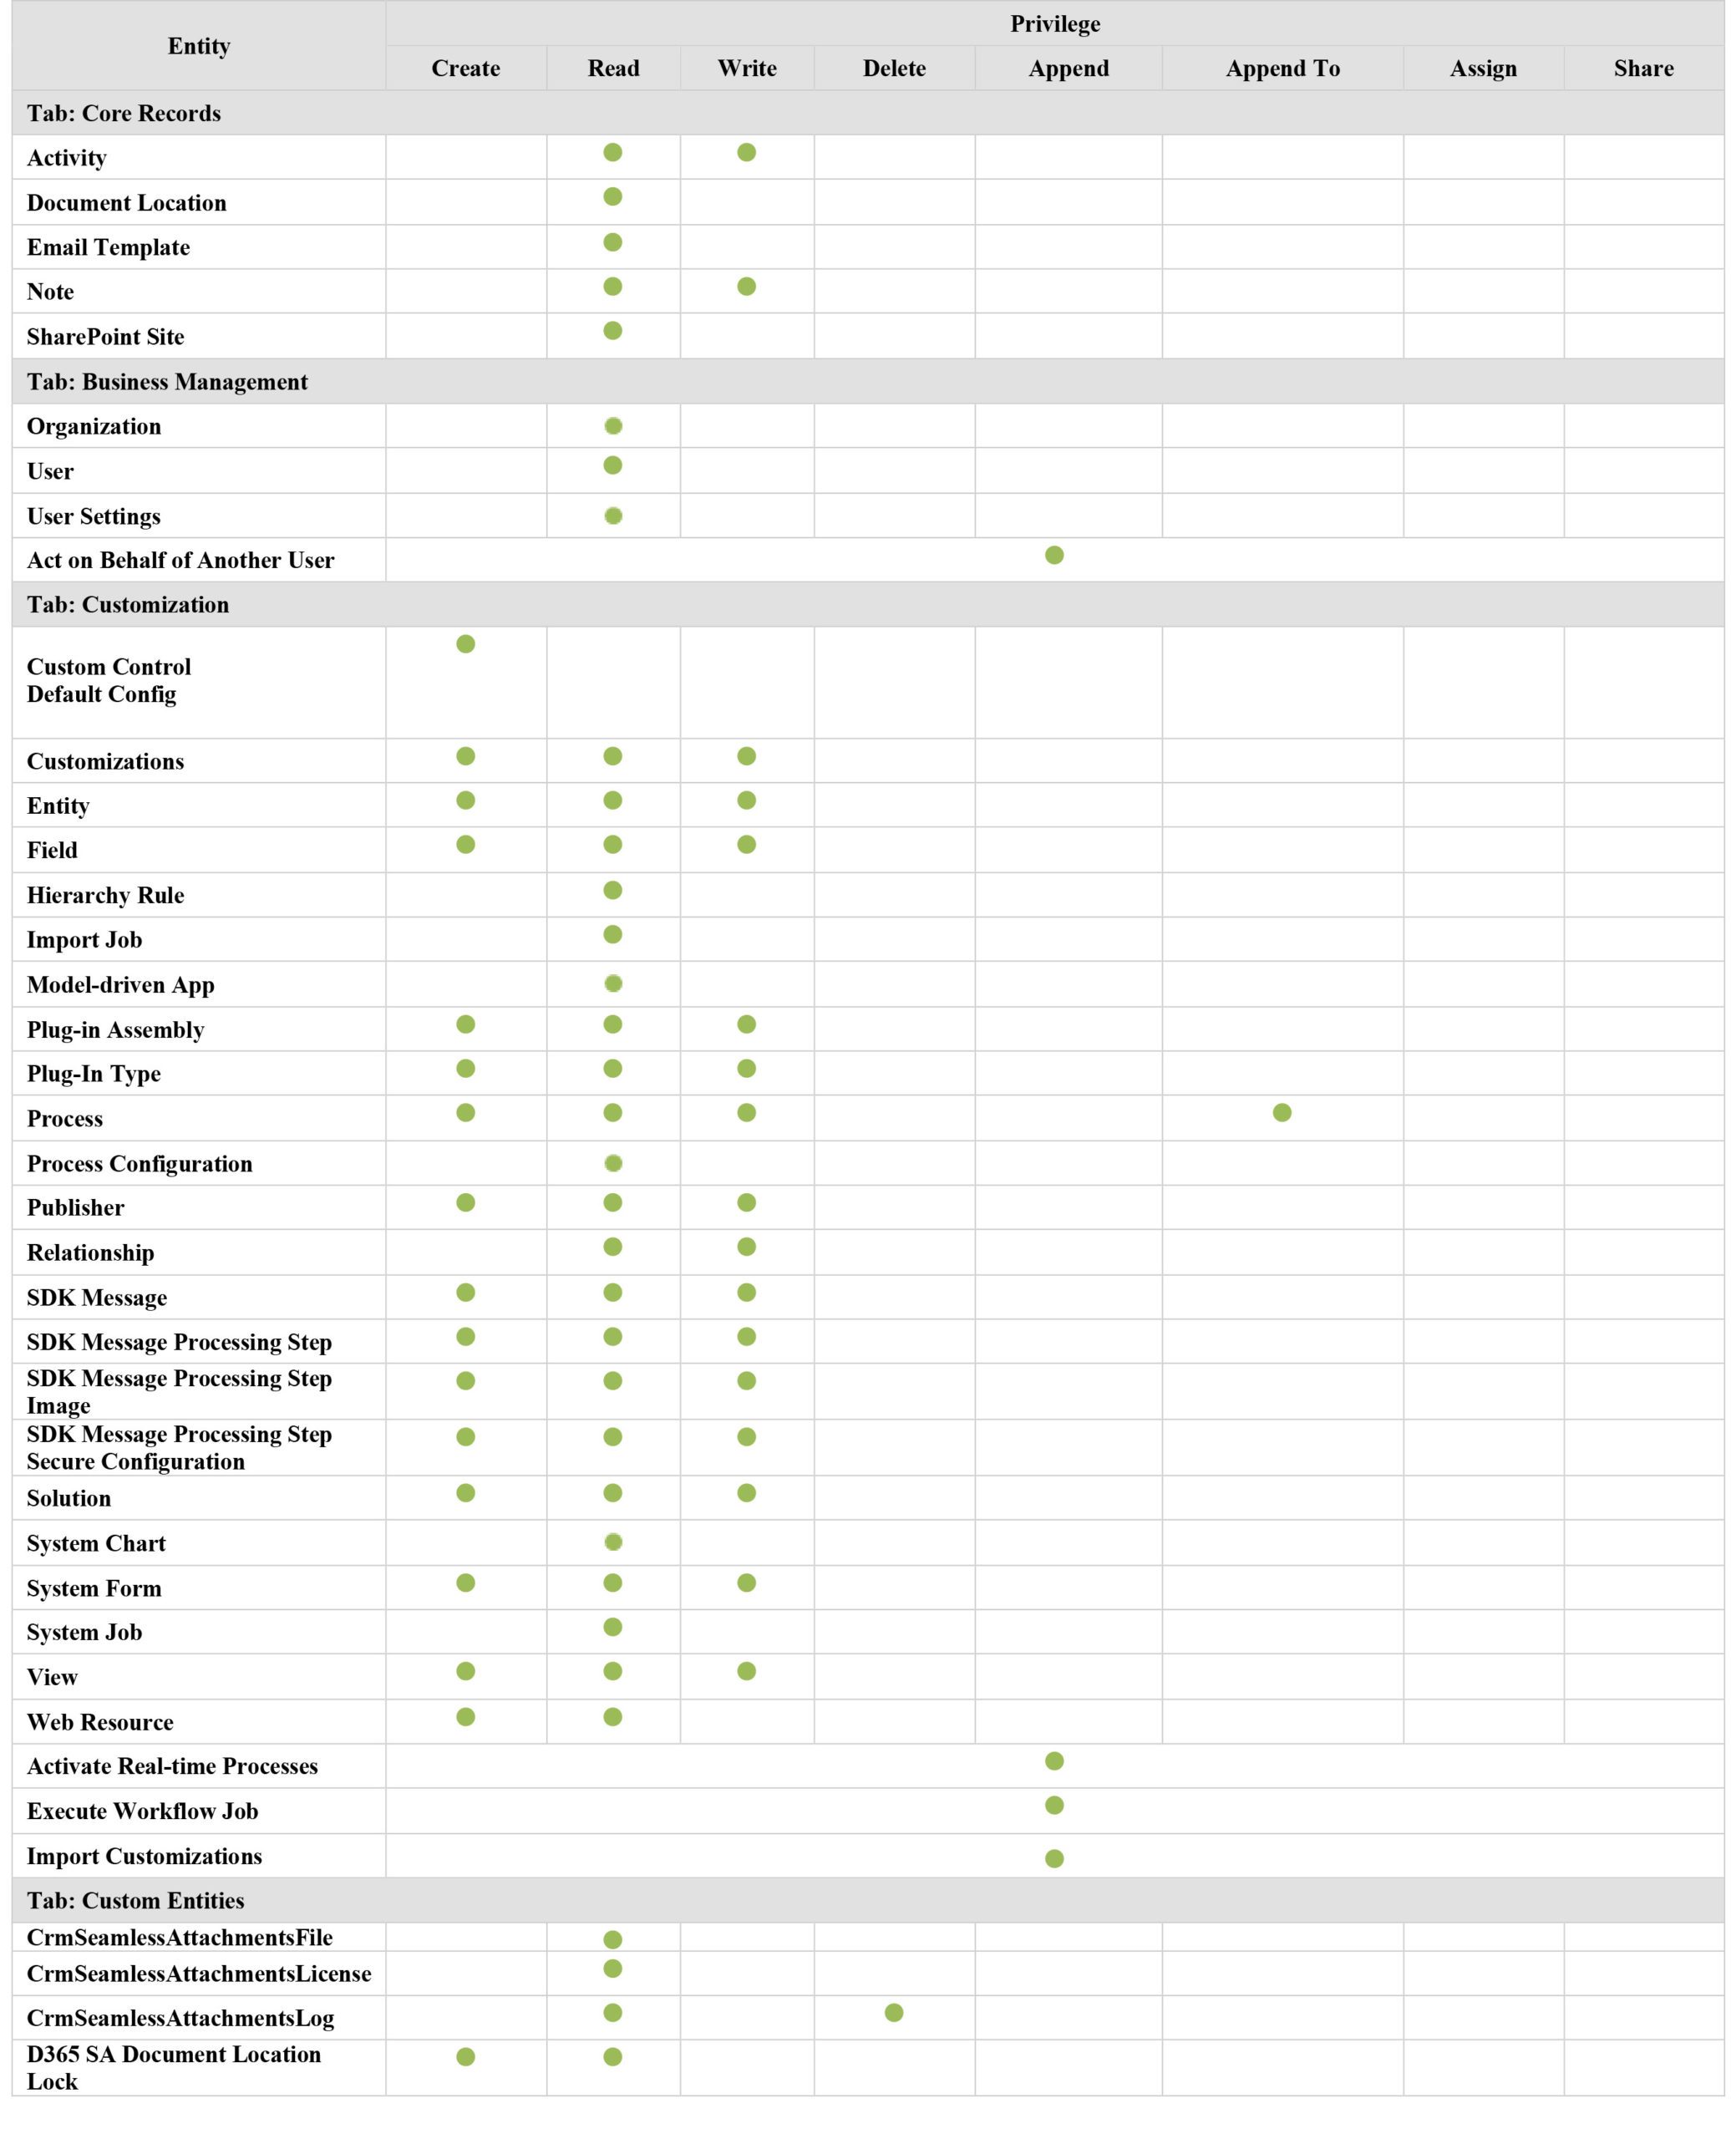
In case you need to do a quick test or trial on non-production environments only and you are not willing to bother with defining custom security role, System administrator role meets all the required permissions.
6.1.2.b Classic credential authentication (only for Dynamics 365 on-premises)
In this step, you will need to configure your connection to your Dynamics 365 (Figure 17) using classical user-password credential authentication.
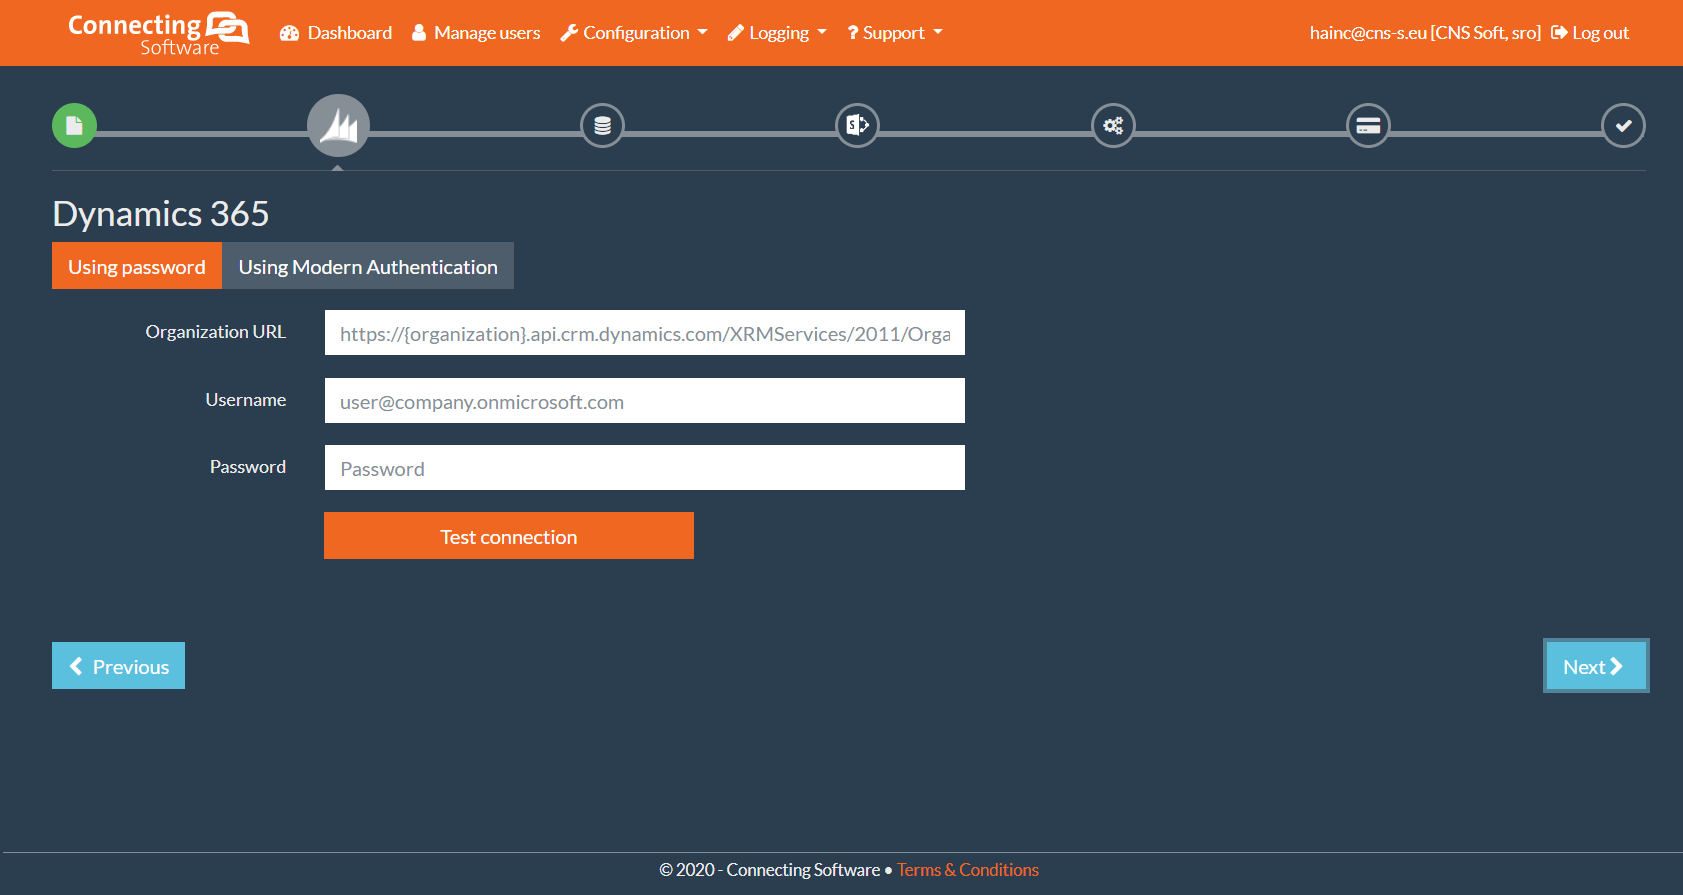
Figure 17 - Configuration Wizard - Dynamics 365 connection configuration using classic credentials
For Dynamics 365 you need a single user, let’s call him "Dynamics service user". The service user needs to meet the security permissions within your Dynamics 365 mentioned in chapter 6.1.2.a. To configure Dynamics 365, you need to fill in the following parameters:
- Organization URL – The URL of your Dynamics 365 Organization service You can find it in your Dynamics 365 (Figure 18). First go to Settings (cogwheel icon) -> Advanced settings and then Settings -> Customizations -> Developer Resources.
EXAMPLE:
https://crm44616.api.crm.dynamics.com/XRMServices/2011/Organization.svc
- User – The Dynamics 365 user permissions mentioned in chapter 1.2.a.
EXAMPLES:
User@OrganizationName.onmicrosoft.com
contoso\user
- Password – The password of the above Dynamics 365 user. You can use the show/hide password button to show/hide your password when you are sure there’s no one watching. Use it to make sure you have the correct password. Once you save the configuration, you can no longer edit the password. If you need to do it, you can set a new password when editing a configuration.
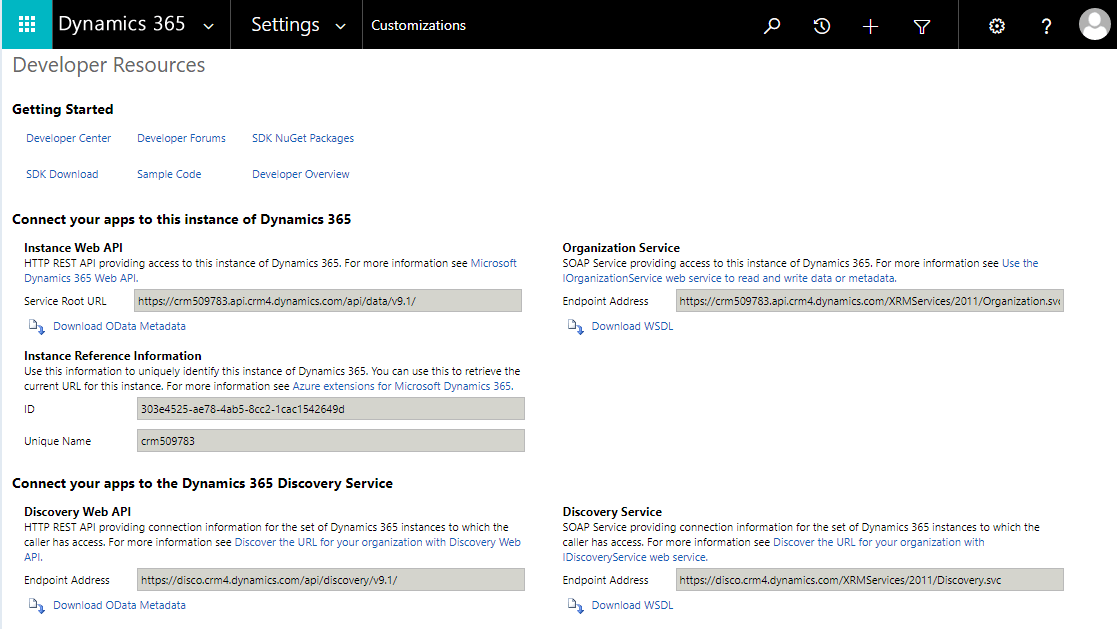
Figure 18 - Getting the Organization URL in Dynamics 365
You always need to use the Test connection button (Figure 17) to test the connection to your Dynamics 365. This a required step before moving on to the next step.
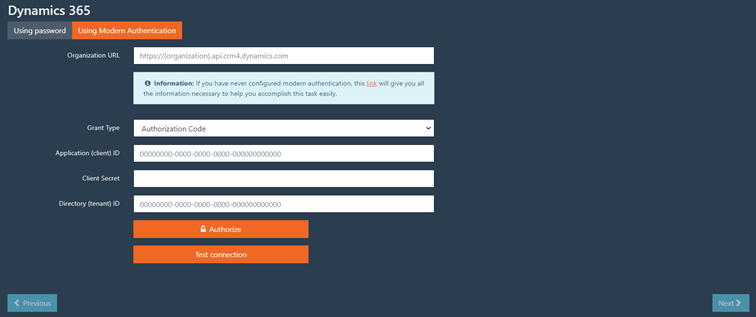
6.1.2.c Modern authentication
Another option to configure the connection to Dynamics 365 is using the Azure Active Directory OAuth3 server-to-server authentication. The advantages of this approach are that:
- it is easy to revoke access
- no passwords are stored on our side.
Our software supports the following flows:
- Implicit Grant (via certificate)
- Authorization Code Grant (via client secret)
Implicit
To setup modern authentication via implicit grant type, you’ll need to perform additional steps as described in the following sections.
Fill in the form with the following (see figure below):
- Organization URL - Configure Organization Service URL in the same way as in chapter 1.2.b according to Figure 18 - Getting the Organization URL in Dynamics 365
- Grant Type – The grant type used for authorization. There are two grant options available: Implicit and Authorization Code. Select Implicit.
- Application (client) ID - This field is read-only and indicates the id of the application "CB Dynamics365 Seamless Attachment Extractor" defined in the Azure AD ecosystem by Connecting Software. This application will then appear in your Office365 tenant Active Directory as accessing your O365 tenant.
- Directory (Tenant) ID – The ID of your Azure AD instance.
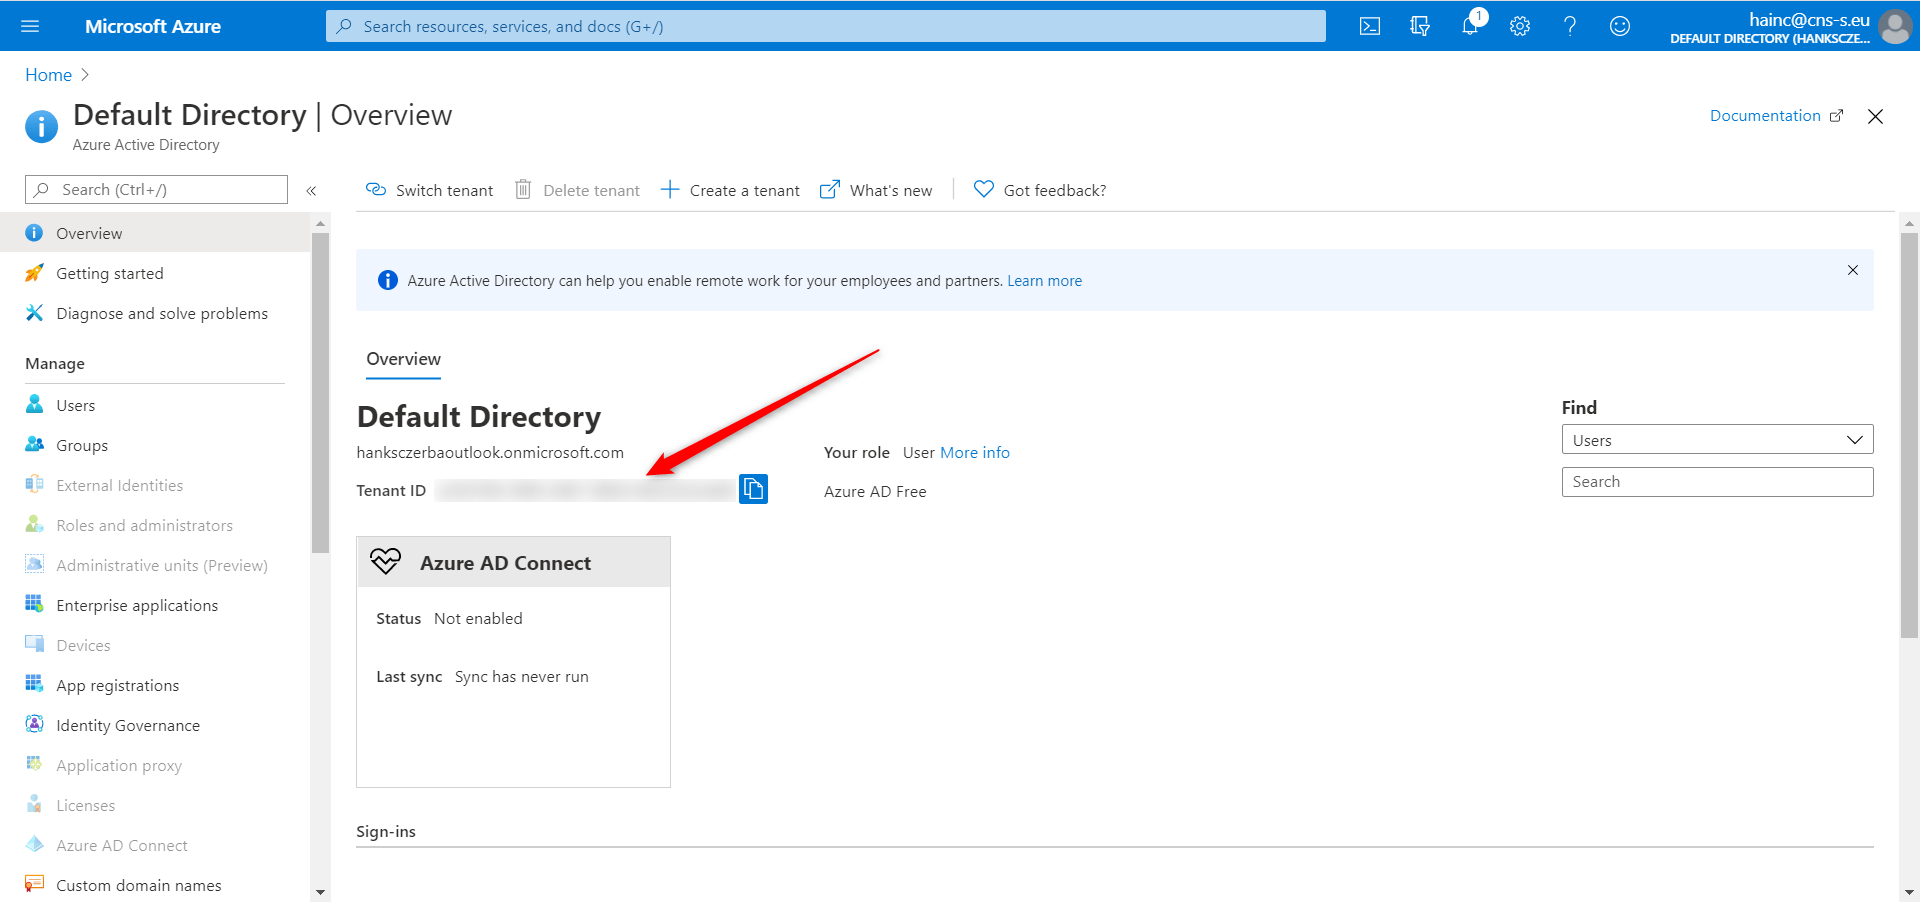
Figure 19 - Finding your O365 Tenant ID in Azure Portal
Click on the Grant tenant administrator consent button to grant admin consent to the application. Only needs to be done once.
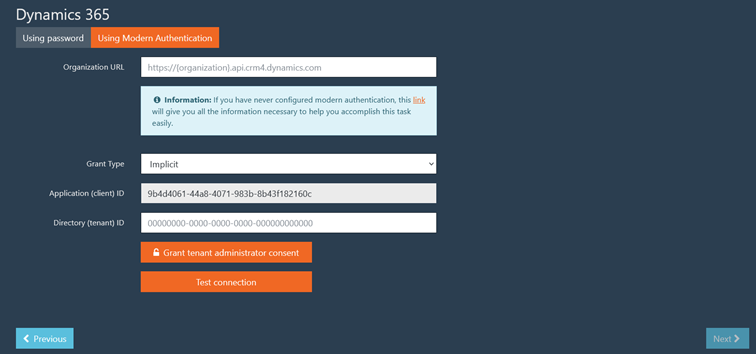
Figure 20 - Dynamics 365 Connection using modern authenticationtion (implicit flow)
WARNING:
Only after you have granted consent, you must then create the application user in Dynamics 365. You can grant admin consent to an application via the "Grant tenant administrator consent" button.
Afterwards, you’ll have to create an application user in your Dynamics 365:
- Since February 2022, management of application users should be done via Power Platform admin center
- Sign in to the Power Platform admin centeras a System Administrator.
- Select "Environments", and then select an environment from the list.
- Select "Settings".
- Select "Users + permissions", and then select "Application users".
- Select "+ New app user" to open the "Create a new app user"
- Select "+ Add an app", enter the Application (client) ID f902e280-4636-4666-982b-380853277e96, select the presented application and then click on Add
- Under "Business Unit", select a business unit from the dropdown list.
- After choosing a business unit, you can click on the edit button of "Security roles"to choose which security roles for the chosen business unit you wish to add to the new application user. You should assign the security roles, in order to meet the permissions mentioned in chapter 1.2.a.
- After adding the security roles, select "Save".
- Select "Create".
- In case the application users management is not available in Power Platform, you should be able to use the legacy approach
- In Dynamics365 go to Settings > Security > Users and switch the view to Application Users.
- Click on New
- Switch to Application User form
- Type in the Application (client) ID f902e280-4636-4666-982b-380853277e96
- Click the Save button
- Select Manage Roles
- Assign the security role meeting the permissions mentioned in chapter 1.2.a to this newly created user
You can now return to the configuration page of CB Dynamics 365 Seamless Attachment Extractor and proceed with the test connection.
By clicking on the button Test connection, you ensure that CB Dynamics 365 Seamless Attachment Extractor can successfully communicate with your Dynamics 365, using the created application user.
After having the connection configured correctly, click on Next to move to the next step.
6.1.2.d Authorization code
To setup modern authentication via authorization code grant type, you’ll need to perform additional steps as described in the following sections.
Register an application in Azure AD
NOTE:
Note that you can also create only one Azure AD app for both Dynamics 365 and SharePoint.
Do the following:
- Open the Azure portal.
- In the Azure portal, on the Azure Active Directory tab, select App registrations, and then select New application registration.
- When the Register an application page appears, enter your application’s registration information.
- When finished, select Register.
- In the Authentication page, select Add a platform, select Web, and then enter the redirect URI https://seamless-attachment-extractor-saas.connecting-software.com/consent-callback for your application.
- In the Certificates & secrets page, go to Client secret and click New client secret and create new secret and copy generated secret for use it in next steps.
Fill in the form
Fill in the form with the following (see figure below):
- Organization URL - Configure Organization Service URL in the same way as in chapter 1.2.b according to Figure 18 - Getting the Organization URL in Dynamics 365
- Grant Type – The grant type used for authorization. There are two grant options available: Implicit and Authorization Code. Select Authorization Code.
- Application (Client) ID – The ID assigned to the single- or multi-tenant app by Azure AD when the app was registered.
- Client Secret – The client secret of the app registration in the Azure AD.
- Directory (Tenant) ID – The ID of your Azure AD instance.
Click on the Authorize button to pass authorization process.
After the authorization process finishes, you’ll be able to test the connection.
By clicking on the button Test connection, you ensure that CB Dynamics 365 Seamless Attachment Extractor can successfully communicate with your Dynamics 365, using the user used during the authroization process.
6.1.3 Configuring the Storage Provider
CB Dynamics 365 Seamless Attachment Extractor allows you to extract your Dynamics 365 files to different file storage locations. Use the following combo box to select the type of storage for your Dynamics 365 files.
Currently, we have the following storage providers available:
- Azure BLOB Storage
- Azure File Storage
- Microsoft SharePoint

Figure 21 - Configuration Wizard - File storage provider selection
After selecting the option that best fits your needs, please click on the Next button to move to the configuration of that specific storage option.
6.1.3.a Configuring SharePoint Storage Provider
SharePoint storage provider supports 3 storage modes:
- One big pile document library
All extracted files are stored in one specified SharePoint document library in its root folder.
- Document library per year & folder per month
A SharePoint document library is created per year (year is taken from ‘createdon’ attribute of parent entity of extracted file) and a folder is created per month (month is taken from ‘createdon’ attribute of parent entity of extracted file).
- Document location based
Files are extracted into SharePoint document location when document management is enabled for the given Dynamics 365 entity by following its adherent SharePointDocumentLocation entity.
NOTE:
If you’re using CB Dynamics 365 to SharePoint Permissions Replicator to secure your files in Sharepoint, ONLY Document location based mode will be able to extract the notes and attachments in a format secureable by CB Dynamics 365 to SharePoint Permissions Replicator.

Figure 22 - SharePoint Storage Provider Modes
SharePoint credentials configuration
Independently of the storage mode you select, you’ll need to provide us with credentials to access SharePoint. We currently support two ways of authentication against SharePoint:
- Classic credentials – consists of Username and Password based credentials
- Modern Authentication – consists on Azure Active Directory OAuth3 server-to-server authentication
In case you have selected SharePoint in the previous step, you will need to configure our service to connect to your SharePoint (Figure 23).
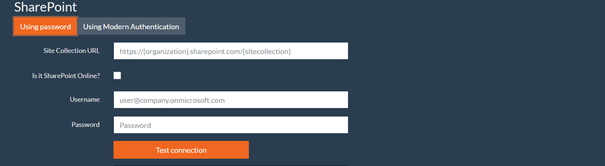
Figure 23 – Configuration Wizard - SharePoint connection Configuration using classic credential authentication
For SharePoint, you need a single user that is member of the owner group for the SharePoint web/site that it will be operating on, let’s call him "SharePoint service user". To configure SharePoint, you need to fill in the following parameters:
- Site Collection URL – The URL of your SharePoint site collection.
EXAMPLES:
https://OrganizationName.sharepoint.com/
https://SharePointName.contoso.com/sites/site1
- User – The SharePoint user. Site Owner is required.
EXAMPLES:
User@OrganizationName.onmicrosoft.com
contoso\user
- Password – The password of the SharePoint user. You can use the show/hide password button to show/hide your password while you are sure there’s no one watching. As happened for the Dynamics configuration, once you save the configuration, you can no longer edit the password. If you need to do it, you can set a new password when editing a configuration.
- Is it SharePoint Online? – Please indicate if the given Site Collection URL points to a SharePoint instance in the Office365 cloud.
WARNING:
If your SharePoint is online, but you forget to indicate it here, when you test your connection, you will get an error "There seems to be something wrong with the SharePoint URL: The remote server returned an error: (403) Forbidden."
You always need to use the Test connection button to test the connection to your SharePoint according to what you have configured. After successfully testing, the wizard will allow you to move to the next step.
NOTE:
If your connection is not working, put the URL into your browser and try to log in with the credentials you entered. This is the best way to make sure that you have the correct URL and credentials!
Another option to configure the connection to SharePoint is using the Azure Active Directory OAuth3 server-to-server authentication. The advantages of this approach are that:
- it is easy to revoke access
- no passwords are stored on our side.
Our software supports the following flows:
- Implicit Grant (via certificate)
- Authorization Code Grant (via client secret)
Implicit
To setup modern authentication via implicit grant type, you’ll need to perform additional steps as described in the following sections.
Fill in the form
- Site Collection URL – The URL of your SharePoint site collection.
EXAMPLES:
https://OrganizationName.sharepoint.com/
https://SharePointName.contoso.com/sites/site1
- Is it SharePoint Online? – Please indicate if the given Site Collection URL points to a SharePoint instance in the Office365 cloud.
WARNING:
If your SharePoint is online, but you forget to indicate it here, when you test your connection, you will get an error "There seems to be something wrong with the SharePoint URL: The remote server returned an error: (403) Forbidden."
- Grant Type – The grant type used for authorization. There are two grant options available: Implicit and Authorization Code. Select Implicit.
- Azure Endpoint – This drop-down allows you to switch to a different instance of Azure. This is something that 99% of users don’t have to touch. You are using different Azure instance if you are for example special kind of US Governmental organization or the People’s Republic of China has its own Azure instance.
- Directory (Tenant) ID – The ID of your Azure AD instance. You can find this ID by navigating to the Azure Active directory overview in your Azure Portal see Figure 19 - Finding your O365 Tenant ID in Azure Portal
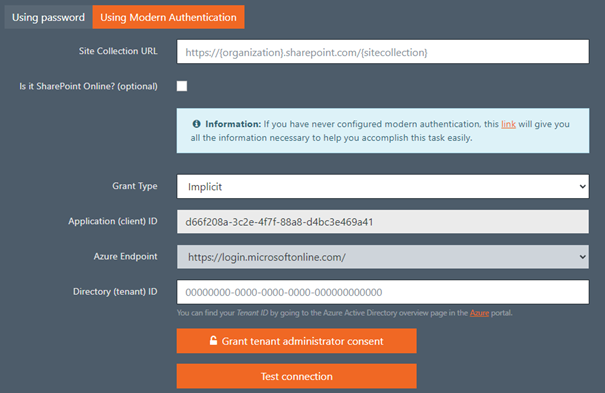
Figure 24 - Configuring the SharePoint connection using modern authentication
Click on the Grant tenant administrator consent button to grant admin consent to your application.
Test Connection
By clicking on the button Test connection, you ensure that CB Dynamics 365 Seamless Attachment Extractor can successfully communicate with your SharePoint.
To setup modern authentication via authorization code grantauthorization code type, you’ll need to perform additional steps as described in the following sections.
Register an application in Azure AD
NOTE:
Note that you can also create only one Azure AD app for both Dynamics 365 and SharePoint.
Do the following:
- Open Azure portal.
- In Azure portal, on the Azure Active Directory tab, select App registrations, and then select New application registration.
- When the Register an application page appears, enter your application’s registration information.
- When finished, select Register.
- In the Authentication page, select Add a platform, select Web, and then enter the redirect URI https://seamless-attachment-extractor-saas.connecting-software.com/consent-callback for your application.
- In the Certificates & secrets page, in the Client secrets section, generate a client secret for your application.
- In the API permissions page, select Add a permission.
- From Microsoft APIs, select SharePoint.
- Under Delegated permissions, you must select, at a minimum Manage, AllSites.Read and AllSites.Write permissions.
NOTE:
Delegated permission AllSites.* is not giving user access to all site collections. Our software will have access only to site collections that user has access to.
Fill in the form
Fill in the form with the following (see figure below):
- Site Collection URL – The URL of your SharePoint site collection.
EXAMPLES:
https://OrganizationName.sharepoint.com/
https://SharePointName.contoso.com/sites/site1
- Is it SharePoint Online? – Please indicate if the given Site Collection URL points to a SharePoint instance in the Office365 cloud.
WARNING:
If your SharePoint is online, but you forget to indicate it here, when you test your connection, you will get an error "There seems to be something wrong with the SharePoint URL: The remote server returned an error: (403) Forbidden."
- Grant Type – The grant type used for authorization. There are two grant options available: Implicit and Authorization Code. Select Authorization Code.
- Application (Client) ID – The ID assigned to the single- or multi-tenant app by Azure AD when the app was registered.
- Client Secret – The client secret of the app registration in the Azure AD.
- Azure Endpoint – This drop-down allows you to switch to a different instance of Azure. This is something that 99% of users don’t have to touch. You are using different Azure instance if you are for example special kind of US Governmental organization or the People’s Republic of China has its own Azure instance.
- Directory (Tenant) ID – The ID of your Azure AD instance. You can find this ID by navigating to the Azure Active directory overview in your Azure Portal see Figure 19 - Finding your O365 Tenant ID in Azure Portal
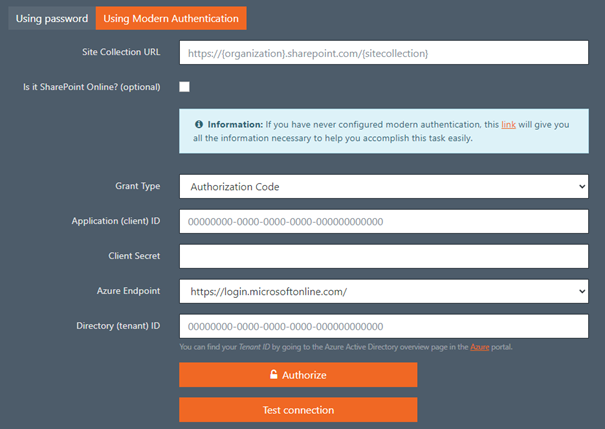
Click on the Authorize button to pass authorization process.
Test Connection
By clicking on the button Test connection, you ensure that CB Dynamics 365 Seamless Attachment Extractor can successfully communicate with your SharePoint.
Once finished defining your SharePoint credentials, you’re prompt for and additional field:
- Document library title – The name of the document library where the extracted files will be stored. For example, if you set this to "Extracted files from Dynamics 365"
- In the mode "One big pile document library", all the extracted files will be extracted to inside of document library called "Extracted files from Dynamics 365"
- In the mode "Document library per year & folder per month", the extracted files will be organized like this:
- For each year, there will be an independent document library prefixed by the specified name, for example, ""Extracted files from Dynamics 365 2021", "Extracted files from Dynamics 365 2022" and so on.
One big pile document library and Document library per year & folder per month modes configuration
When configuring these modes, you start by specifying your SharePoint credentials.
Document Location Mode
This extraction mode will start by checking, for every extracted file, whether its regarding or parent entity has enabled document management in Dynamics 365.
- In case that is true, it will check if there is a SharePointDocumentLocation entity for the regarding or parent entity
- If the SharePointDocumentLocation exists, then extractor will extracts the file using the following structure: Existing Document Location/Extracted/[Type of extracted file (Note/Attachment)]/[id of file in Dynamics 365]-[file name]
- If the SharePointDocumentLocation does not exist, extractor detects if CB Dynamics 365 to SharePoint Permissions Replicator is installed and active with its SharePoint Structure Creator (SSC) add-on
- If SharePoint Structure Creator is activated, the extractor will invoke it for creation of the document location according to the defined rules in the configuration of SharePoint Structure Creator, and then extract the file using the following structure: Newly created Document Location following SSC rules/Extracted/[Type of extracted file (Note/Attachment)]/[id of file in Dynamics 365]-[file name]
- If SharePoint Structure Creator is not detected, the extractor creates a new document location itself in same way as Dynamics 365 would create it (it mimics the default Dynamics 365 document location behavior) and then extract the file using the following structure: Newly created Document Location following default Dynamics 365 behavior/Extracted/[Type of extracted file (Note/Attachment)]/[id of file in Dynamics 365]-[file name]
- In case Document Management is not enabled for the files’ regarding or parent entity. The file will not be extracted
- In case extractor cannot resolve the file’s parent or regarding entity, it will not be extracted
In the case of Dynamics 365 activities, if an activity of the file entity does not contain a regarding entity reference (for example, in an email, the regarding entity is not set), the extraction of that file (the attachment of that email) is skipped unless the "Use activity's Document Location when 'regarding' is not set?" flag is set.
When the "Use activity's Document Location when 'regarding' is not set?" option flag is enabled and the parent (of extracted file) activity entity has no regarding entity set, it will automatically enable document management for all activity entities when extraction is started and it will create document locations and extract to document locations of these activity entities without a regarding entity reference (e.g. Email that has no regarding entity will have its own document location and its attachments extracted to it).
If activity entity has regarding entity (e.g., Account or Contact), its attachments will be extracted to the document location of the regarding entity.
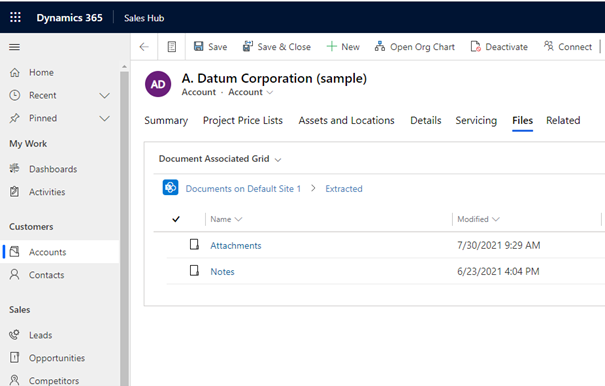
Figure 25 - Example of extracted attachments and notes in a document location of a regarding account entity
To configure document-location based storage mode for SharePoint you have the option to configure a list of SharePoint connection configurations/credentials for multiple SharePoint sites as there can be more than one root site defined in your Dynamics 365 document management settings.
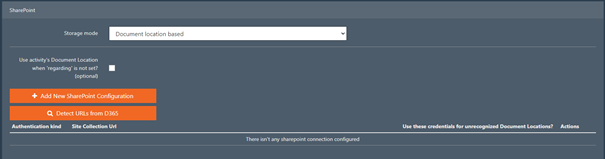
Figure 26 - Document Location based SharePoint storage mode
Extractor offers the "Detect URLs from Dynamics 365" button to be used during creation of extractor configuration which after filling the Dynamics 365 connection credentials can retrieve all the root site URLs from Dynamics 365 and place them in the extractor configuration. After using this button, extractor will ask you to fill username and passwords or modern authentication credentials for each detected SharePoint URL/connection configuration.
When the Dynamics 365 credentials were not filled prior to clicking this button, extractor will notify you with a pop-up message to do so.
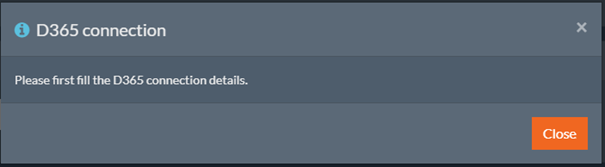
Figure 27 - Extractor notifies you when attempting to use the "Detect URLs from Dynamics 365" button prior filling Dynamics 365 connection details
After successfully detecting the SharePoint root site URLs from Dynamics 365 please use the "edit configuration" buttons (steps 3 and 4 on the following figure) to fill the connection details for each SharePoint root site, each configuration will require you to test connection after setting its connection details.
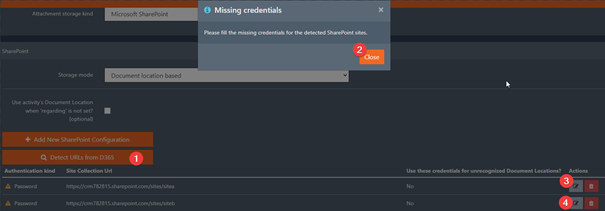
Figure 28 - You will be asked to fill SharePoint connection details for each detected root site
No matter if you use the "Detect URLs from Dynamics 365" button or the "Add New SharePoint configuration" button, filling connection credentials for each SharePoint root site (configuration) should be equivalent to procedures described either in chapter Classic credential authenticationError! Reference source not found. for classic credentials or in chapter Modern authentication for modern authentication credentials
After filling in the credentials information, there is an addition checkbox named "Use these credentials for unrecognized Document Locations?". By enabling this option, you are indicating that the credentials of this SharePoint configuration will be used for any other SharePoint document locations whose root site URLs are not configured within any of the SharePoint configurations.
6.1.3.b Configuring Azure Storage provider
For both Azure storage provider types (File and Blob) you need to configure the Azure Storage General values to allow the extractor to access your Azure storage account.
Azure Storage General
This configuration step is used to define the access to you Azure storage account

Figure 29 - Configuration Wizard - Azure Storage general options
You need to fill in:
- Storage Account – The name of your storage account (marked as 1 in Figure 30)
- Storage Key – One of the storage account’s keys (marked as 2 in Figure 30)
You always need to use the Test connection button to test the connection to your Azure storage account according to what you have configured, this is a required step.
Where do I find these values in the Azure portal?
Open your Azure storage account in Azure portal and the left navigation pane select Access keys (Figure 30).
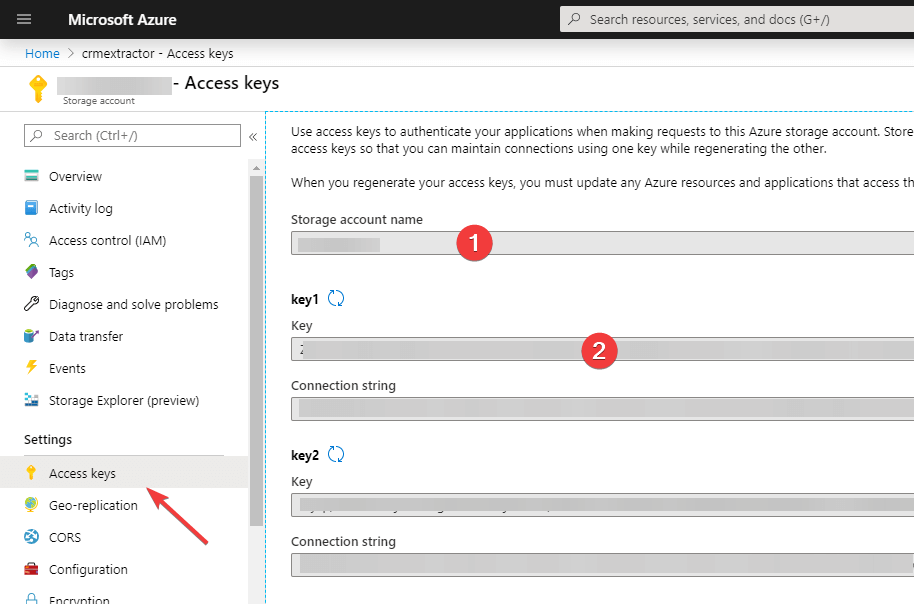
Figure 30 - Obtaining access keys in Azure
In case you have selected Azure Blob storage as a storage provider, you can move on to the corresponding section on page 27 and ignore the pieces of information about Azure File storage.
Azure File storage
If you are using the Azure File Storage provider after you have stepped through the general Azure storage configuration, you need to configure the following specific values (Figure 31):
- Attachments Share Name –The Azure file storage share name to store all files of the Dynamics 365 activitymimeattachment entity.
- Attachments Folder Name – An existing folder name on the Attachments Share to store all files of the Dynamics 365 activitymimeattachment
- Annotations Share Name – The Azure file storage share name to store all files of the Dynamics 365 annotation
- Annotations Folder Name – An existing folder name on the Attachments Share to store all files of the Dynamics 365 annotation
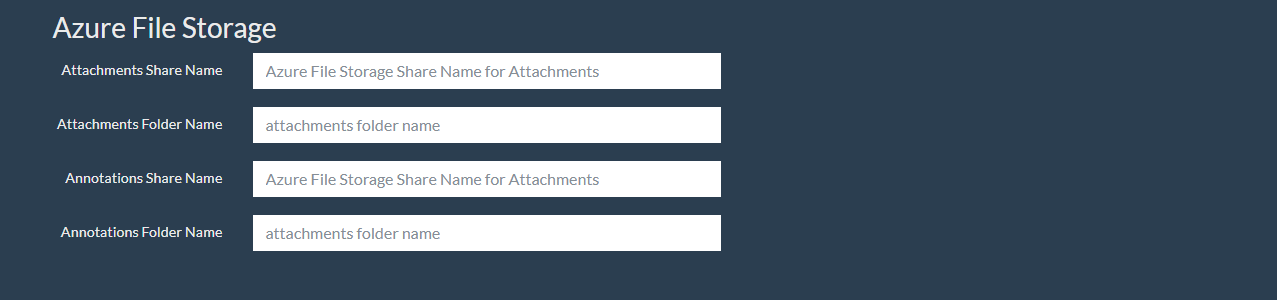
Figure 31 - Configuration Wizard - Azure File Storage configuration
After defining your configuration of Azure File storage, you can click on the Next button. Please refer now to section 6.1.5.
Azure Blob storage
If you are going to use Azure Blob Storage after you have stepped through the general Azure storage configuration, you need to configure these specific values for the Azure BLOB Storage provider:
- Attachments Container Name –The Azure BLOB storage container name to store all files of the Dynamics 365 activitymimeattachment
- Annotations Container Name – The Azure BLOB storage container name to store all files of the Dynamics 365 annotation

Figure 32 - Azure Blob Storage configuration
Where do I create/view BLOB containers in the Azure portal?
Go to your Azure storage account (Figure 33). On the left navigation pane select Containers and create/view names of your BLOB containers.
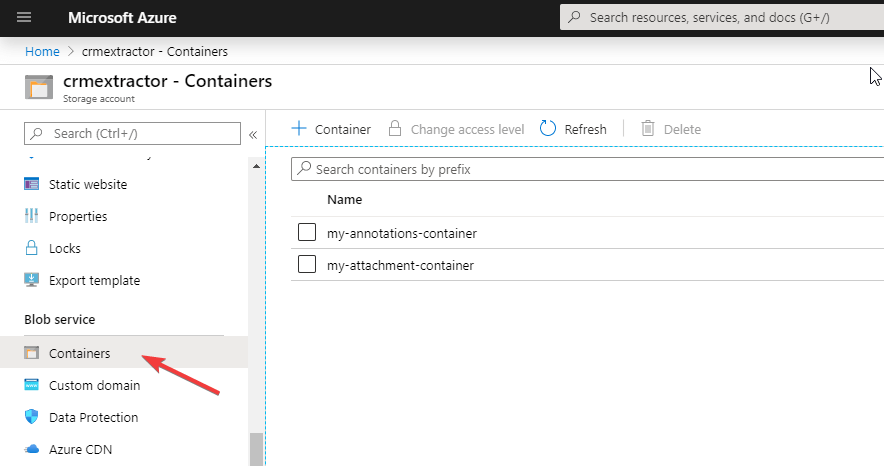
Figure 33 - Azure Blob containers location
After setting the values for your configuration of Azure Blob storage you can click in the Next button.
6.1.4 Extraction Settings
There are a set of general settings that can modify the behaviour of CB Dynamics 365 Seamless Attachment Extractor extraction process.
These pre-processing options include:
- Process note's files using Service Account - When checked, note's files that are extracted by the background service will be marked as modified by the Dynamics 365 user configured to run the Extractor. Otherwise, they will be marked as modified by the owner of the file. Typically, this setting is checked when users pretend to extract files owned by unlicensed or disabled Dynamics 365 users.
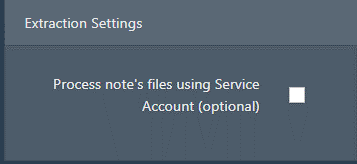
Figure 34 - Extraction settings
6.1.5 Pre-processing Options
You can configure CB Dynamics 365 Seamless Attachment Extractor to preprocess files before extracting them to the selected storage provider.
These pre-processing options include:
- Encryption – The encryption method used on the extracted Dynamics 365 files in the selected storage provider
- Compression – The compression method used on the extracted Dynamics 365 files in the selected storage provider

Figure 35 - Configuration Wizard - Preprocessing options
6.1.5.a Encryption
The encryption possibilities allow you to set up:
- Passthrough – Files are not encrypted in the selected storage provider
- AES256 – Files are encrypted using the AES256 encryption mechanism using the encryption key and salt specified by you.
- AES256 Encryption Key – the encryption key to use to encrypt the files
- AES256 Encryption Key Salt – the encryption key salt to use to encrypt the files
WARNING:
If you change the encryption settings from any encryption method to Passthrough after you started the extraction for your configuration, the Dynamics 365 files that have already been extracted will be retrieved in their encrypted form.
WARNING:
If you change the encryption key or salt after you started the extraction for your configuration, the Dynamics 365 files that have already been extracted will be retrieved in their encrypted form.

Figure 36 - Configuration Wizard - Encryption options
6.1.5.b Compression
The compression possibilities allow you to set up:
- Passthrough – Files are not compressed in the selected storage provider
- Zip – Files are compressed using the Zip compression mechanism and the compression threshold and level specified by you:
- Compression Threshold - Compression threshold decides whether to compress a file. For example, if you wish to compress files only where the compressed size of a file would be 90% of original file size or better, set this value to 0.9. Setting this value to 1 means it will try to compress all files.
- Zip Compression Level
- Optimal – optimal compression is applied, but it will take longer to do the compression
- Fastest – minimal compression is applied to achieve faster compression times
- No Compression – no compression is applied

Figure 37 - Configuration Wizard - Compression options
WARNING:
If you change the compression settings from any compression method to Passthrough after you started the extraction for your configuration, the Dynamics 365 files that have already been extracted will be retrieved in their compressed form.
After defining your preferences regarding encryption and compression you can click on the Next button to proceed with your service activation.
6.1.6 Activating the Service
When you purchased your subscription, you should have received an activation code via email, as shown in Figure 8.
The activation code should be automatically filled in if you accessed the wizard by clicking in the button Activate service available on the email. If it is not, copy the activation code from the email you received, paste it into the Activation Code field, and press the Activate Token button.
A confirmation message will be displayed confirming that the service was activated successfully, and you can click on Next to conclude the configuration.
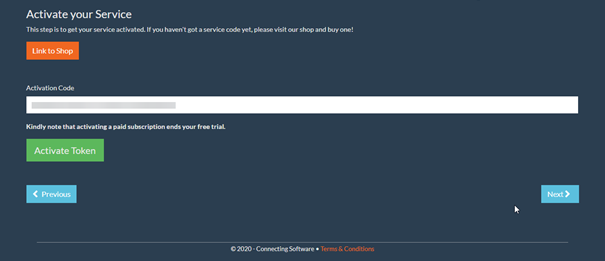
Figure 38 - Configuration Wizard - Service Activation
6.1.7 Starting the Extraction
At this moment, CB Dynamics 365 Seamless Attachment Extractor is ready to start the extraction of your Dynamics 365 files. If you wish to start this process immediately, you just need to click on the checkbox Start extracting and then click on the button Finish. You can also start the extraction later if, for example, you still want to back up your files before you extract them.
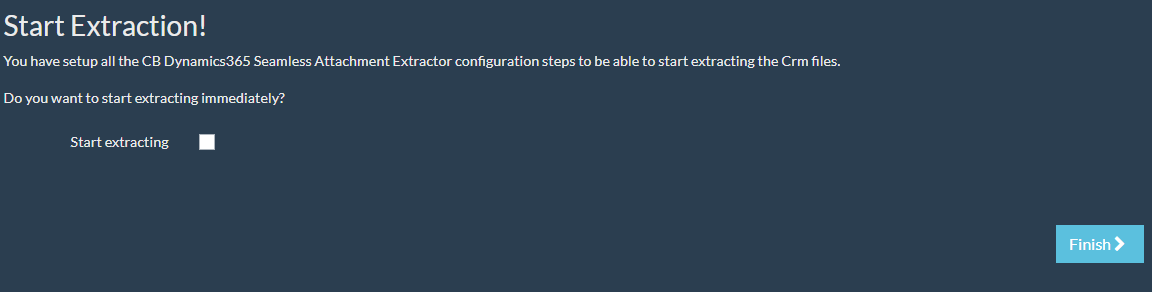
Figure 39 - Configuration Wizard - Final step
6.2 Using the Configurations List
The CB Dynamics 365 Seamless Attachment Extractor configurations list is the alternative way of configuring your replication. You can use it instead of the Configuration Wizard or change some configurations after initially running the wizard.
After logging in, you are redirected to the Dashboard page. To open the configurations list, click on CB Dynamics 365 Seamless Attachment Extractor logo in the left side menu.

Figure 40 – Configuration menu
A list of your CB Dynamics 365 Seamless Attachment Extractor configurations will show up. At this point, it is normal if you don’t have any configurations appearing in the list. In this case, use the Create New button to create a new configuration (Figure 42).

Figure 41 - Configurations list
6.2.1 Naming the Configuration
Every configuration needs to have a meaningful name to identify it. In the first step (Figure 42) you will need to give it a name.
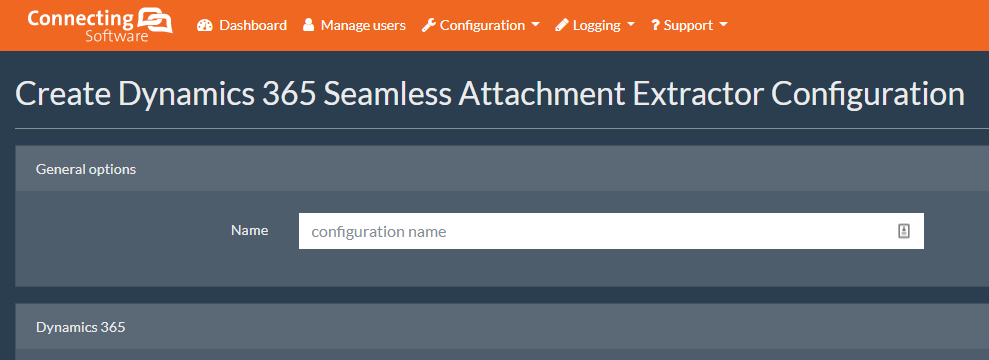
Figure 42 – Creating a Configuration – Configuration Name
6.2.2 Configuring the Connection to Dynamics 365
In this step, you will need to configure the connection to your Dynamics 365 (Figure 43).
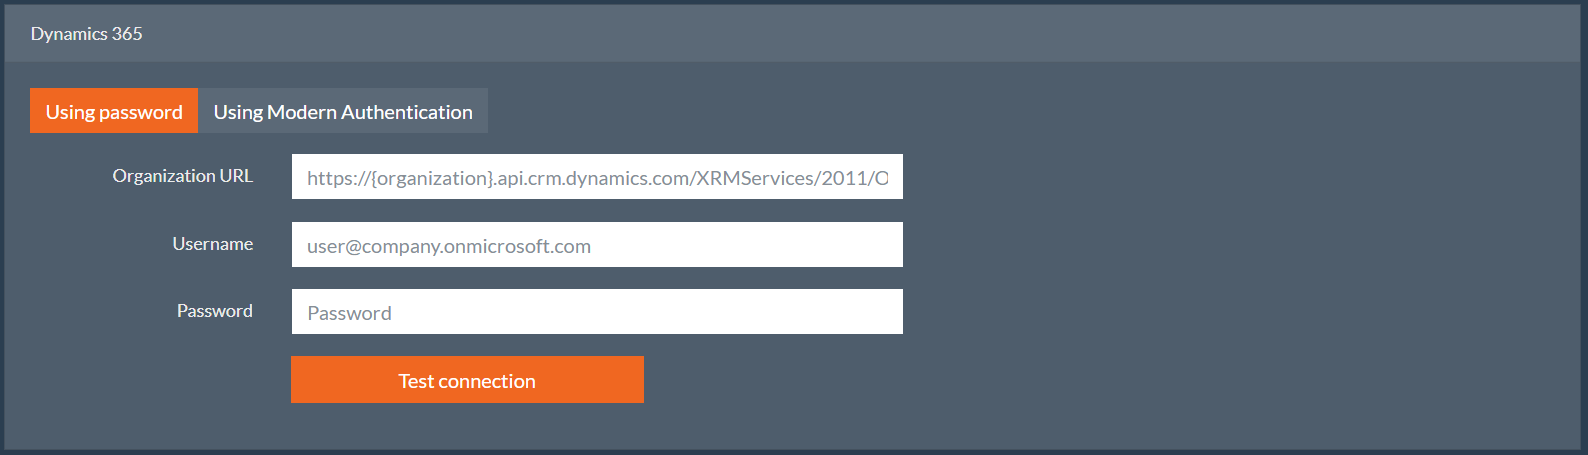
Figure 43 – Creating Configuration – Dynamics 365 connection configuration
Fill in your Organization URL, Dynamics 365 user and password. Please refer to section 6.1.2 (page 10) for more info.
6.2.3 Configuring the Storage Provider
CB Dynamics 365 Seamless Attachment Extractor allows you to extract your Dynamics 365 files to different file storage options. Use the following combo box to select the type of storage for your Dynamics 365 files.
Currently, we have the following storage providers available:
- Azure BLOB Storage
- Azure File Storage
- Microsoft SharePoint

Figure 44 – Creating Configuration – File storage provider selection
6.2.3.a Configuring SharePoint Storage Provider
If you select the option Microsoft SharePoint, the form on Figure 45 will appear so that you can set up the connection between CB Dynamics 365 Seamless Attachment Extractor and your SharePoint.
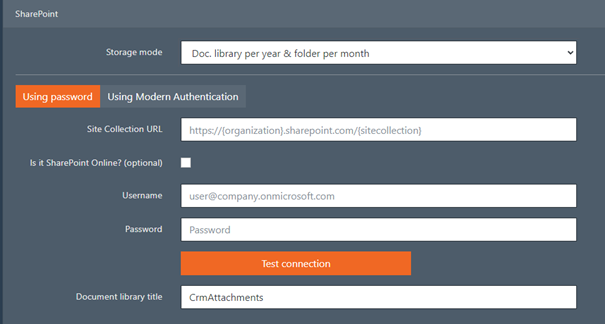
Figure 45 – Creating Configuration – SharePoint Configuration
To know more about each of the fields presented in the form please refer to the section 6.1.3.a (page 17).
6.2.3.b Configuring Azure Storage provider
For both Azure storage provider kinds (File and Blob) you need to configure the Azure Storage General values to allow the extractor to access your Azure storage account.
Azure Storage General configuration
This configuration section is used to define the access to you Azure storage account

Figure 46 – Creating Configuration – Azure Storage general options
To know more about how to configure each of the fields presented in the form please refer to the section 6.1.3.b on page 26.
Azure File storage
After you have stepped through the general Azure storage configuration you need to configure these specific values for Azure File Storage provider (Figure 47).
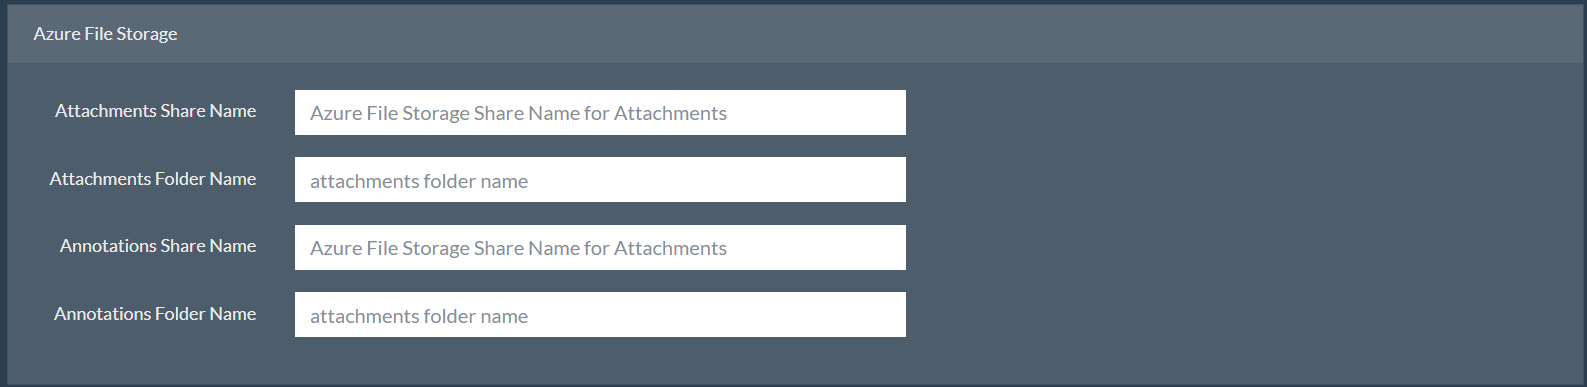
Figure 47 – Creating Configuration – Azure File Storage configuration
To know more about how to configure each of the fields presented in the form please refer to the section 6.1.3.b on page 26.
Azure Blob storage
If you are going to use Azure Blob Storage after you have stepped through the general Azure storage you need to configure these specific values for Azure BLOB Storage provider (Figure 48).

Figure 48 – Creating Configuration – Azure Blob Storage Configuration
To know more about how to configure each of the fields presented in the form please refer to the section 6.1.3.b on page 27.
6.2.4 Extraction Settings
There are a set of general settings that can modify the behaviour of CB Dynamics 365 Seamless Attachment Extractor extraction process.
These pre-processing options include:
- Process note's files using Service Account - When checked, note's files that are extracted by the background service will be marked as modified by the Dynamics 365 user configured to run the Extractor. Otherwise, they will be marked as modified by the owner of the file. Typically, this setting is checked when users pretend to extract files owned by unlicensed or disabled Dynamics 365 users.
Figure 49 - Extraction settings
6.2.5 Pre-processing Options
You can configure CB Dynamics 365 Seamless Attachment Extractor to preprocess files before extracting them to the selected storage provider (Figure 50).
These pre-processing options include:
- Encryption – The encryption method used for encrypting the extracted Dynamics 365 files in the selected storage provider
- Compression – The compression method used for reducing the size of the extracted Dynamics 365 files in the selected storage provider

Figure 50 – Creating Configuration – Preprocessing options
6.2.5.a Encryption
To enable the encryption of the files before extracting them, you can use the options shown in Figure 51.
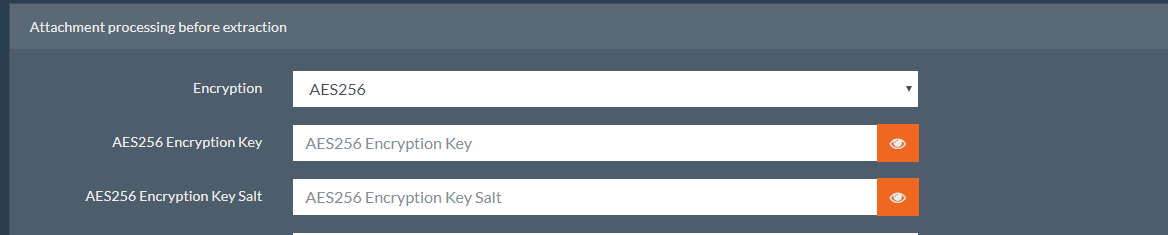
Figure 51 – Creating Configuration – Encryption options
Please refer to section 6.1.5.a on page 29 for more about how to configure each of the fields presented in the form and important warnings regarding this feature.
6.2.5.b Compression
To enable the encryption of the files before extracting them, you can use the options shown in Figure 52.

Figure 52 – Creating Configuration – Compression options
Please refer to section 6.1.5.b on page 29 for more information about each of the fields presented in the form and important warnings regarding this feature.
6.2.6 Saving your Configuration
When you finish configuring the extraction settings and filling all the required fields, you can use the Create button to save your configuration.
NOTE:
The configuration will be saved, but the extraction will not start yet.
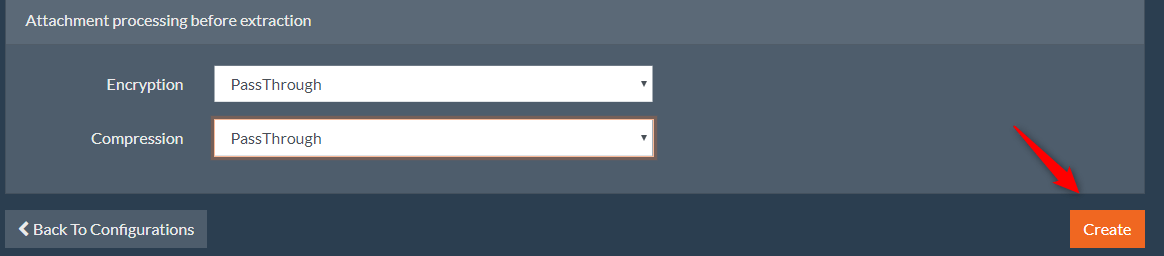
Figure 53 – Creating Configuration – Final step
Your configuration will appear on the list of existing configurations.
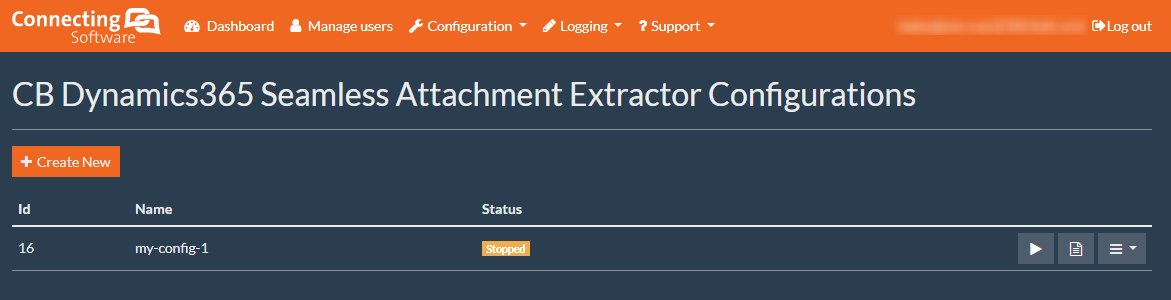
Figure 54 – List of created configurations
6.2.7 Starting the Extraction
To start the extraction of your Dynamics 365 files using the parameters in this configuration, use the Start button marked with the play icon that is to the right of the configuration name (Figure 55).
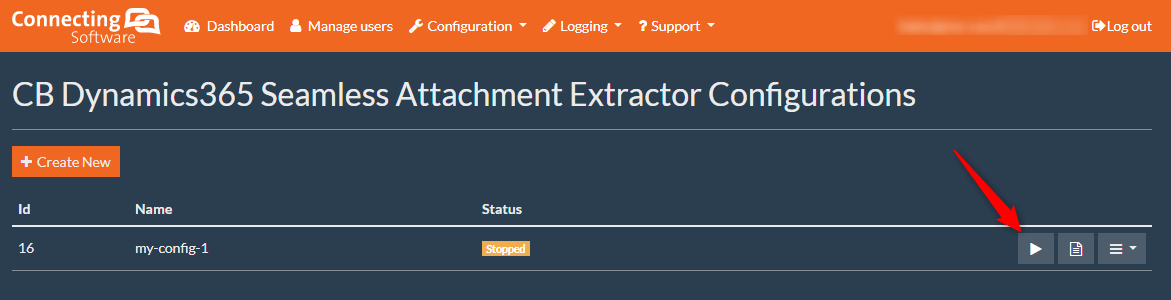
Figure 55 – Start extraction process
If your configuration has a properly activated SaaS subscription, the Dynamics 365 file extraction process will start right away.

Figure 56 - Extraction process started
In case you have not activated the SaaS subscription for your configuration yet, the error shown in Figure 57 will pop-up when you attempt to start extracting files.
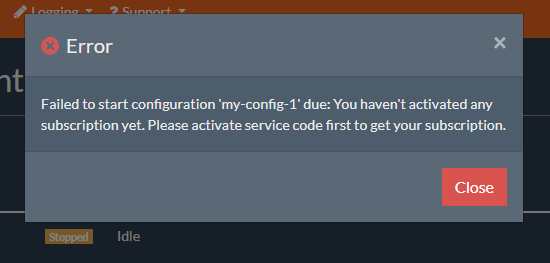
Figure 57 – Error - Invalid subscription when starting the extraction
In this case, please refer to the following section on service activation (section 6.2.8).
6.2.8 Service Activation
When you purchased your trial or a regular subscription, you should have received an activation code via email, as shown in Figure 8 (page 6).
Please use the drop-down menu on the right side of the configuration list row belonging to your configuration to open the service activation window (Figure 58).
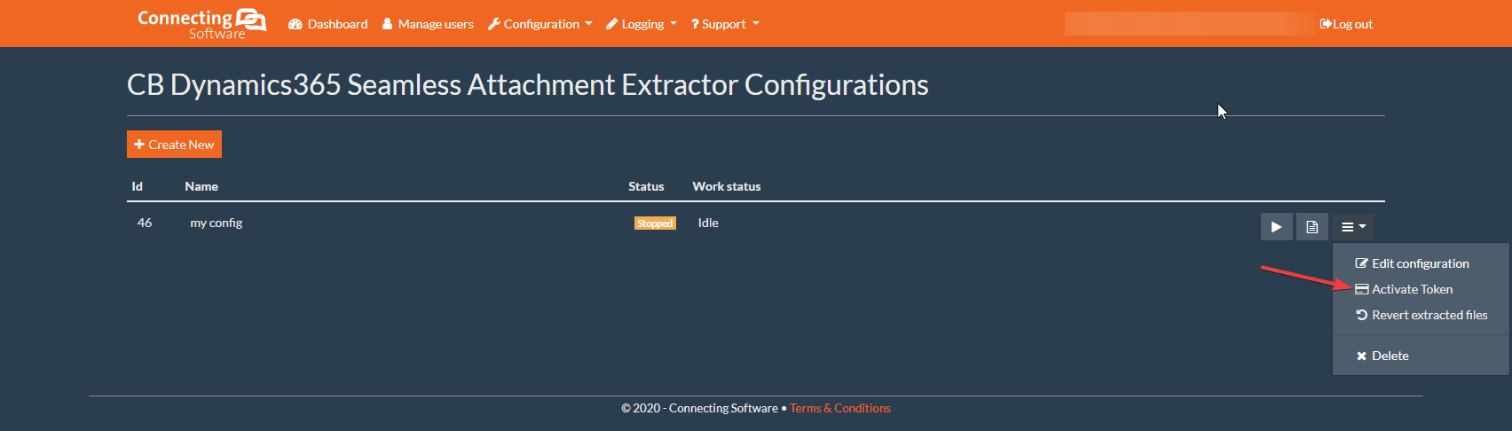
Figure 58 – Creating configuration – Activating the service
The service activation message in Figure 59 will be shown. Please copy the activation code from the email you received, paste it into the Activation Code field, and press the Activate button.
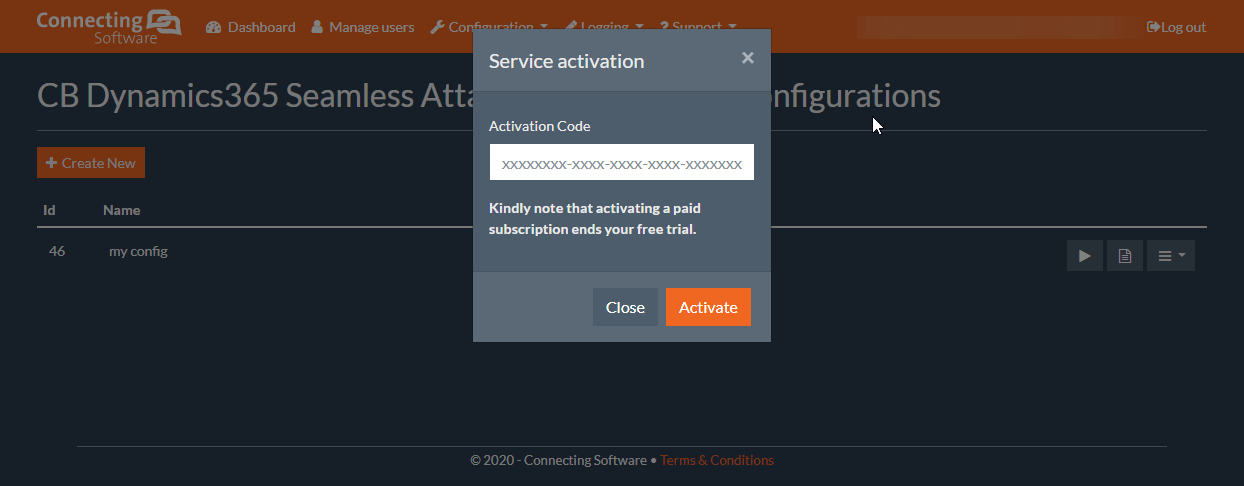
Figure 59 – Service activation
NOTE:
Activating a paid subscription ends any free trial you might have.
If you are trying to activate a trial token for the Dynamics 365 organization for which you activated trial in the past you will end up with the error message shown in Figure 60.
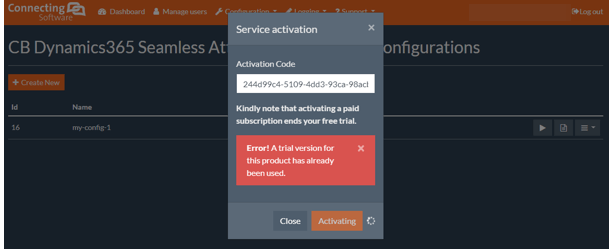
Figure 60 – Error - Trying to apply a new trial token for the same Dynamics 365 organization
If you are trying to activate your token more than once, you will get the error message shown in Figure 61
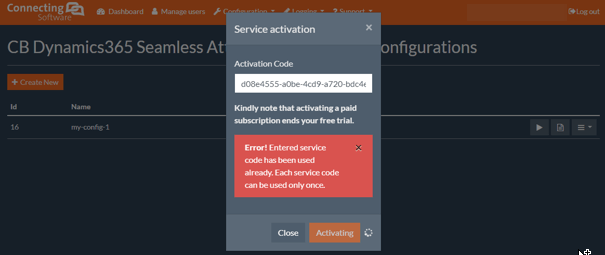
Figure 61 – Error - Trying to apply a token that was already used before
If you are activating a trial for your Dynamics 365 organization for the first time or you are activating a non-trial token, a confirmation message will be displayed (Figure 62). This confirms that the service was activated successfully.
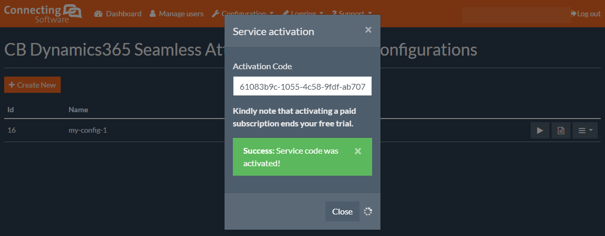
Figure 62 - Configuration Creation – Service activated
When you go to the dashboard of the Saas portal (by clicking Dashboard on the top menu), if you have successfully activated the configuration, you should see something like Figure 63.
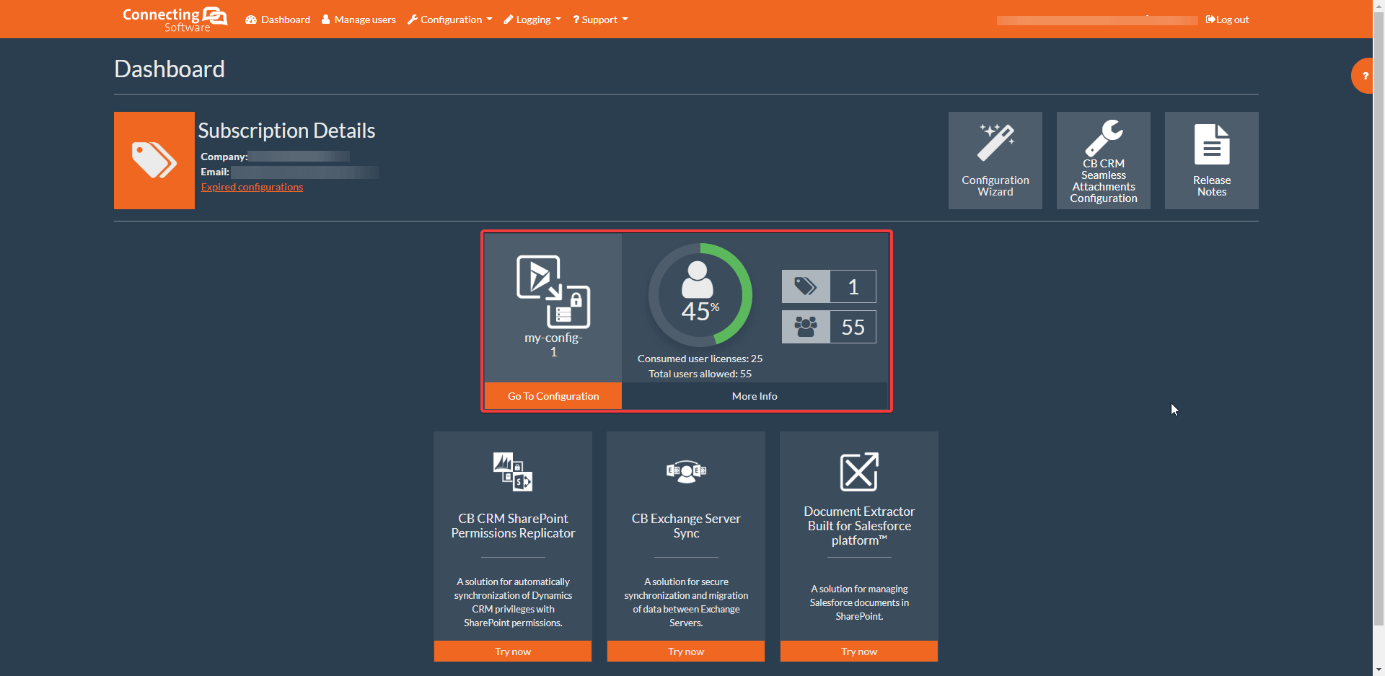
Figure 63 – SaaS Platform dashboard
After successful activation, you can start extracting files using the procedure described in section 6.2.7.
6.2.9 Deleting a Configuration
You will be able to delete your configuration at any time. Deleting a configuration should be handled with great care.
WARNING:
When you delete a configuration:
· The configuration will be permanently deleted
· All your paid subscriptions related to this configuration will be lost
· The Dynamics 365 custom solution that is installed by CB Dynamics365 Seamless Attachment Extractor WILL NOT be uninstalled from your Dynamics 365. This ensures that all the previously extracted files remain accessible through Dynamics 365.
· You WILL NOT be able to create a new configuration of CB Dynamics365 Seamless Attachment Extractor targeting the same Dynamics 365 unless you completely remove CB Dynamics 365 Seamless Attachment Extractor from your environment, please see the note below.
NOTE:
If you want to completely remove CB Dynamics 365 Seamless Attachment Extractor from your environment, you MUST:
1. Ensure that you have enough storage space in your Dynamics 365 to store all the previously extracted files
2. Activate the revert mode (see section 9 - Reverting Extracted Files)
3. Delete the configuration on the SaaS Portal
4. Access your Dynamics 365 and uninstall the CBSeamlessAttachments solution
a. From your Dynamics 365, access to Settings > Customization > Solutions
b. Select CBSeamlessAttachments
c. Click on Delete
d. Follow the instructions.
This option is available by expanding the menu icon next to the configuration you want to delete (Figure 64). Once opened, you choose the Delete option and click on Yes to confirm your decision (Figure 65).

Figure 64 – Delete Configuration Option
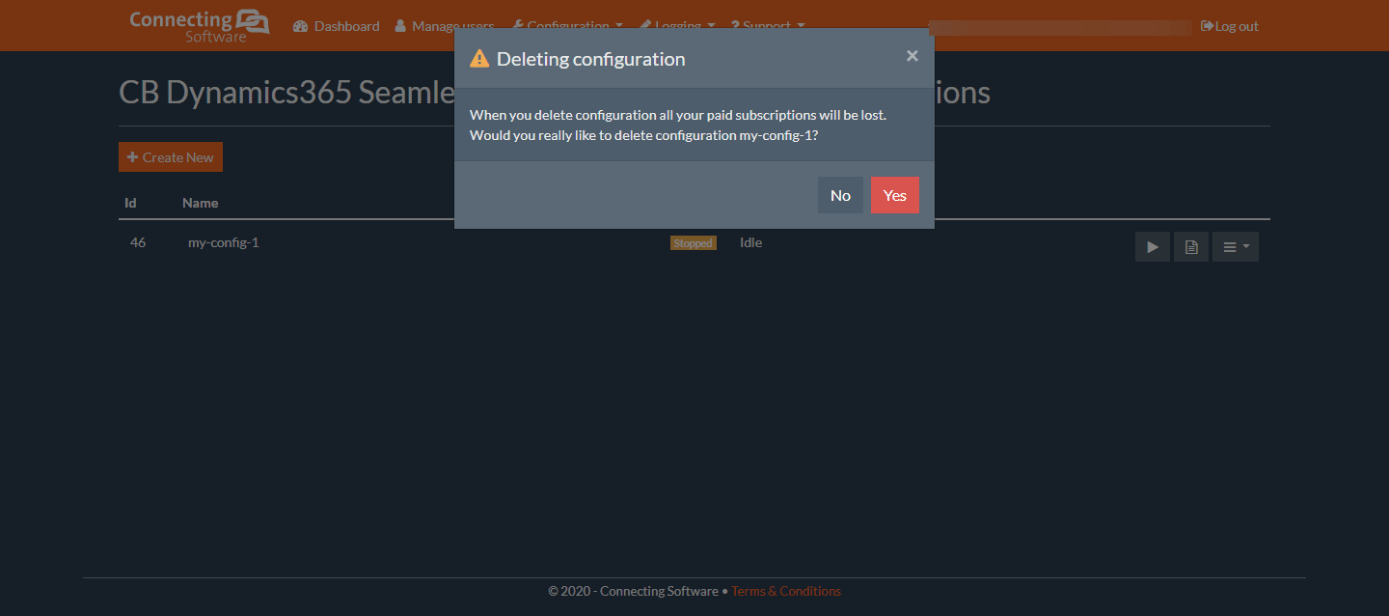
Figure 65 – Deleting Configuration Confirmation Screen
7 Dashboard
After having an active configuration, this configuration can be accessed through the SaaS Configuration menu or through the SaaS Dashboard (Figure 66).
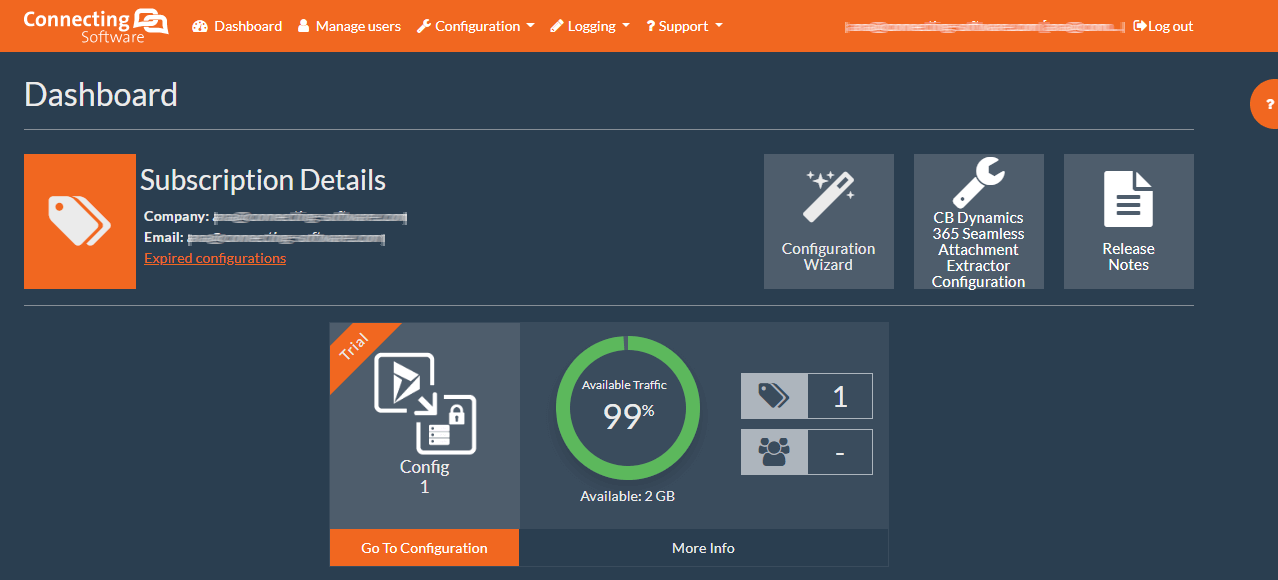
Figure 66 – CB Dynamics 365 Seamless Attachment Extractor - Dashboard for trial
7.1 Navigating the Dashboard
On the Dashboard (Figure 67), you will find:
- quick links (1)
- your configurations (2).
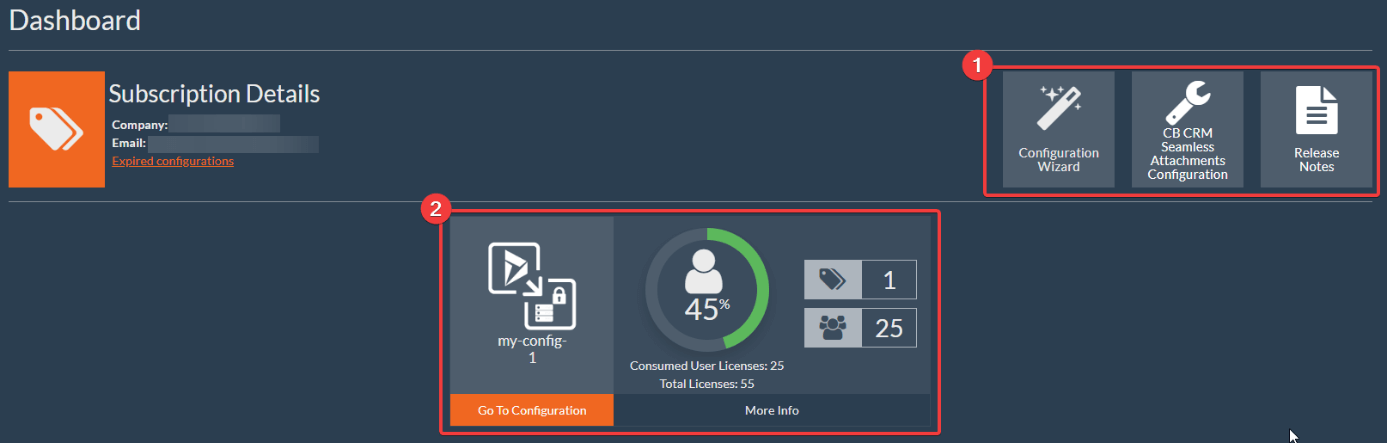
Figure 67 – CB Dynamics 365 Seamless Attachment Extractor - Dashboard elements
Let's look into the configurations section in more detail. For each configuration (Figure 68) you see:
- Service icon/name
- Name of your configuration
- Link to the Configuration’s editing page
- Available/consumed user licenses chart
- Number of available subscriptions (both active and future)
- Number of licensed users
- Link to obtain more info about the service
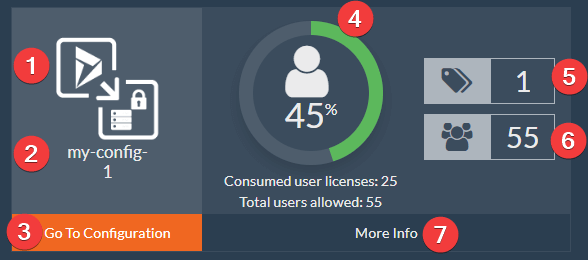
Figure 68 – CB Dynamics 365 Seamless Attachment Extractor Service Information
Keep in mind that by clicking on the Go to Configuration button (3) you will be redirected to the configuration page (refer to section 6.2).
Clicking on the button More Info (7) will redirect you to a section where you can see more information about the service such as subscriptions, and the available number of licensed users (section 7.2).
7.2 Valid Subscriptions
When you open the More info section, you will find all active and future subscriptions (Figure 69).

Figure 69 – Valid Subscriptions
Expanding a subscription, you can see useful information, like the period for which it is valid and user licenses information.
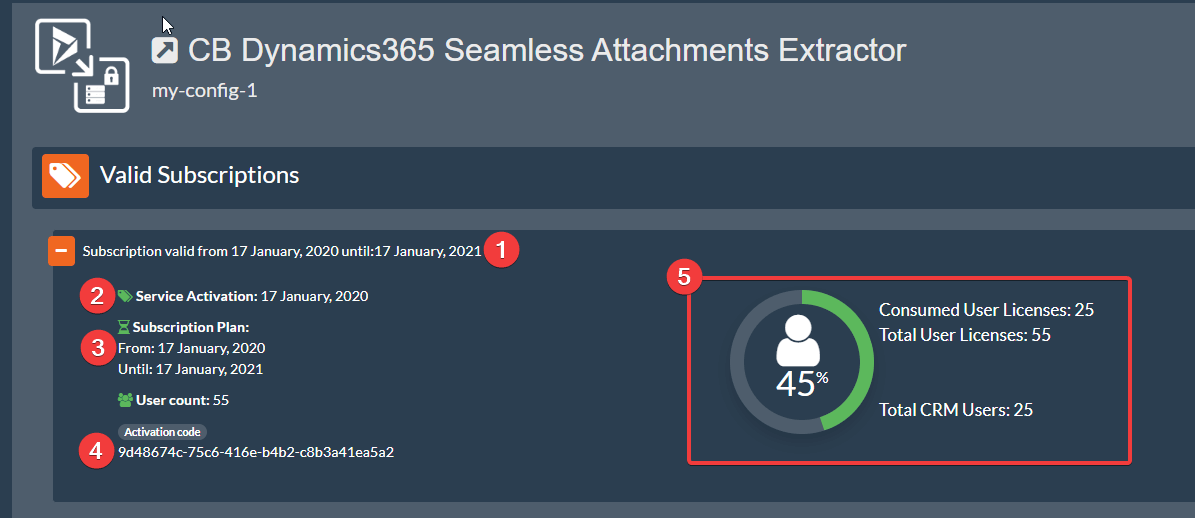
Figure 70 – Subscription Details
- Period the subscription is valid
- Day the subscription was activated
- Subscription plan (will indicate if it is trial)
- Activation code
- Information about the subscription and number of used licenses:
- Consumed User Licenses - the ones you have already used
- Total User Licenses
- Total Dynamics 365 Users
7.3 Other Information
The Other Information section is below the Valid Subscriptions. In it, you can find all subscriptions that are already expired (Figure 71).
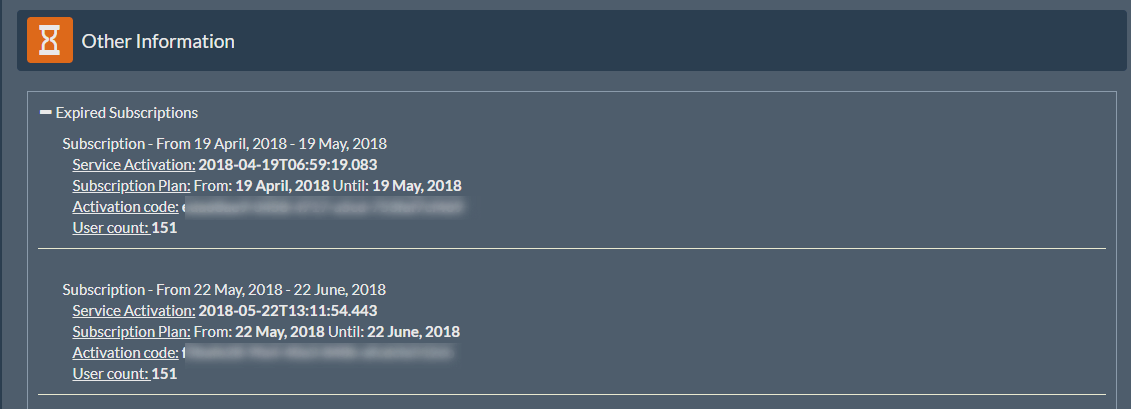
Figure 71 – Other Information
8 Activity log
The activity log allows you to browse the history of activities that were performed by the CB Dynamics 365 Seamless Attachment Extractor for a particular configuration. The activity log can be shown by clicking the Document icon button for that configuration as shown in Figure 72.
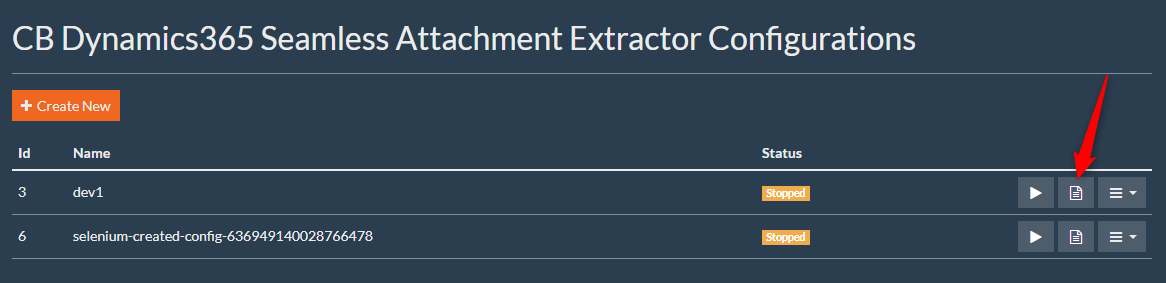
Figure 72 – Activity Log Option
From the activity log view (Figure 73), you can:
- filter by specific log types (1),
- navigate to older pages (2) and
- Search for specific text (3).
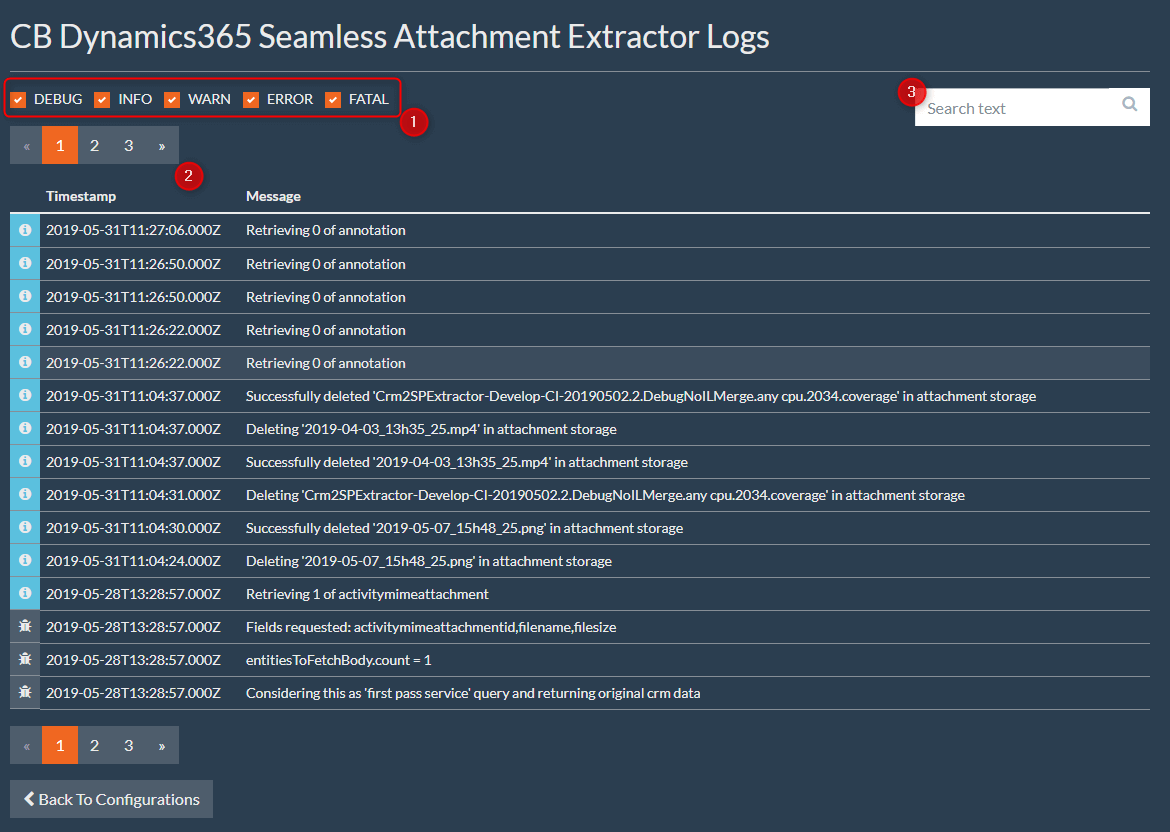
Figure 73 – Activity Log Details
The following log types are produced:
- Debug: Internal information that could be used to troubleshooting
- Info: General information from the CB Dynamics 365 Seamless Attachment Extractor service
- Warn: Warning messages
- Error: Error messages
- Fatal: Fatal errors (service cannot continue)
9 Reverting Extracted Files
CB Dynamics 365 Seamless Attachment Extractor provides a mechanism that allows you to revert the extraction process made by this product. This means that, at any time, if you want that your files return to your Dynamics 365 and at the same time remain in your external storage provider you just need to proceed with this action.
To start this process, you should expand the menu icon related to the configuration you want to revert and choose the Revert extracted files option (Figure 74).
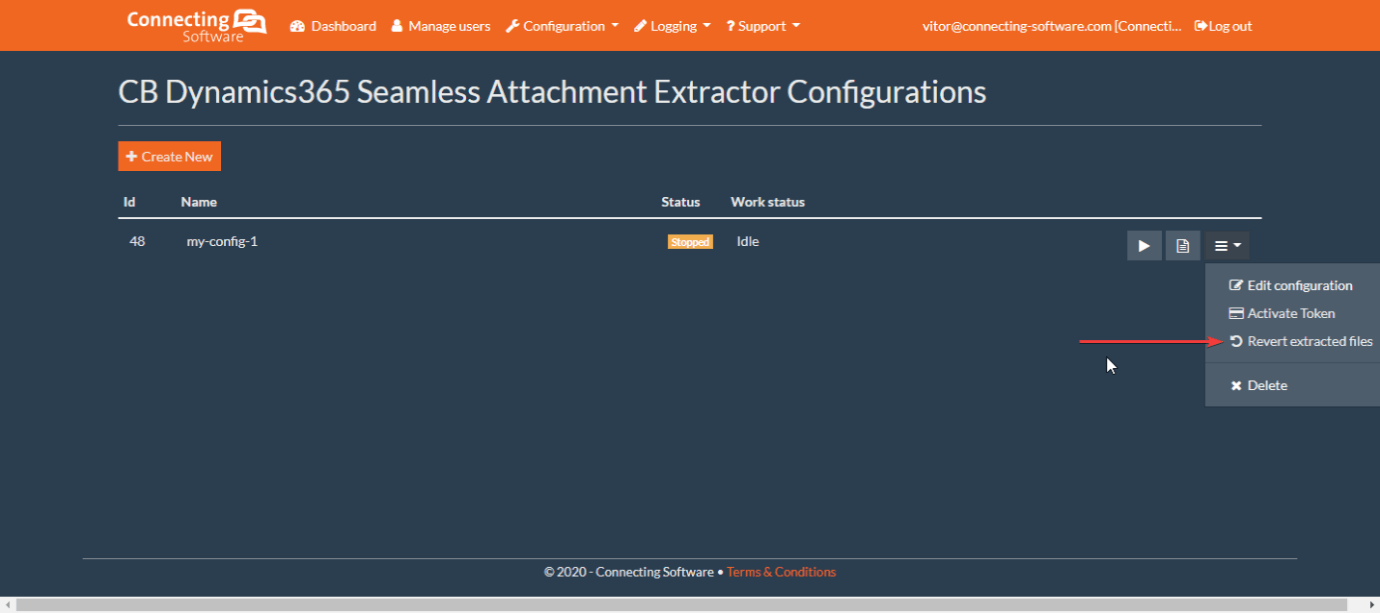
Figure 74 – Revert extracted files option
You should then confirm your decision by clicking on the Yes button (Figure 75).
WARNING:
By clicking the Yes button all your files will be stored again in your Dynamics 365 and they will remain in the configured external storage provider. You are responsible to delete the files from the external storage yourself. Make sure this is what you want and that you have enough storage space in Dynamics 365.
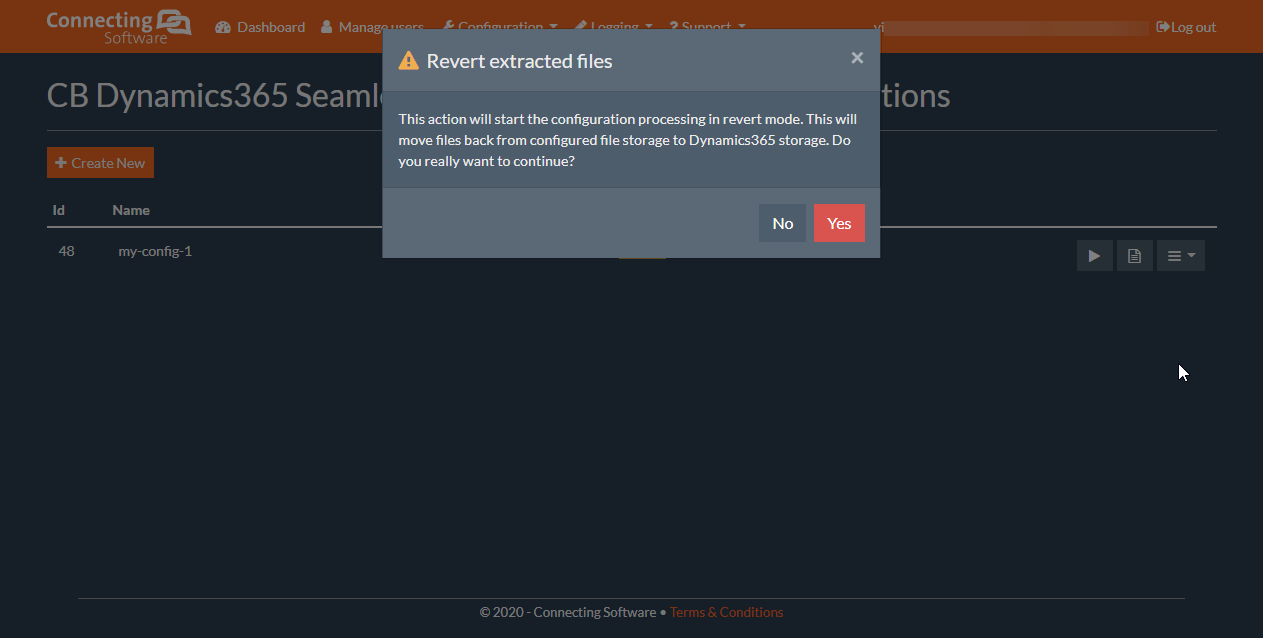
Figure 75 – Revert extracted files confirmation dialogue
10 Support and troubleshooting
There is a useful links option available at the CB Dynamics 365 Seamless Attachment Extractor dashboard (Figure 76).
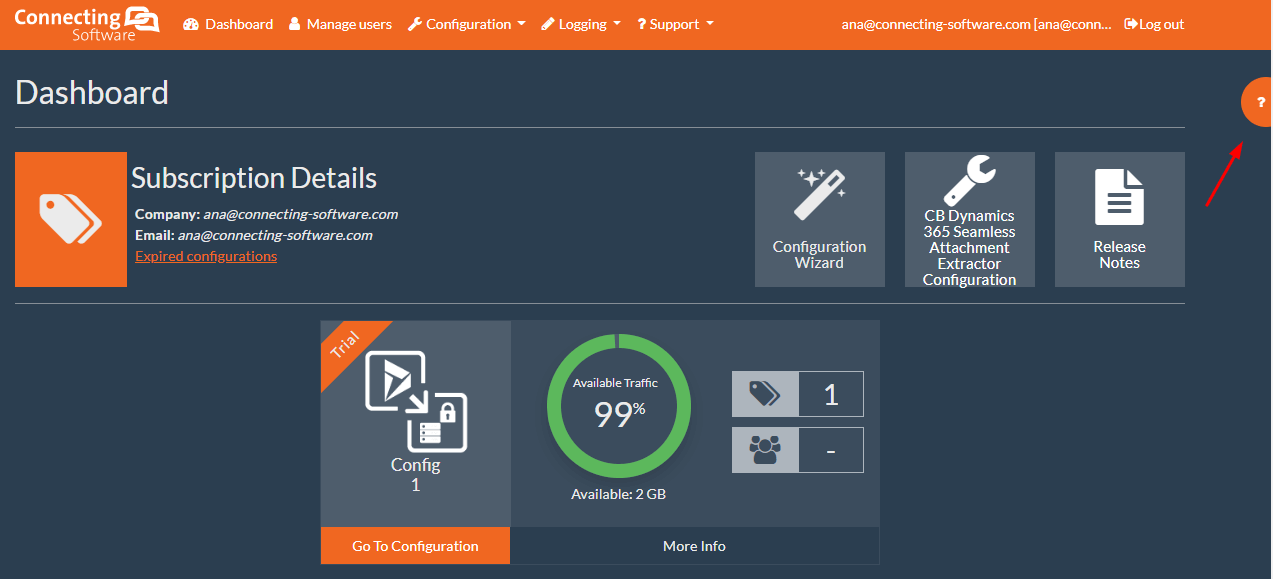
Figure 76 - Useful links at the dashboard
If you need any assistance or have further questions, please contact the support team of CB Dynamics 365 Seamless Attachment Extractor at our email address support@connecting-software.com or via the support form https://saas.connecting-software.com/Support/Create. These options are also available via the Support option on the top menu.