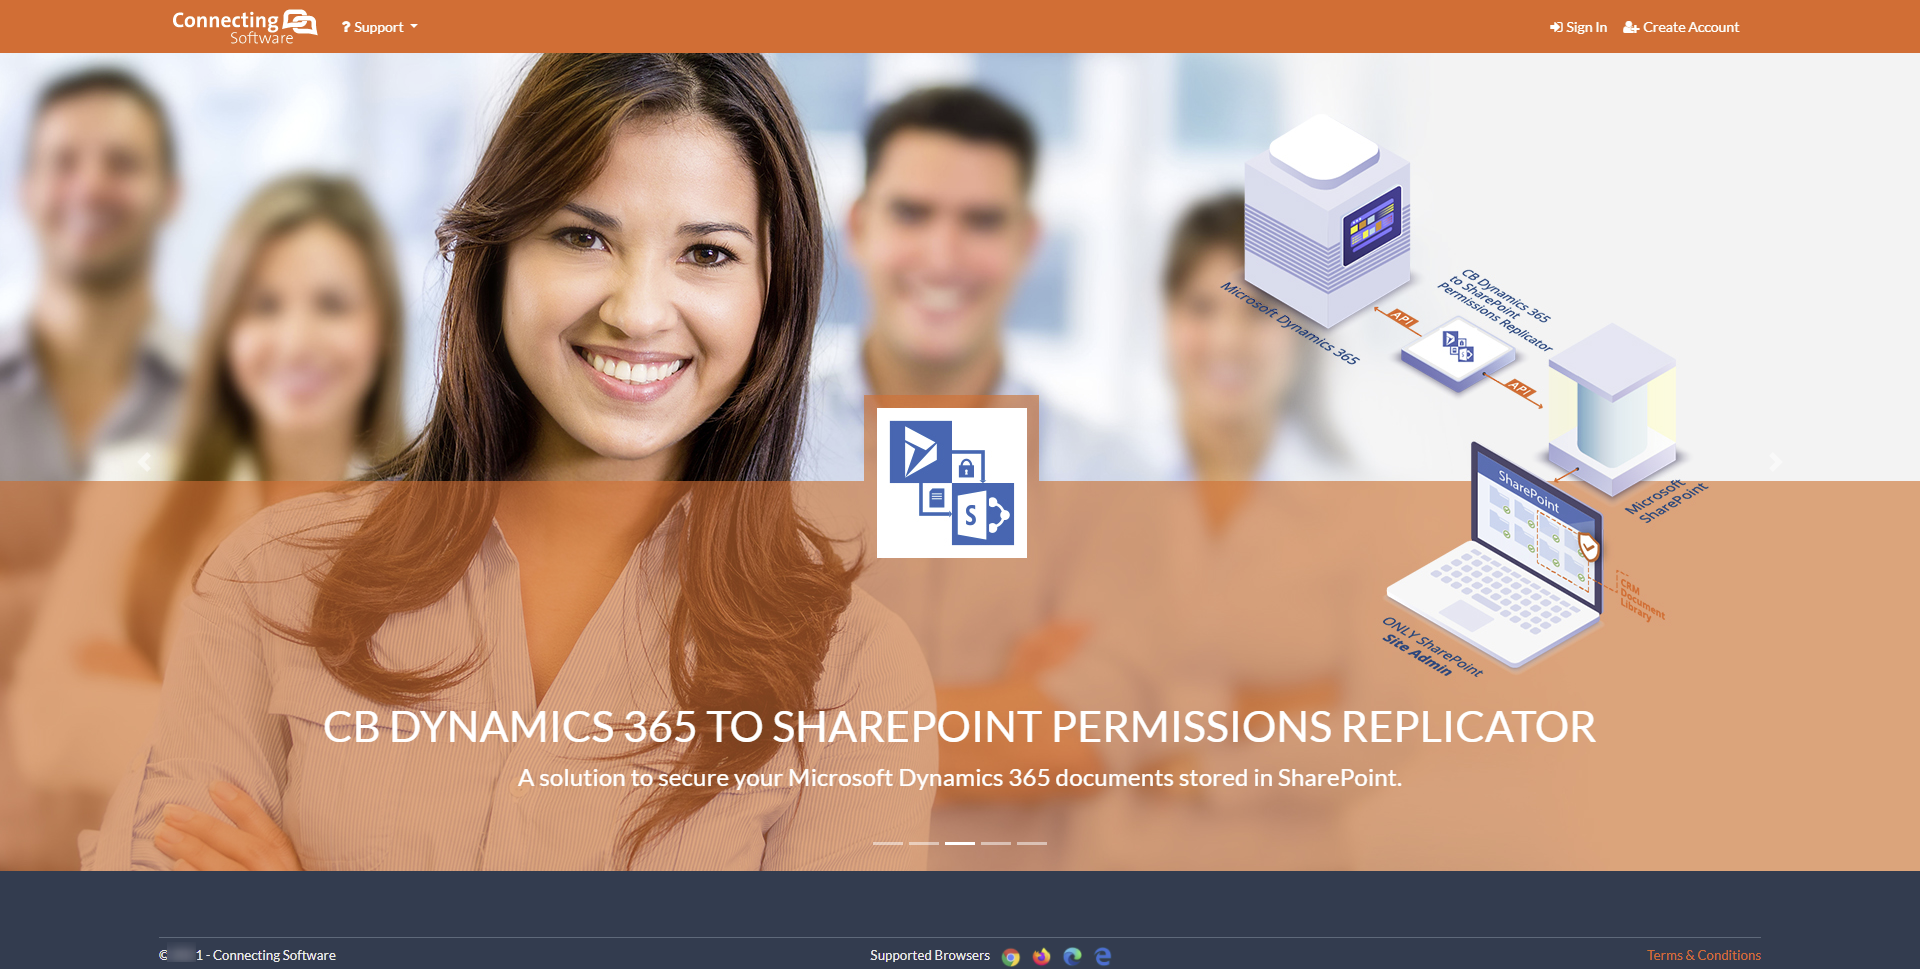
CB Dynamics 365 to SharePoint Permissions Replicator Online Documentation
1. Overview
The out-of-the-box integration between Dynamics 365 and SharePoint document storage has a lot of advantages but also some disadvantages. The most significant disadvantage is the absence of permissions integration. Each one of those systems has its own security model and there is no out-of-the-box integration between them. This undesirable behaviour causes serious security issues, as everyone can see everything on the SharePoint side.
The CB Dynamics 365 to SharePoint Permissions Replicator product solves this problem easily
Key Features
• Replicates Dynamics 365 permissions on item, file, folder, list, document library or even a SharePoint site
• Supports client based integration (IFrame, crmlistcomponent)
• Supports server based integration
• Event-based service
• Configurable
• Provided as a cloud service (no need to install)
2. How it Works
The CB Dynamics 365 to SharePoint Permissions Replicator consists of three basic components:
- Connecting Software SaaS Portal (here)
- CB Dynamics 365 to SharePoint Permissions Replicator cloud service
- Dynamics 365 Solution – CB Replicator
Connecting Software SaaS Portal takes care about configuration, subscription management and monitoring.
CB Dynamics 365 to SharePoint Permissions Replicator cloud service is responsible for running the permissions replication process.
Dynamics 365 Solution contains the plugin that registers all the steps that can influence permissions in Dynamics 365. When one of these steps occurs, the plugin will notify CB Dynamics 365 to SharePoint Permissions Replicator service, which will ensure that correct permissions are written into SharePoint. This makes sure that the privileges in Dynamics 365 will be exactly replicated to the relevant SharePoint folders. There are several ways to change permissions in Dynamics 365 and this solution covers all of them:
- User
- Security roles
- Sharing
- Teams, access teams and access team templates
- Business unit
- Hierarchy security – manager and position (CRM 2015, 2016 and Online)
![]() WARNING:
WARNING:
This service will break role inheritance and modify security inside SharePoint. We are not responsible for recovering permissions to the initial state. Please test the service in your test environment first and create backups before implementing to the production environment.
We rely on item level security at folder level in SharePoint. Any manual changes to item level security for influenced document libraries (sharing, etc.) can interfere with our service and may lead to inconsistent behavior or service malfunction.
3. System Requirements
- Internet access to our portal (here)
- Dynamics 365 and SharePoint must be accessible outside your network (Microsoft Azure Cloud)
- Properly configured Document Management between Dynamics 365 and SharePoint
- Properly working Microsoft Dynamics CRM Sandbox Processing Service in on premise Dynamics 365 (our solution contains Dynamics 365 plugin running in sandbox isolation mode)
4. Purchase
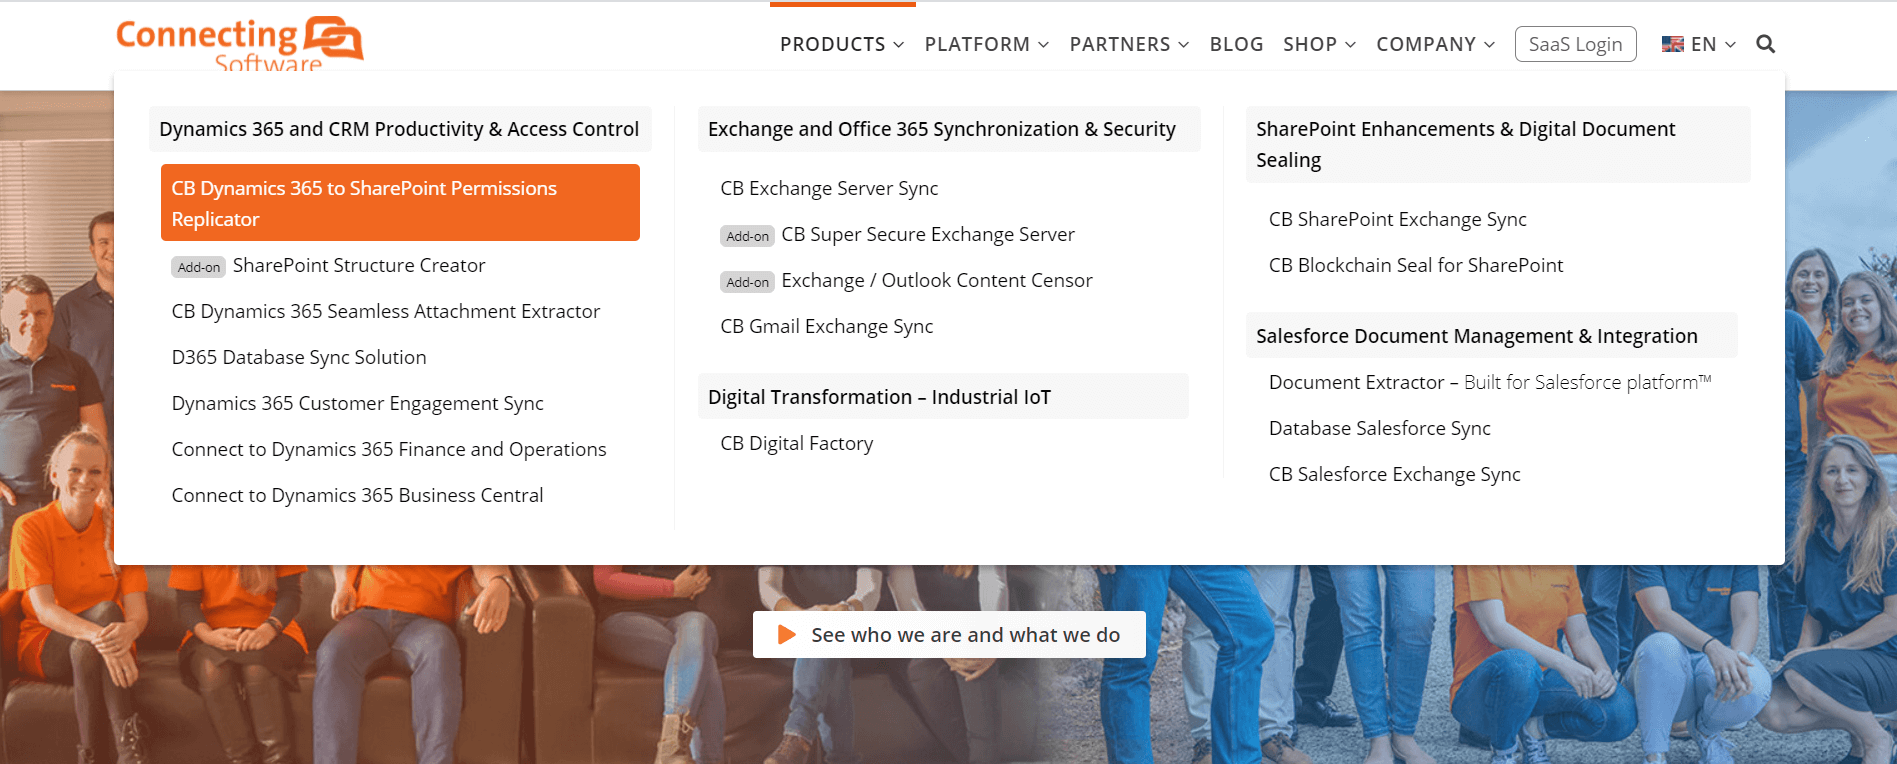
To purchase the CB Dynamics 365 to SharePoint Permissions Replicator product, visit our webpage @ test.connecting-software.com and choose “CB Dynamics 365 to SharePoint Permissions Replicator” from the products menu as shown below.
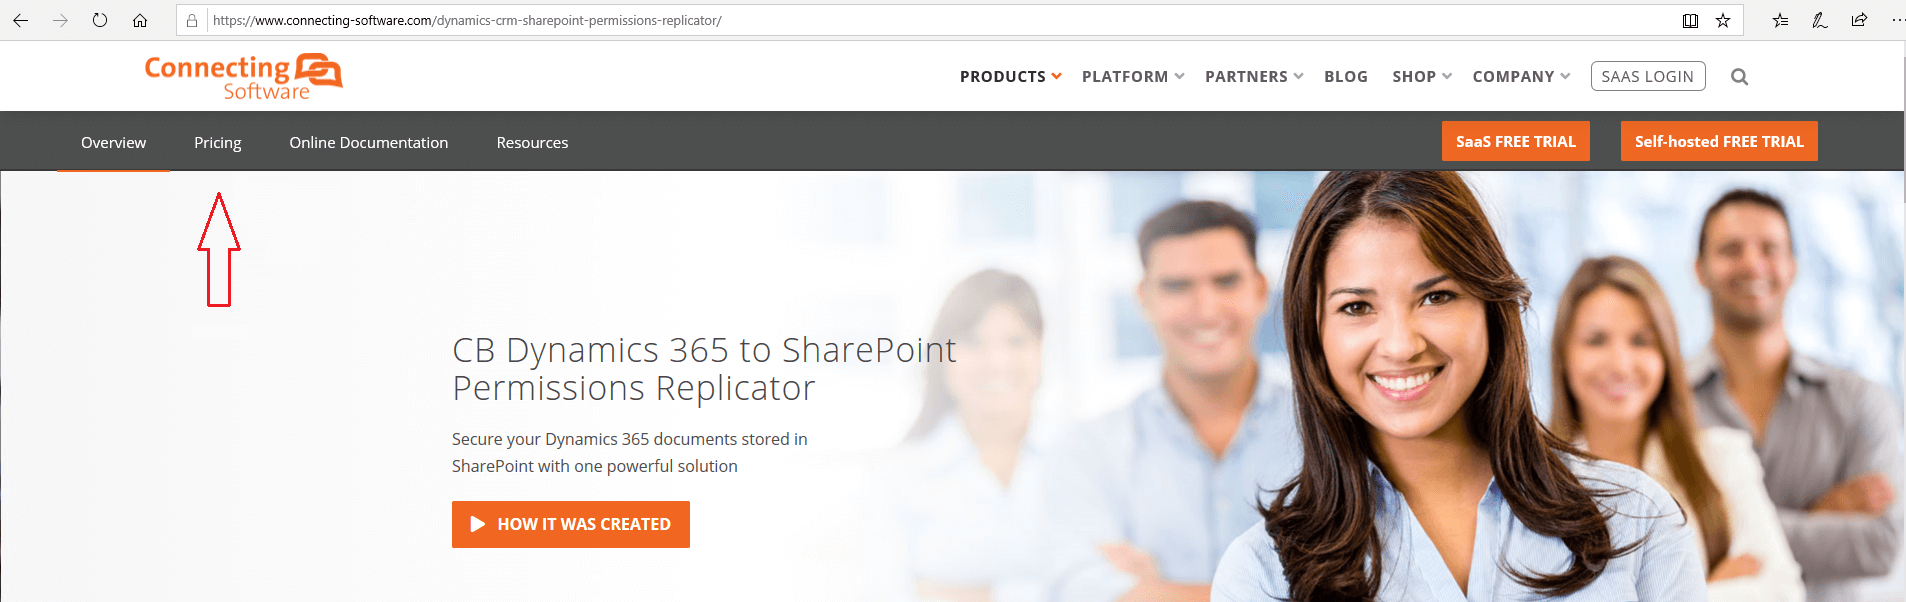
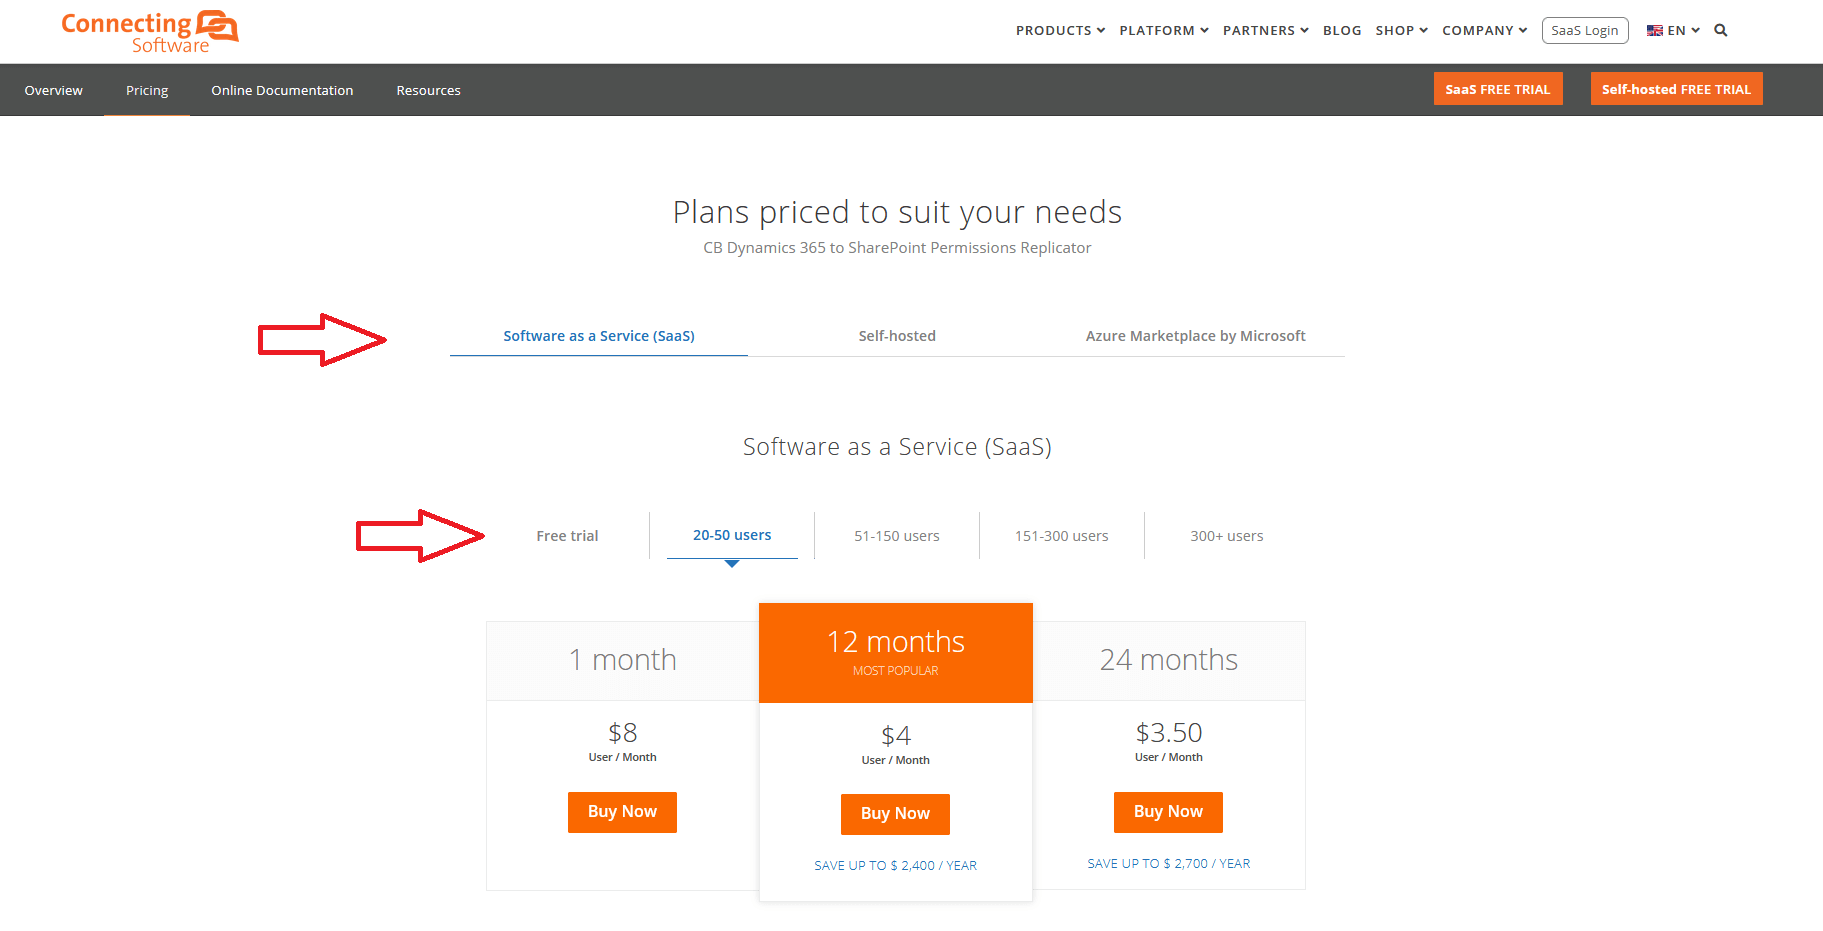
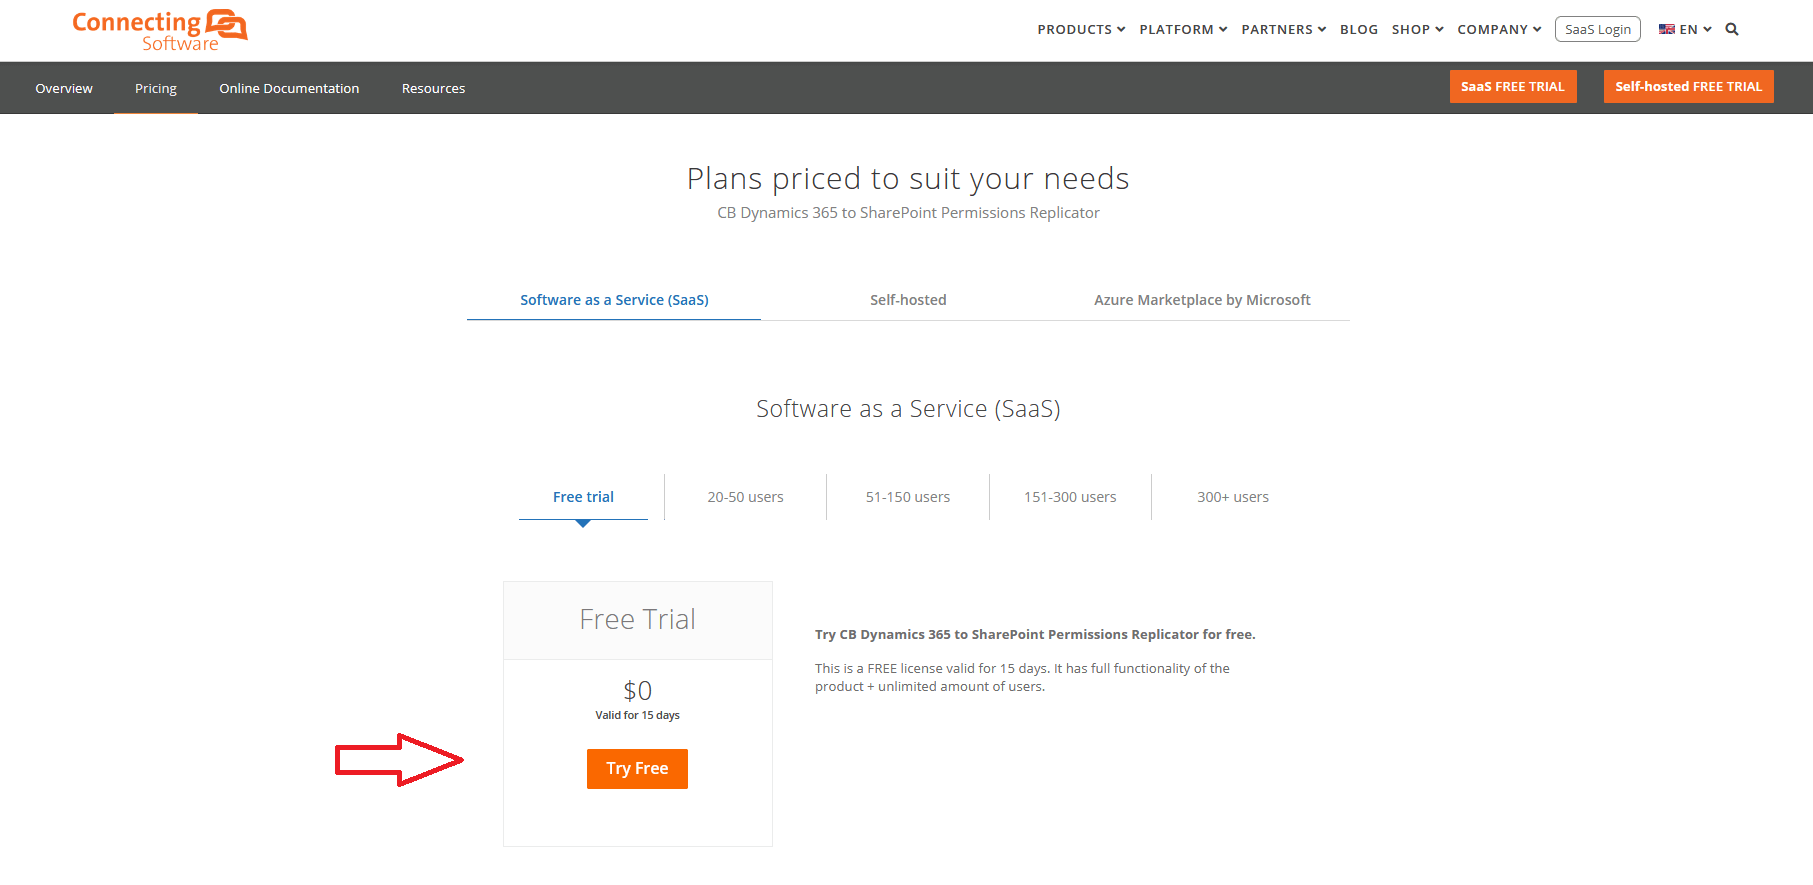
From the “CB Dynamics 365 to SharePoint Permissions Replicator” product page shown below, click the Pricing tab to view the pricing page with the available purchase plans as shown in Figure 3.
Click “Free Trial” to get your free trial to test the product first or you could purchase a paid subscription as shown below by clicking “Buy Now”.
Click “Try Free” to add the product to your cart.
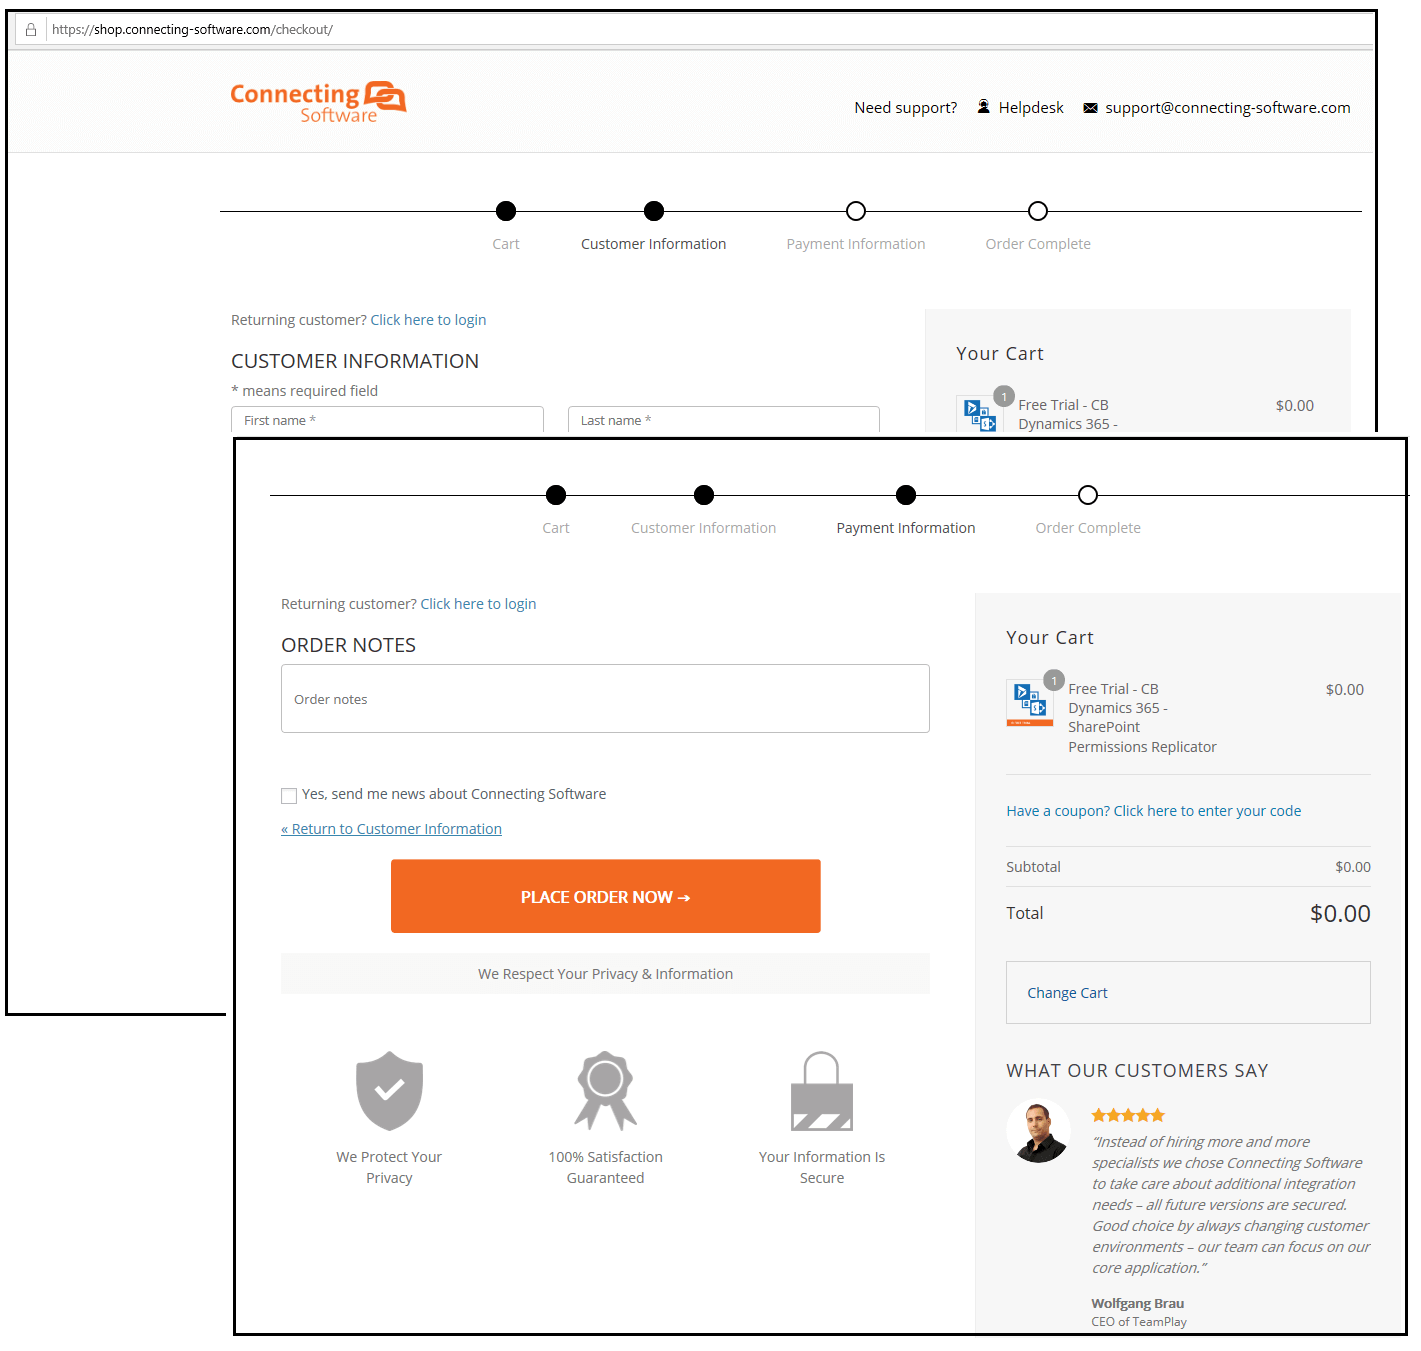
Complete your purchase profile and place your order by clicking “Place Order Now” button
After you will see an order confirmation on the screen
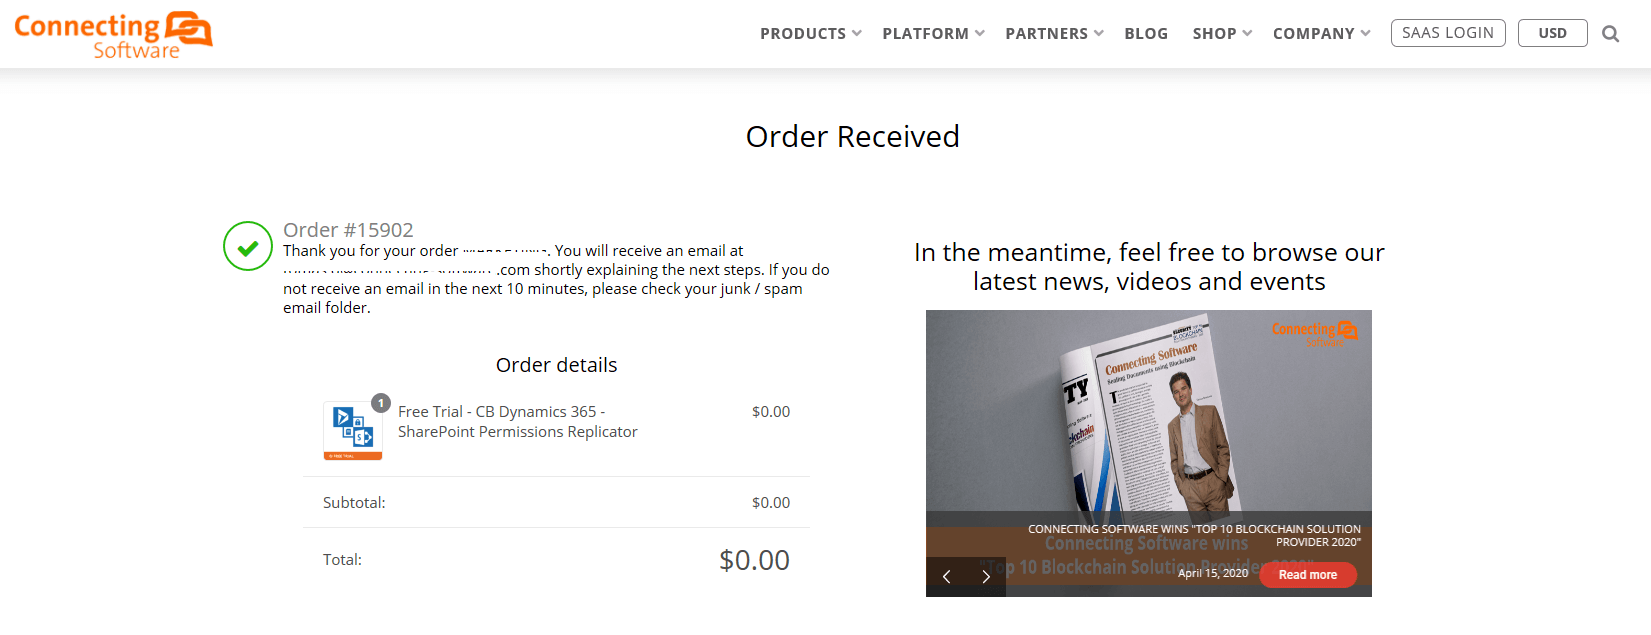
You will receive two emails from us. An order confirmation email and a guidelines email.
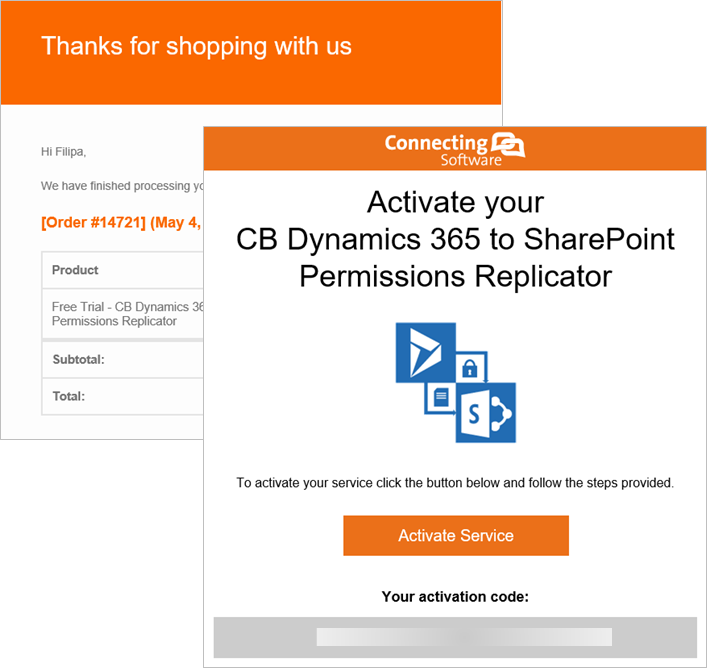
Click the link pointing to our SaaS portal from Step 1 in the guidelines email to access your SaaS portal and configure your “CB Dynamics 365 to SharePoint Permissions Replicator”.
5. Navigating the Dashboard
After having an active configuration, this configuration can be accessed through the SaaS Configuration menu or through the SaaS Dashboard as shown below:
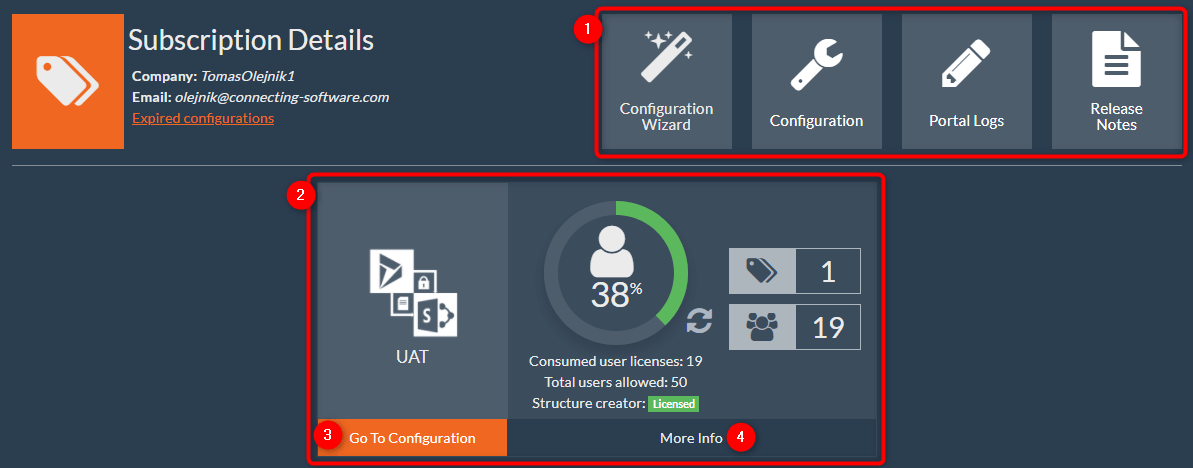
In the Dashboard you will find quick links (1) as well as your configurations (2). Keep in mind that by clicking “Go to Configuration” (3) you will be redirected to the configuration page and by clicking “More Info” (4) you will be able to see more information about the configuration.
Each configuration has information about the number of subscriptions and users as shown below:

1. Service icon/name
2. Name of your configuration
3. Link to the Configuration’s list page (where you can start/stop the configuration)
4. Available number of users to map
5. Replication status – if the icon is rotating replication is running
6. Number of available subscriptions (both active and future)
7. Number of users
8. Number of consumed and total user licenses
9. SharePoint Structure Creator license status
10. More information link
Clicking anywhere on the configuration box (2) will redirect you to a section where you can find more information about the service, such as subscriptions.
5.1 Valid Subscriptions
Scrolling down to the next section, you can find all active and future subscriptions.

Expanding a subscription, you can see useful information, like validation period (start and end dates), user licenses information, and other details about the subscription.
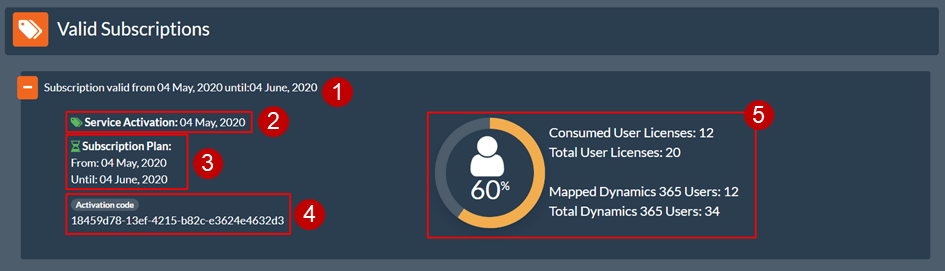
- Subscription’s validation date
- The day the subscription was activated
- Subscription plan
- The activation code
- Information about the the subscription and user licenses:
- a. Consumed user licenses – number of licenses that are currently in use
- b. Total User licenses – number of licenses bought with this subscription
- c. Missing User licenses – number of licenses missing for your configuration if there are more mapped Dynamics 365 users than the total number of user licenses.
- d. Mapped Dynamics 365 Users – number of users that are mapped between SharePoint and Dynamics 365
- e. Total Dynamics 365 Users – number of existent users in Dynamics 365
5.2 SharePoint Structure Creator Add-on
|
To trial or purchase the SharePoint Structure Creator, an add-on feature for CB Dynamics 365 to SharePoint Permissions Replicator, please visit our webshop: https://shop.connecting-software.com/sharepoint-structure-creator-saas-pricing. |
 NOTE:
NOTE:Scrolling down to the next section, you can find all active and future subscriptions for SharePoint structure creator add-on feature.

Expanding a subscription, you can see useful information, like validation period (start and end dates), the number of licenses bought with this subscription (if any), and other details about the subscription.
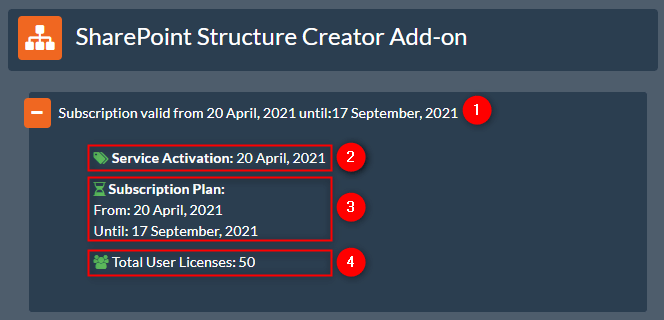
1. Subscription’s validation date
2. The day the subscription was activated
3. Subscription plan
4. The number of licenses bought with this subscription – if not showing, then it means that the value is taken from the main subscription under “Valid Subscriptions” section.
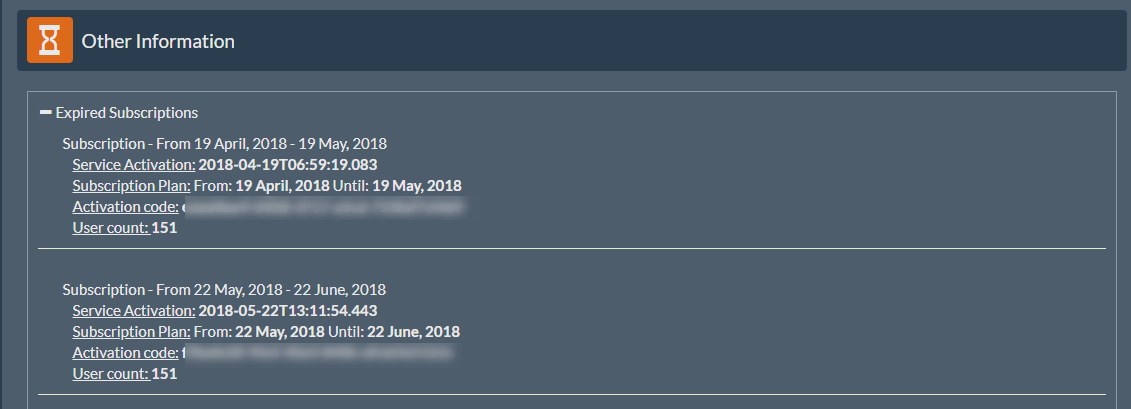
5.3 Other Information
In the last section, you can find all subscriptions that are already expired
6. Login to your account
Please navigate to our SaaS portal (here). You need to login to your SaaS portal account if you have one already or create a new one.
7. Configuration wizard (initial setup)
The configuration wizard is a new streamlined way of setting up the configuration to get the replication to work.
The configuration wizard guides you through the basic setup, directly after you log in for the first time. However, you can run the configuration wizard at any time via Configurations by clicking on the Create New button.
You can run the configuration wizard at any time via Dashboard quick links section. In case you have one or more configurations, you will be redirected to the Welcome page to choose between creating a new configuration via configuration wizard or activating an existent configuration. Please look into section 3.6 for more information about how activate an existent configuration.
7.1 Naming the configuration
You start by specifying a name for your configuration. By giving the configuration a meaningful name, it is easier to find it later in the list.

Click the Next button to proceed to the next step and configure a connection for Dynamics 365.
7.2 Configuring Dynamics 365 connection
In this step, you will need to configure Dynamics 365 connection.
|
If you are unable to connect to Dynamics 365, please try to log in via browser to make sure that you have entered valid information. |
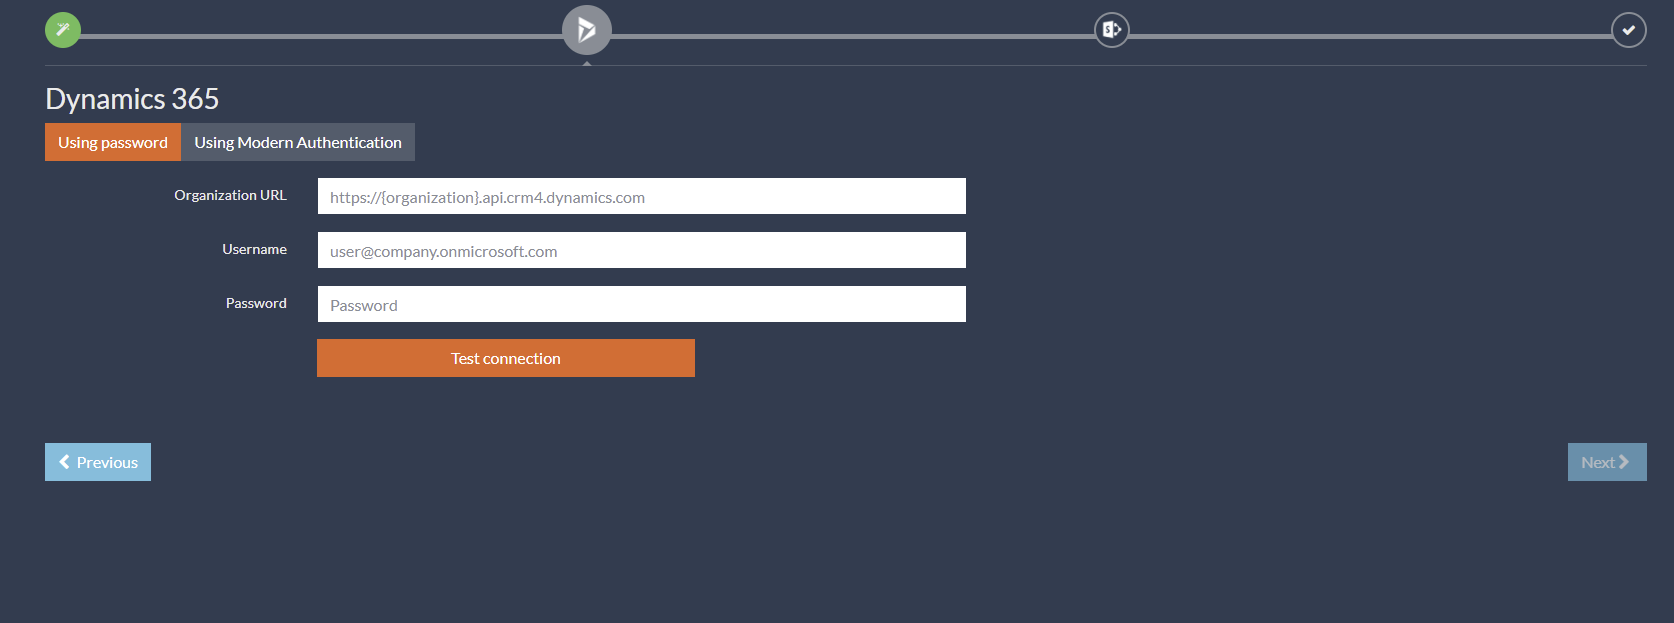
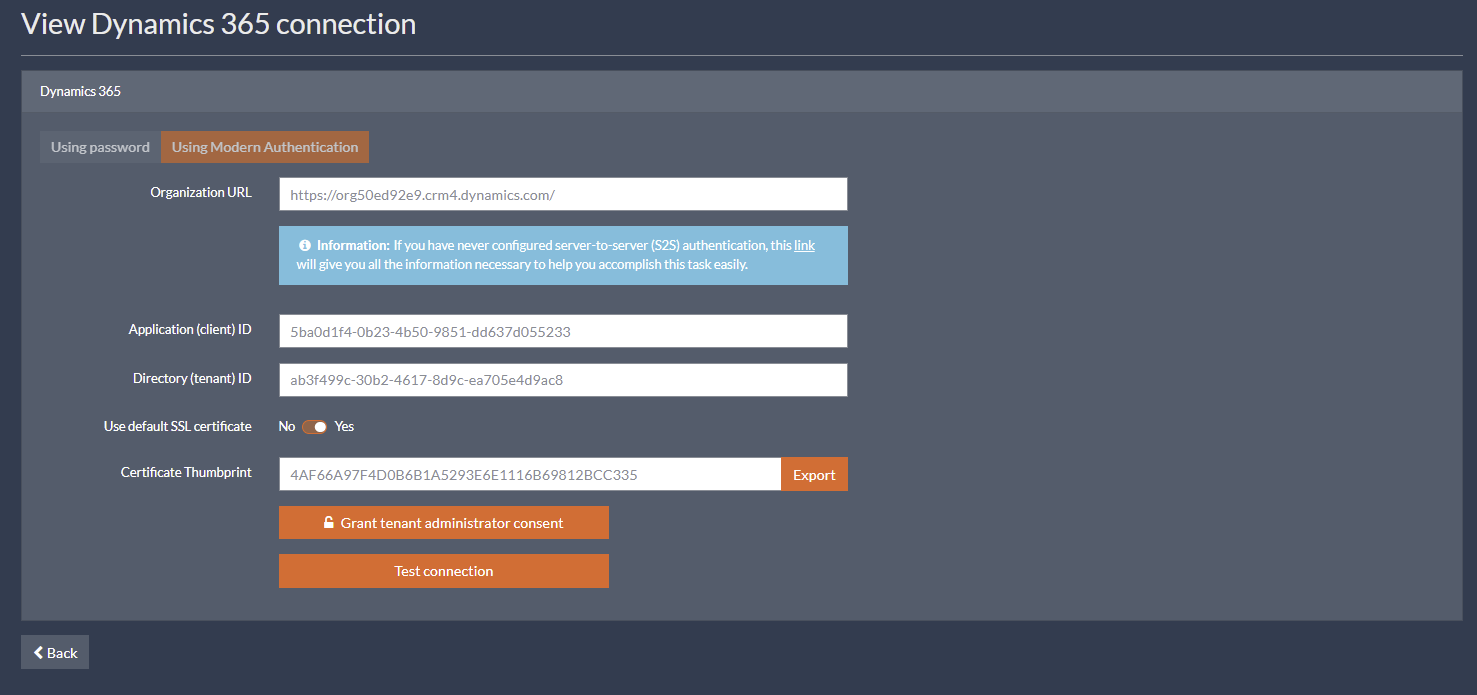
To configure Dynamics 365, you can choose between Using Password Authentication or Using Modern Authentication and then set up the following connection properties:
- Organization URL – The full address of your Dynamics 365 instance. Examples:
- https://OrganizationName.api.crm4.dynamics.com/
- https://CrmName.contoso.com/OrganizationName/
To be able to proceed to the next step, you need to fill in all required fields and then test your server connection.
Click on the Test connection button to test your server connection.
7.2.1 Using Password Authentication
For password authentication, you need a single user, let’s call him “service user”. The user needs to have the necessary privileges in Dynamics 365 (typically a System Administrator role, for more information see section 3.2.3).
Fill in the form with the following (see figure below):
- User – The login of the user who is System Administrator. Examples:
- User@OrganizationName.onmicrosoft.com
- contoso\user
- Password – The password of the Dynamics 365 user.
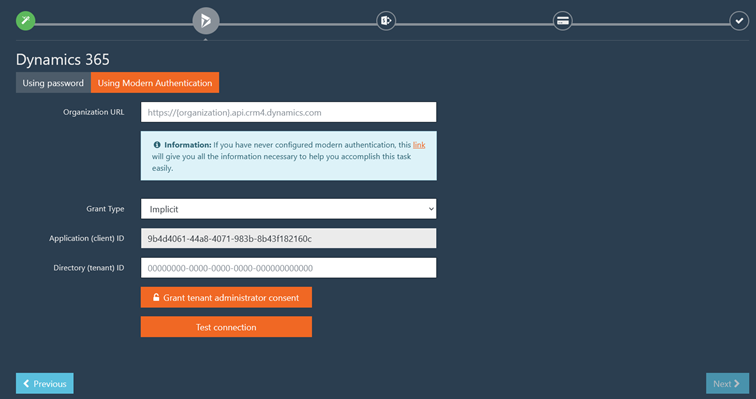
7.2.2 Using Modern Authentication
Our software supports the following flows:
- Implicit Grant (via certificate)
- Authorization Code Grant (via client secret)
7.2.2.a Implicit
To setup modern authentication via implicit grant type, you’ll need to perform additional steps as described in the following sections.
Fill in the form
Fill in the form with the following (see figure below):
- Grant Type – The grant type used for authorization. There are two grant options available: Implicit and Authorization Code. Select Implicit.
- Directory (Tenant) ID – The ID of your Azure AD instance.
Click on the Grant tenant administrator consent button to grant admin consent to the application. Only needs to be done once.
Create an application user
|
Only after you have granted consent, you must then create the application user in Dynamics 365. You can grant admin consent to an application via the “Grant tenant administrator consent” button. |
 WARNING:
Do the following:
- Sign-in to the Power Platform admin center as a System Administrator.
- Select Environments, and then select an environment from the list.
- Select Settings.
- Select Users + permissions, and then select Application users.
- Select + New app user to open the Create a new app user page.
- Select + Add an app, type in the Application (client) ID assigned to your app by Azure AD when the app was created, select the app, and then click on Add.
- Under Business Unit, select the business unit you want to add the user.
- After choosing a business unit, click on for Security Roles, select a security role (see section 3.2.3), and then select Save.
- Select Create.
7.2.2.b Authorization code
To setup modern authentication via authorization code grant type, you’ll need to perform additional steps as described in the following sections.
Register an application in Azure AD
|
Note that you can also create only one Azure AD app for both Dynamics 365 and SharePoint. |
 NOTE:
NOTE:Do the following:
- Open the Azure portal.
- In the Azure portal, on the Azure Active Directory tab, select App registrations, and then select New application registration.
- When the Register an application page appears, enter your application’s registration information.
- When finished, select Register.
- In the Authentication page, select Add a platform, select Web, and then enter the redirect URI https://permissions-replicator-saas.connecting-software.com/consent-callback for your application.
- In the Certificates & secrets page, go to Client secret and click New client secret and create new secret and copy generated secret for use it in next steps.
- In the API permissions page, select Add a permission.
- From Microsoft APIs, select Dynamics CRM.
- Under Delegated permissions, you must select user_impersonation.
Fill in the form
Fill in the form with the following (see figure below):
- Grant Type – The grant type used for authorization. There are two grant options available: Implicit and Authorization Code. Select Authorization Code.
- Application (Client) ID – The ID assigned to the single- or multi-tenant app by Azure AD when the app was registered.
- Client Secret – The client secret of the app registration in the Azure AD.
- Directory (Tenant) ID – The ID of your Azure AD instance.
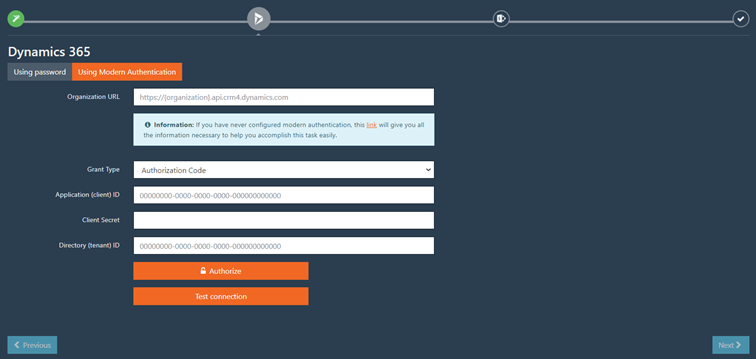
Click on the Authorize button to pass authorization process.
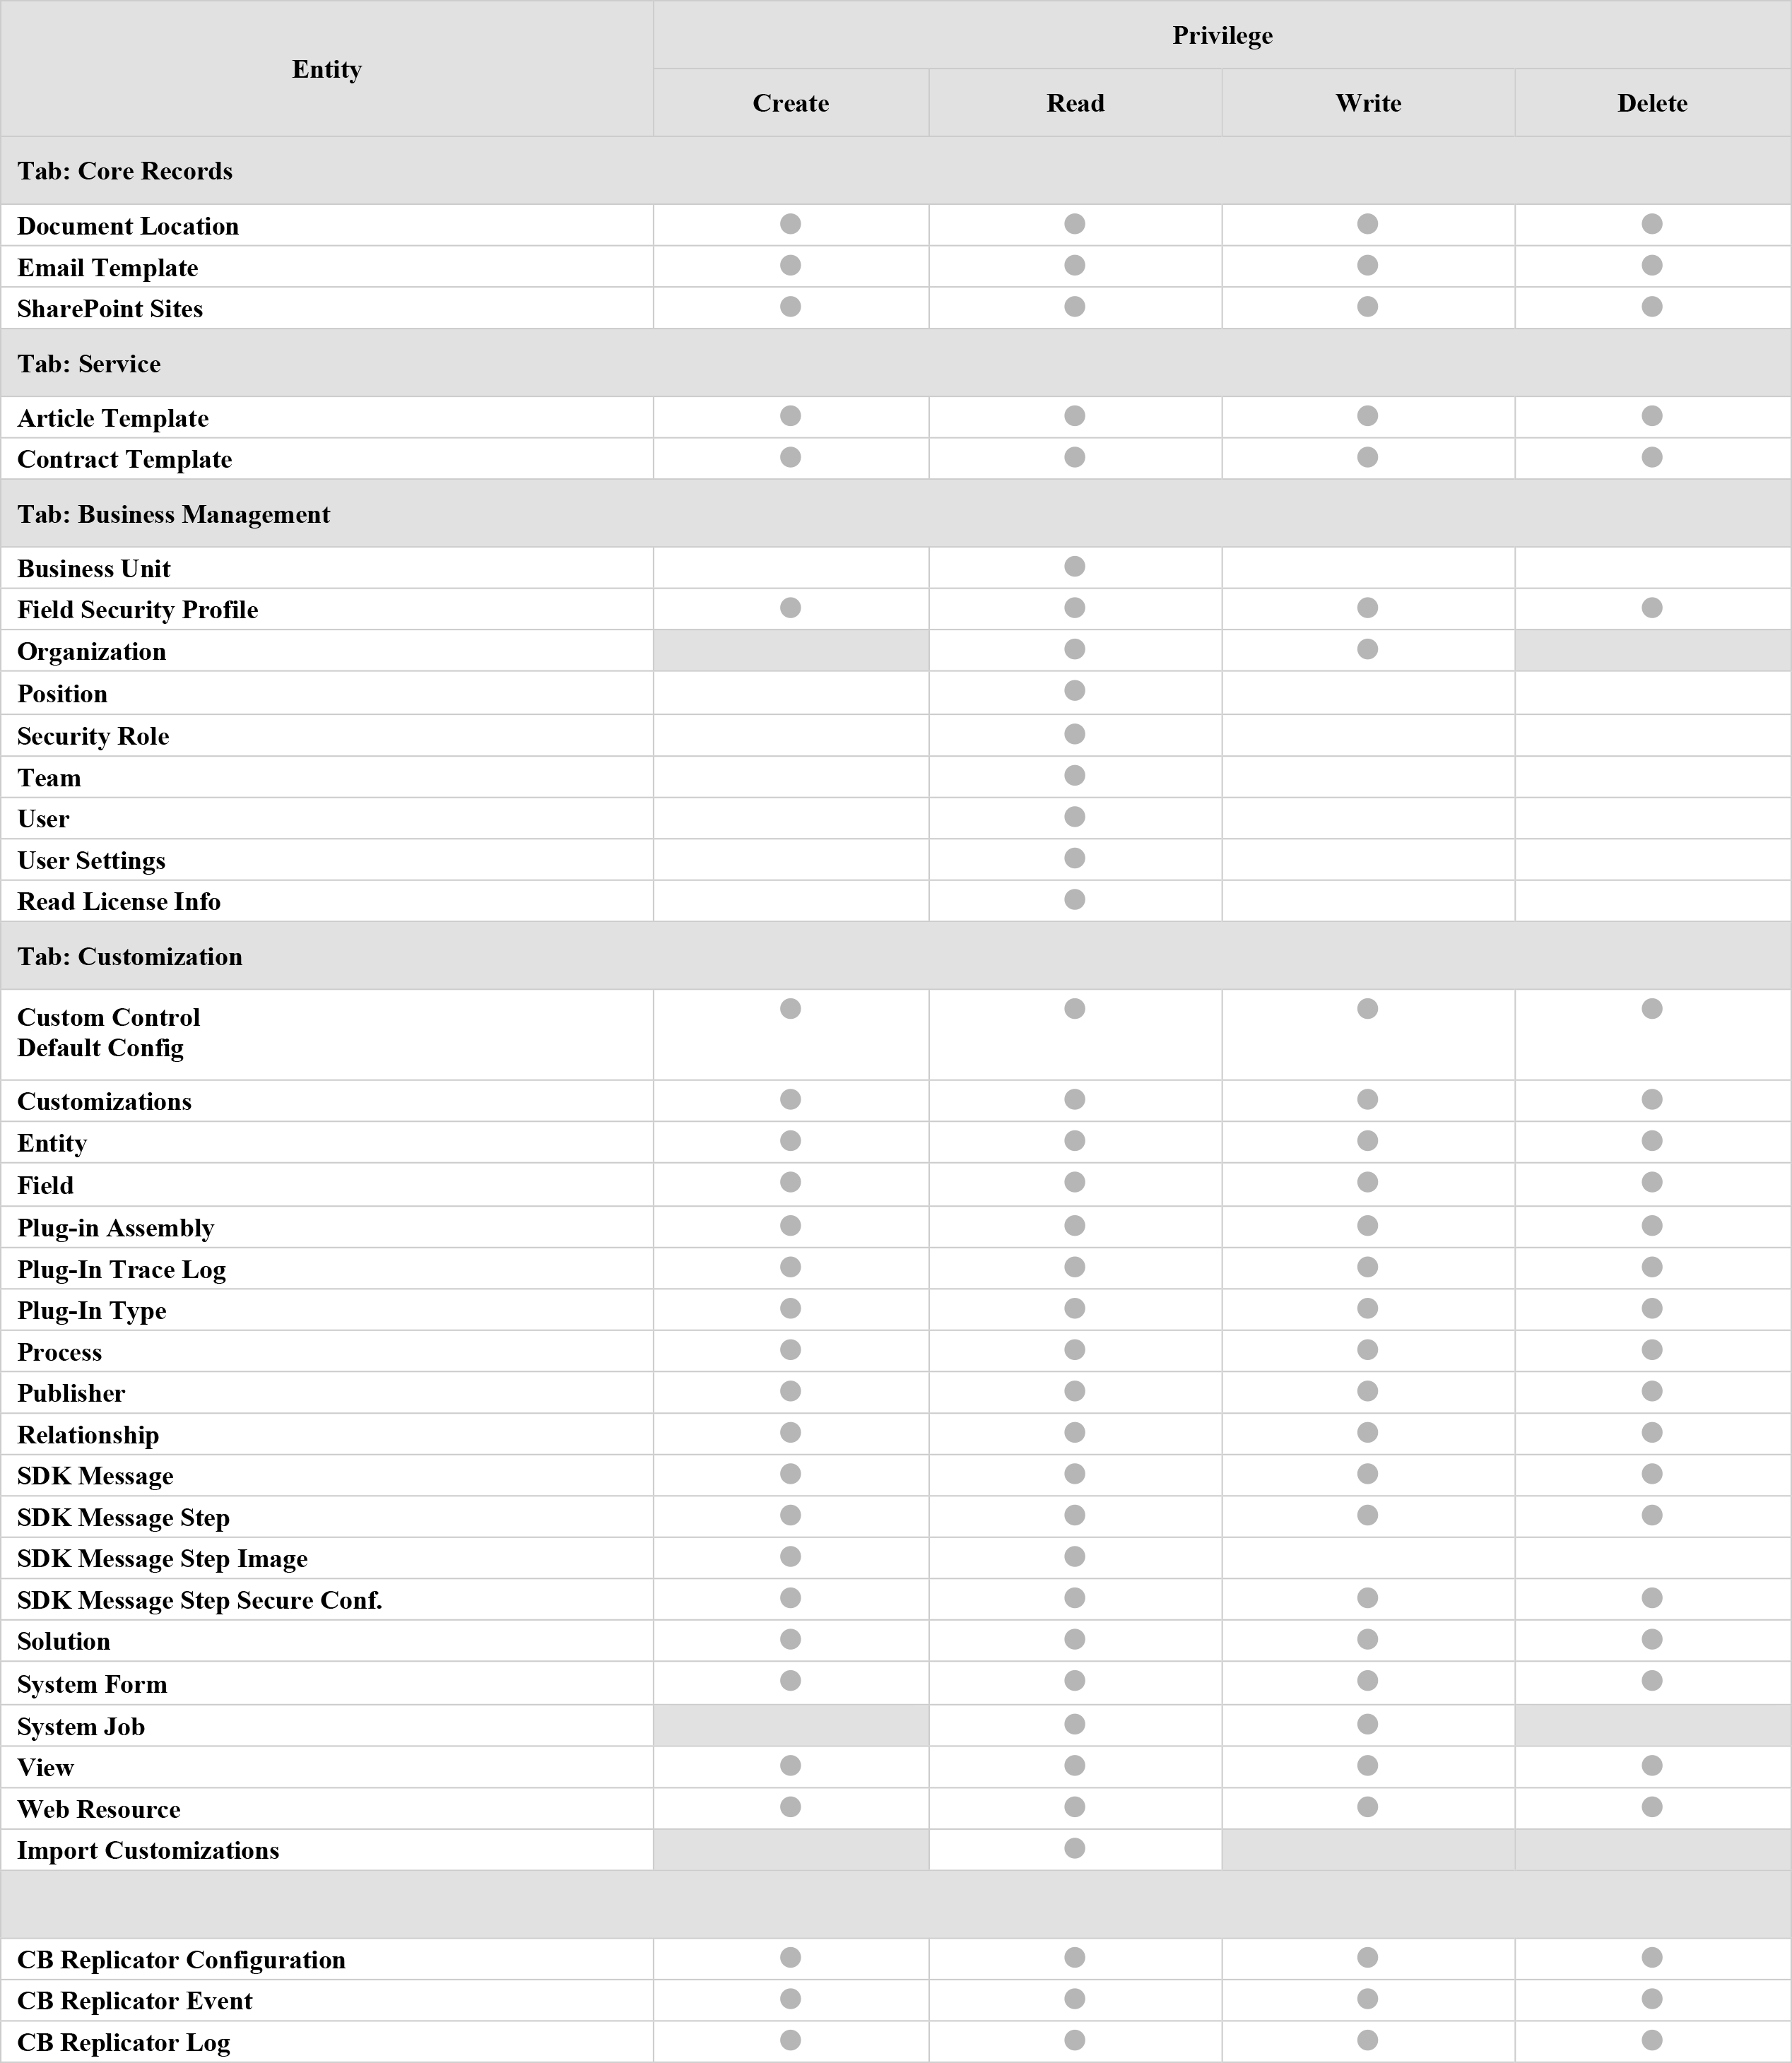
7.2.3 Minimum required Dynamics 365 privileges
CB Replicator requires a user to access Dynamics 365. This user must be assigned a role with certain privileges for CB Replicator to work properly. The easiest way to make sure the user has the necessary privileges is to assign System Administrator role.
It is, however, possible to use a much more restrictive security role, that is, a role with fewer privileges in Dynamics 365.
Table 1 indicates the minimum required privileges that need to be part of the role assigned to the user used to access your Dynamics 365. All the privileges require Organization (global) access level.
|
In addition to the entities listed in Table 1, all entities that you intend to replicate need to have global read privilege. You can find all these entities listed in Configurations > Settings > Entity filter. |
Table 1: Minimum required privileges for Dynamics 365 user / application user
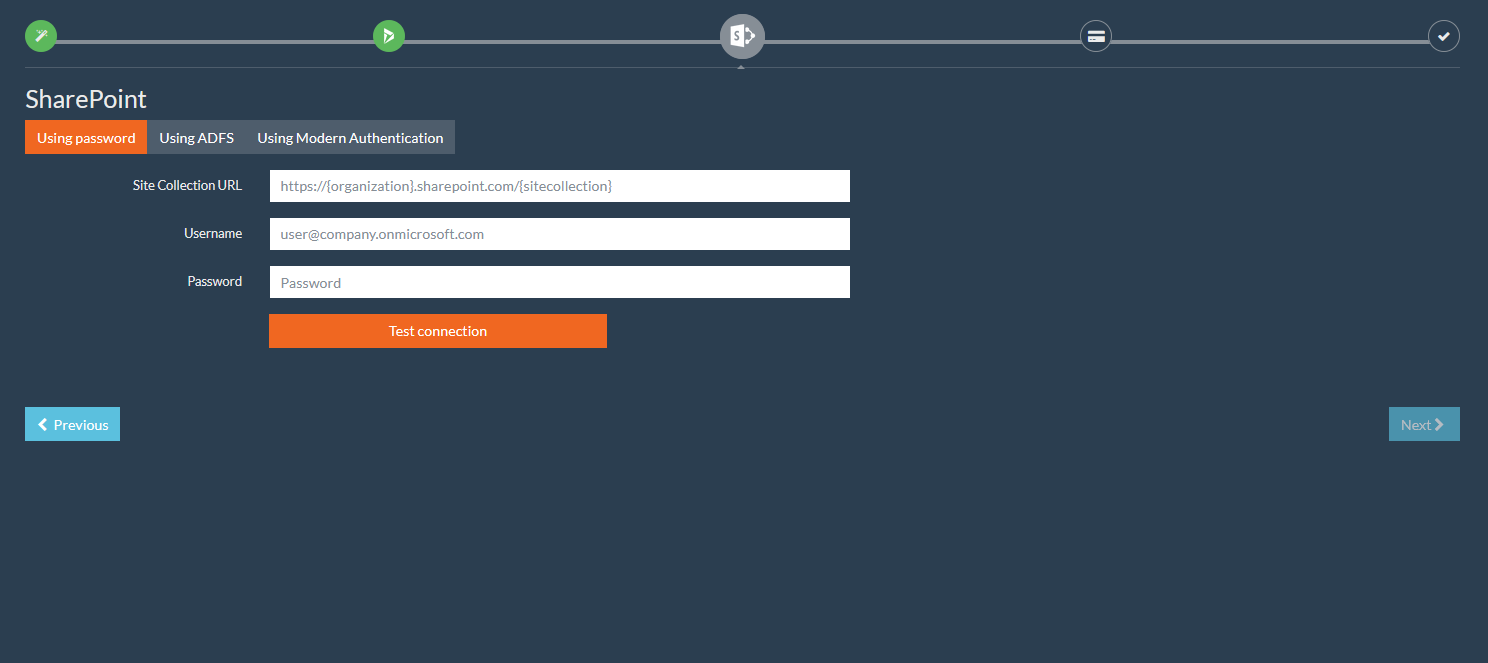
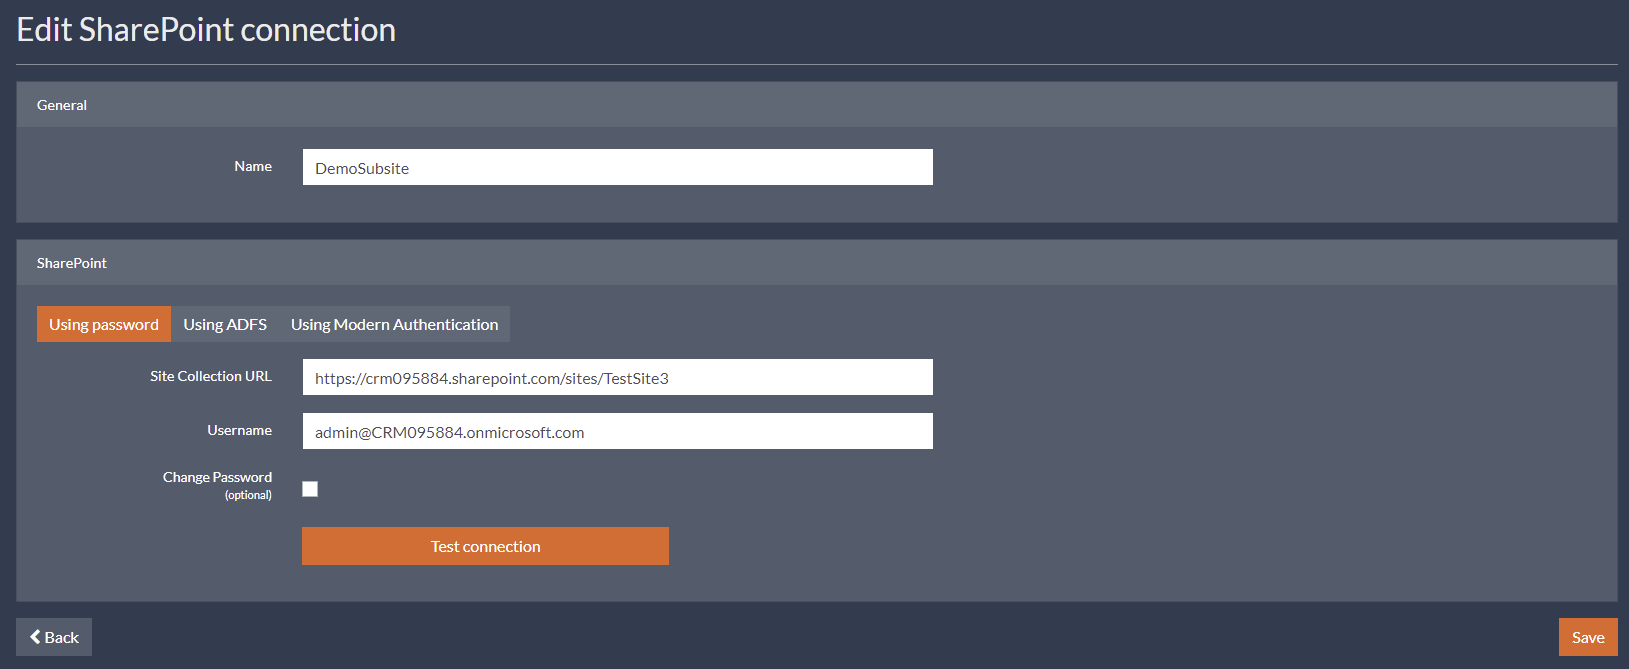
7.3 Configuring SharePoint connection
In this step, you will need to configure SharePoint connection.
|
If you are unable to connect to SharePoint, please try to login via browser to make sure that you have entered valid information. |
|---|
 NOTE:
NOTE:To configure Dynamics 365, you can choose between Using Password Authentication, Using ADFS or Using Modern Authentication and then set up the following connection properties:
- Site Collection URL – The full address of your SharePoint site collection. Examples:
- https://OrganizationName.sharepoint.com
- https://OrganizationName.sharepoint.com/sites/SiteName
To be able to proceed to the next step, you need to fill in all required fields and then test your server connection. Keep in mind that when you click on the Next button you won’t be able to go back and change your configuration, everything will be already created.
Click on the Test connection button to test your server connection.
7.3.1 Using Password Authentication
For password authentication, you need a single user that is Site Collection Administrator, let’s again call him “service user”.
Fill in the form with the following (see figure below):
- User – The login of the user who is Site collection administrator. Examples:
- User@OrganizationName.onmicrosoft.com
- contoso\user
- Password – The password of the SharePoint user.
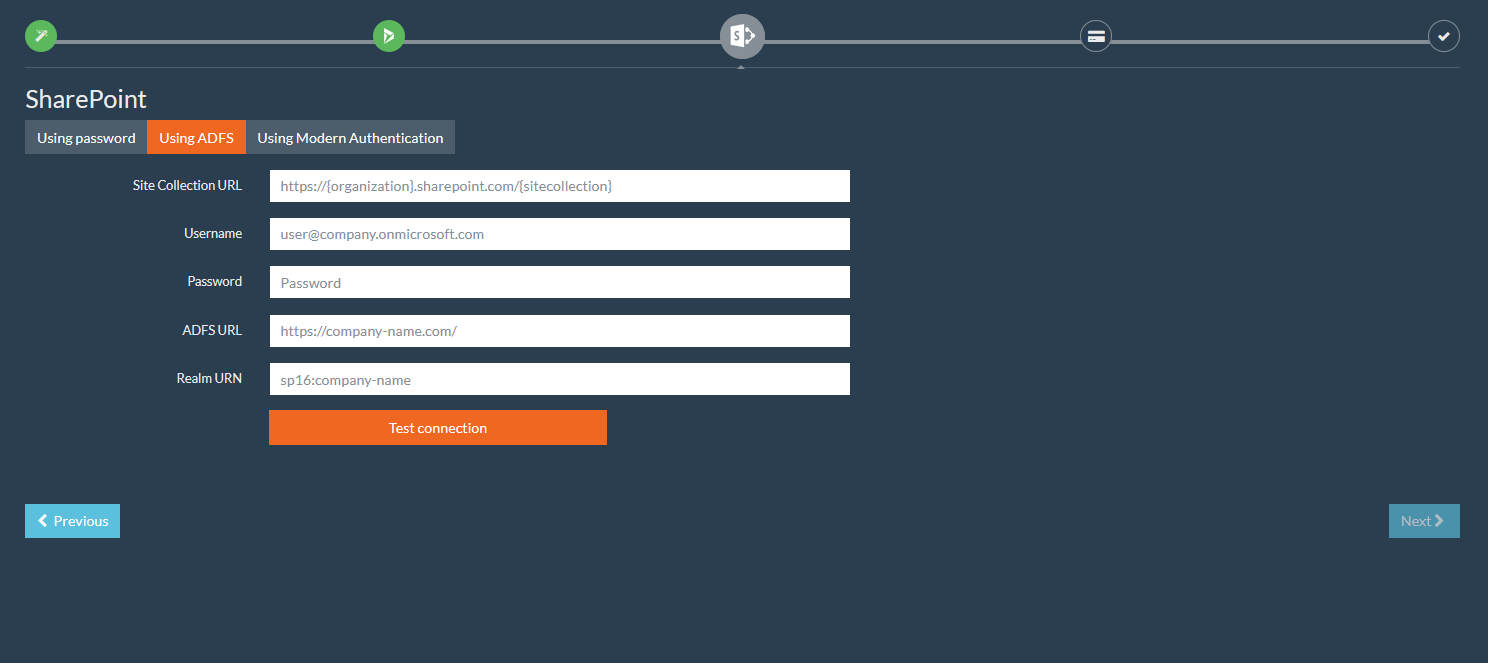
7.3.2 Using AD FS authentication
For AD FS authentication, similarly, you need a single user that is Site Collection Administrator, let’s again call him “service user”.
Fill in the form with the following (see figure below):
- User – The login of the user who is Site Collection Administrator. Examples:
- User@OrganizationName.onmicrosoft.com
- contoso\user
- Password – The password of the SharePoint user.
- ADFS URL – The base URL of the ADFS 2.0 service endpoints (e.g. https://adfs.contoso.com).
- Realm URN – The uniform resource name (URN) of the security realm federated with the given ADFS server (e.g. urn:sharepoint.contoso).
7.3.3. Using Modern Authentication
Our software supports the following flows:
- Implicit Grant (via certificate)
- Authorization Code Grant (via client secret)
7.3.3.a Implicit
To setup modern authentication via implicit grant type, you’ll need to perform additional steps as described in the following sections.
Fill in the form
Fill in the form with the following (see figure below):
- Grant Type – The grant type used for authorization. There are two grant options available: Implicit and Authorization Code. Select Implicit.
- Directory (Tenant) ID – The ID of your Azure AD instance.
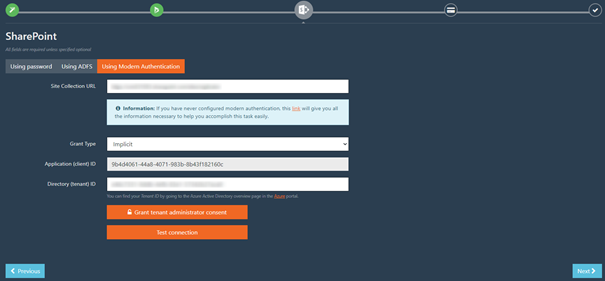
Click on the Grant tenant administrator consent button to grant admin consent to your application.
7.3.3.b Authorization code
To setup modern authentication via authorization code type, you’ll need to perform additional steps as described in the following sections.
Register an application in Azure AD
|
Note that you can also create only one Azure AD app for both Dynamics 365 and SharePoint. |
Do the following:
- Open Azure portal.
- In Azure portal, on the Azure Active Directory tab, select App registrations, and then select New application registration.
- When the Register an application page appears, enter your application’s registration information.
- When finished, select Register.
- In the Authentication page, select Add a platform, select Web, and then enter the redirect URI https://permissions-replicator-saas.connecting-software.com/consent-callback for your application.
- In the Certificates & secrets page, go to Client secret and click New client secret and create new secret and copy generated secret for use it in next steps.
- In the API permissions page, select Add a permission.
- From Microsoft APIs, select SharePoint.
- Under Delegated permissions, you must select, at a minimum AllSites.FullControl permissions.
|
Delegated permission AllSites.FullControl is not giving user access to any site collection. Our software will have access only to site collections that user has access to. For our product the user needs to be Site collection administrator. |
 NOTE:
NOTE:Fill in the form
Fill in the form with the following (see figure below):
- Grant Type – The grant type used for authorization. There are two grant options available: Implicit and Authorization Code. Select Authorization Code.
- Application (Client) ID – The ID assigned to the single- or multi-tenant app by Azure AD when the app was registered.
- Client Secret – The client secret of the app registration in the Azure AD.
- Directory (Tenant) ID – The ID of your Azure AD instance.
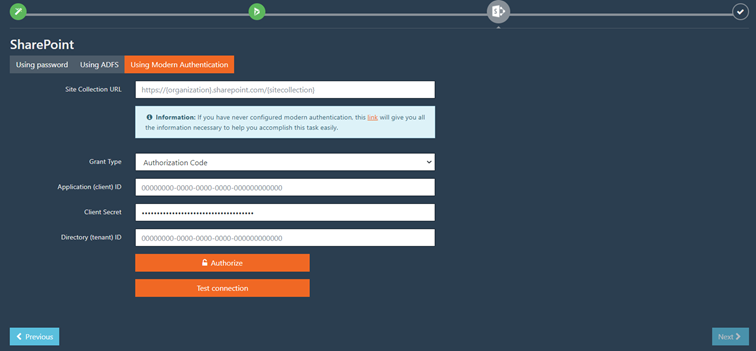
Click on the Authorize button to pass authorization process.
7.4. Token Activation
In this step, you can choose to activate the service at this time or skip activation.
|
You can activate the service later via Configurations > Activate service. |
If you purchased a trial or a regular subscription you should have received an activation code via e-mail.
To activate the service, copy the activation code from the e-mail you received and paste it into the Activation Code field and click on the Activate Token button (see figure below).

A confirmation message will be displayed confirming that the service was activated successfully.
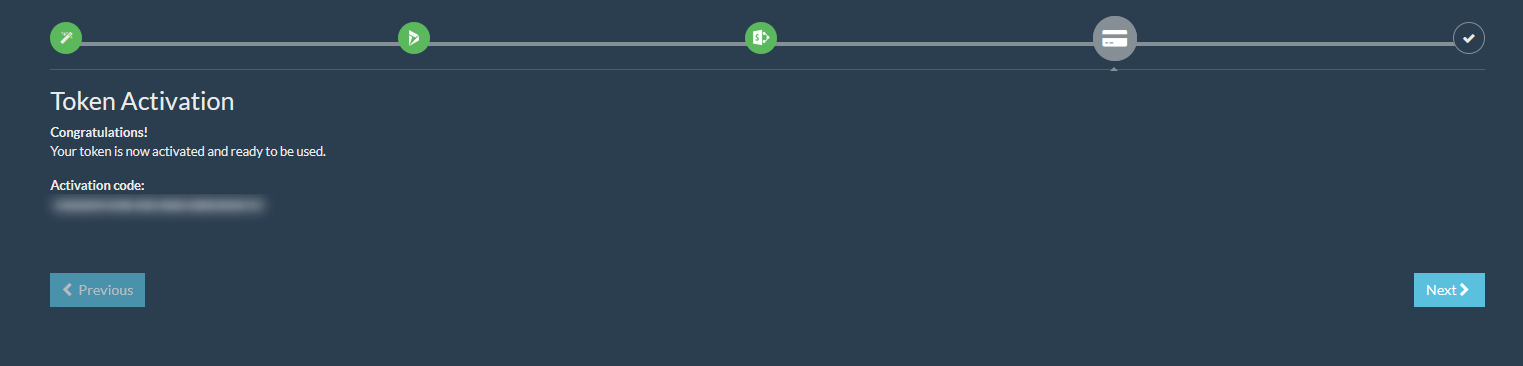
Once done, you can proceed to the final step.
7.5. Starting Replication
In the final step, you can choose whether to start replicating the permissions on the configuration immediately after clicking on the Finish button.
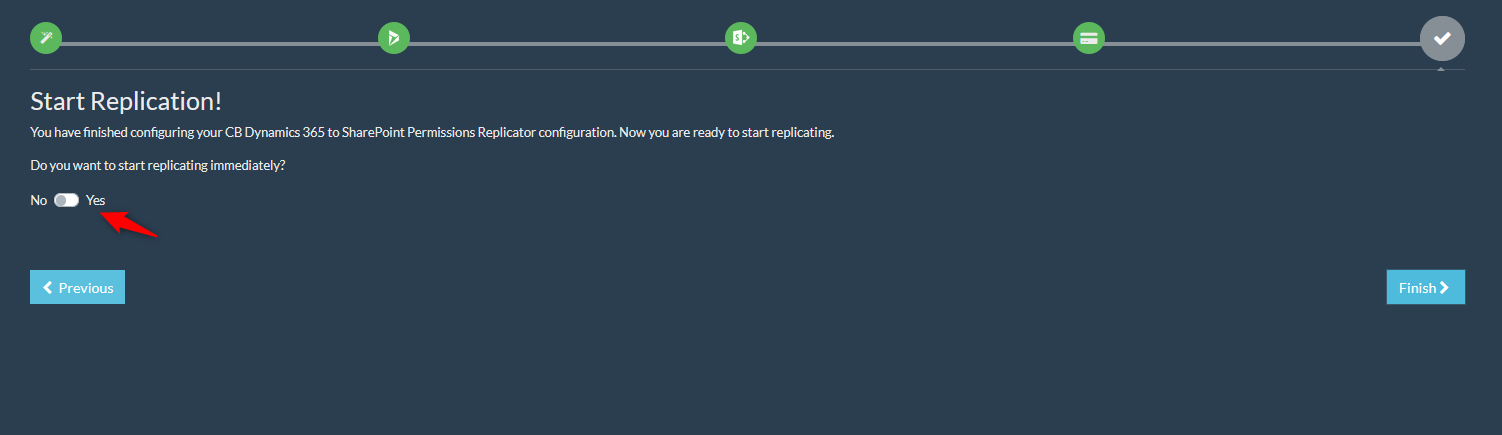
You can start the replication process anytime later by clicking on Start button at Configurations page.
7.6 Activating an existent configuration
In this step, if you click on the Activate code on an existent Configuration, you need to select the Configuration Name that you wish to activate from the selection box and then click on the Activate button.
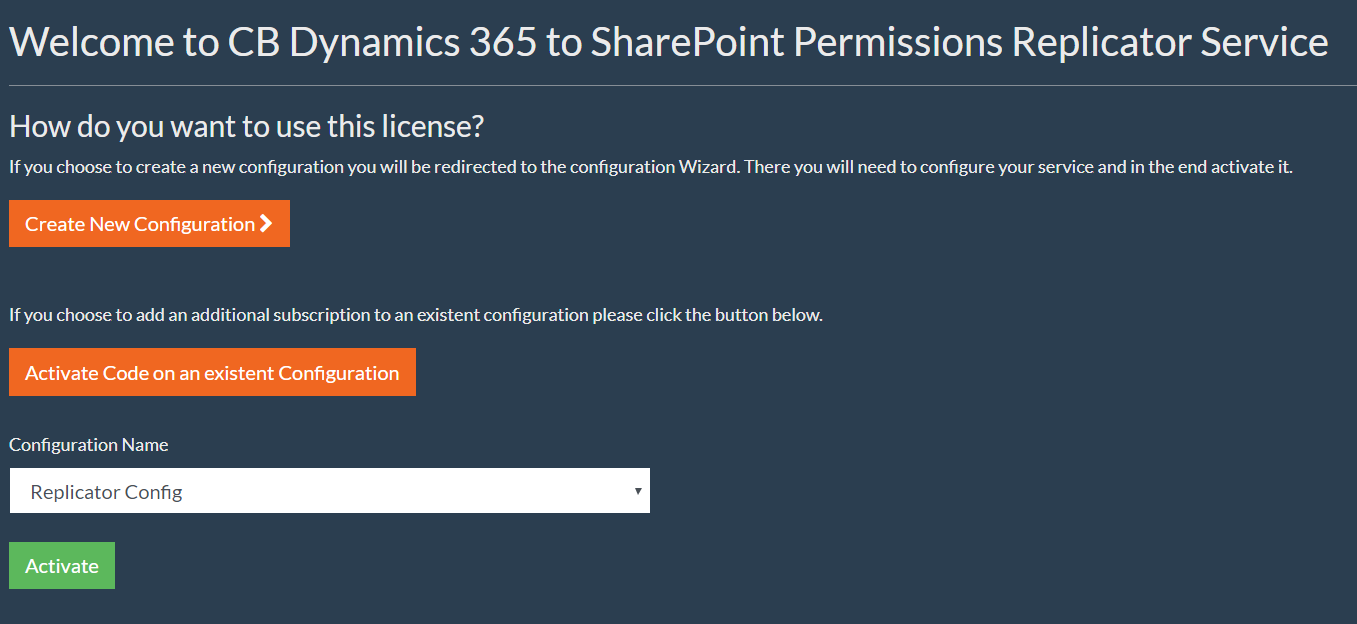
You will be requested to type in the Activation Code (see image below).
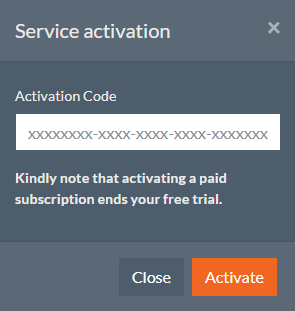
If you purchased a trial or a regular subscription you should have received the activation code via e-mail. The Activation Code field should be automatically pre-filled. If that is not the case, copy the activation code from the e-mail you received and paste it into the Activation Code field and click on the Activate button. A confirmation message will be displayed confirming that the service was activated successfully.
8. Configurations
A configuration represents a single Dynamics 365 connection and one or more SharePoint connections. The configurations are independent from each other and each has its own settings
you can manage all the configurations via Configuration > CB Dynamics 365 to SharePoint Permissions Replicator on the navigation bar
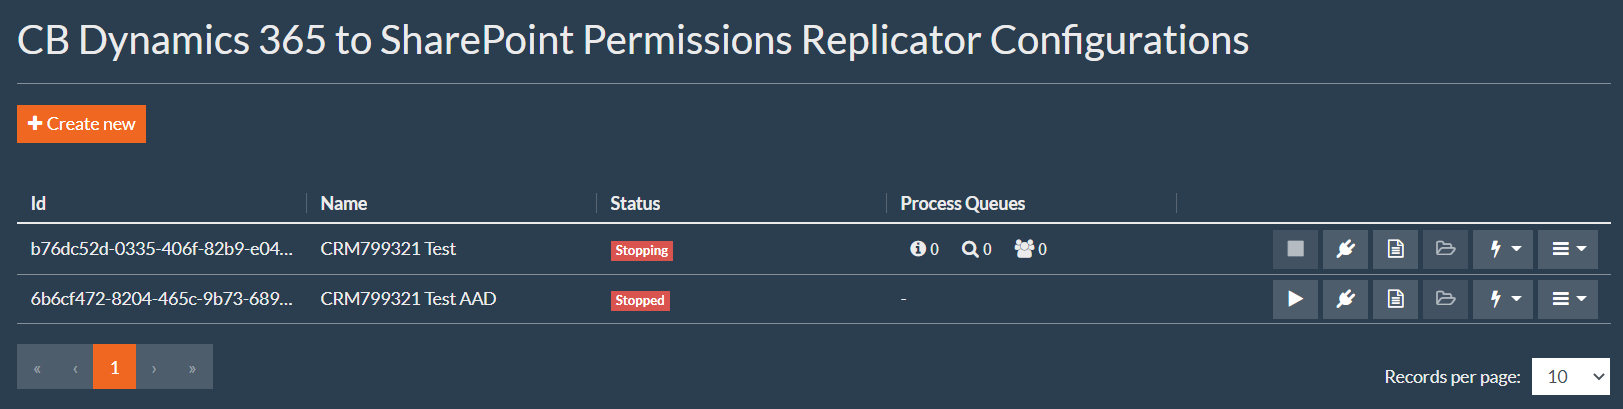
After creating a configuration, you can start the replication process. To do so, click on the  button.
|
There could be a delay before the permissions are replicated to SharePoint as the “CB Dynamics 365 to SharePoint Permissions Replicator” is relying on service queues for its execution. |
|---|
 NOTE:
NOTE: The Status column indicates the status of the replication process. The possible statuses are:
- Starting – The replication process is starting. This is an intermediate state after clicking the Start button.
- Started – The replication process is running. The Dynamics 365 permissions are being replicated into SharePoint.
- Stopping – The replication is stopping. This is an intermediate state between Started and Stopped state after clicking the Stop button.
- Stopped – The replication process is stopped. Dynamics 365 permissions are not being replicated into SharePoint.
- Initial Loading – Initial processing.
After starting the replication process, the Process Queues column indicates the status of the queues. The possible statuses are, from left to right:
- Event queue holds Dynamics 365 events to be processed by CB Replicator. Events are processed one by one. An event can trigger a request to update permissions that is forwarded to the evaluation queue.
- Evaluation queue holds SharePoint Document locations for evaluating permissions. The queue items are processed by Evaluation Workers. Workers calculate permissions for a document location and check permission changes. If there are changes, the item is forwarded to the Write queue.
- Write queue holds SharePoint Document locations for writing permissions. The queue items are processed by Writer workers that are responsible for writing the unique permissions to the SharePoint item.
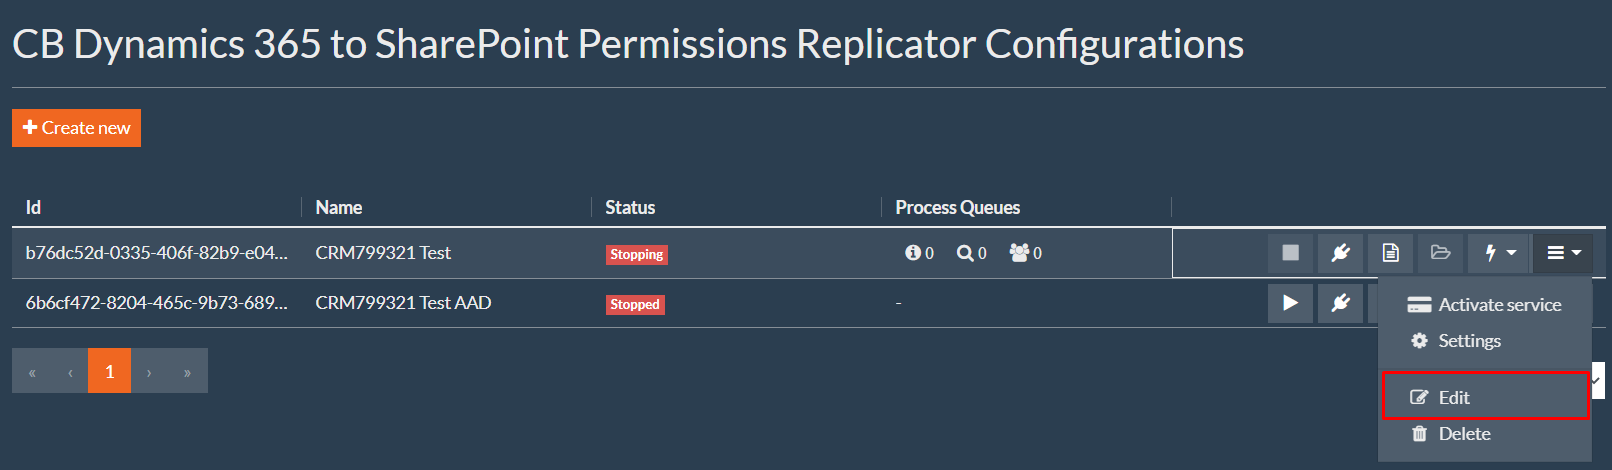
You can modify an existing configuration by expanding the burger icon  next to any configuration and then click on the Edit option as shown in the figure below.
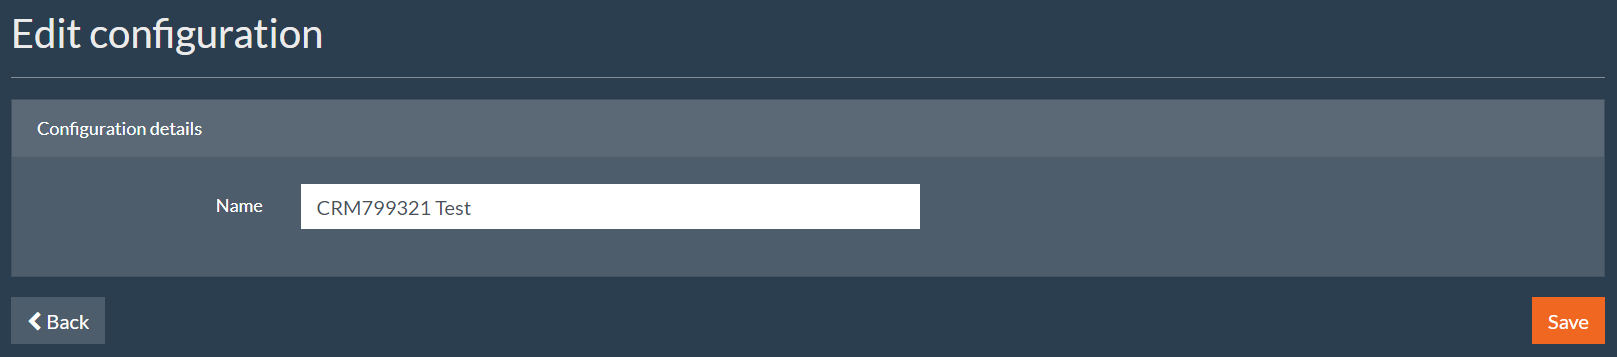
The Edit configuration page allows you to edit configuration details such as its Name as shown in figure below.
You can delete an existing configuration by expanding the burger icon  next to any configuration and then click on Delete option (see figure below). You will be asked to confirm.
|
When deleting a configuration, it will be permanently deleted with all activated subscriptions (even paid ones). These subscriptions are not transferable to other configurations. |
 NOTE:
NOTE: 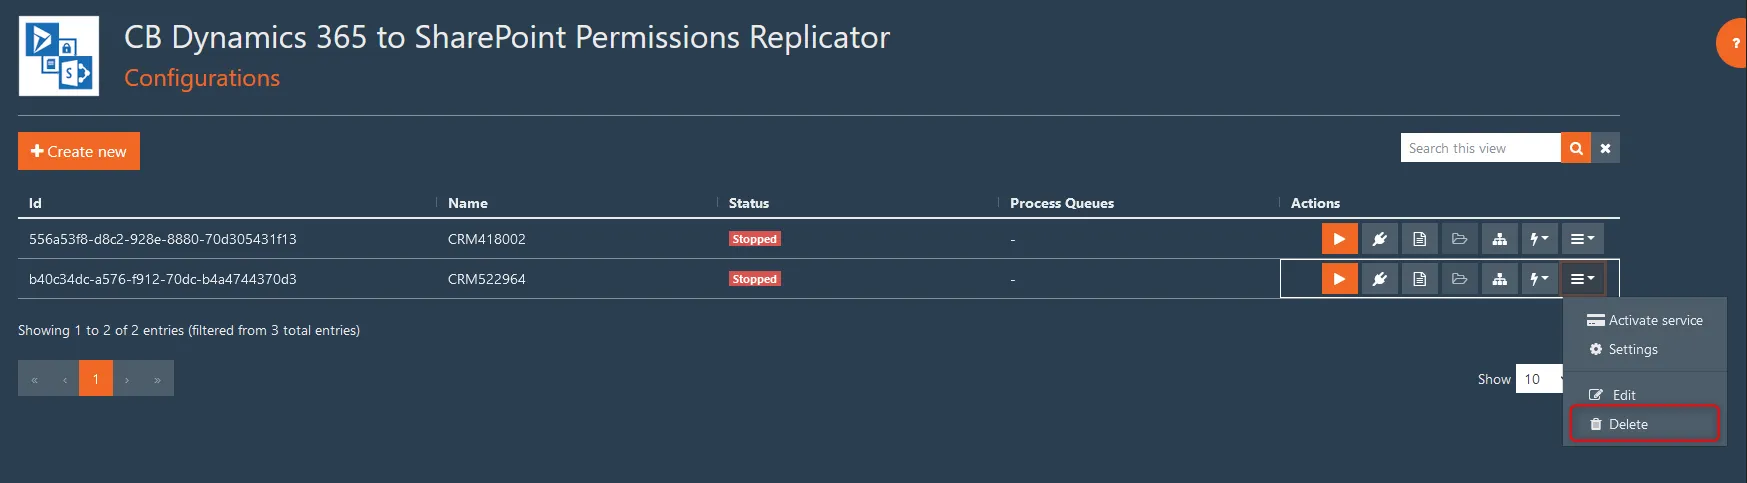
To manage the existing connections, click on the icon  next to any configuration. To start, you will have a Dynamics 365 connection and a SharePoint connection configured via Configuration Wizard. Refer to section 6 for more information.
To help you with basic troubleshooting, the service keeps track of the replication process. To view activity log, click on the icon  next to any configuration. You will be redirected to the History Logs page to view detailed logs of the activity. Refer to section 6 for more information.
After permissions are set on a SharePoint document location based on Dynamics 365 access rights, the service will no longer modify them unless a change in Dynamics 365 security is made. That said, after starting the replication process, you can manually overwrite permissions of any SharePoint document location at any time by clicking on the icon  next to any configuration.
You can also take advantage of SharePoint Structure Creator add-on by clicking on the icon ![]() next to any configuration. Refer to our website for more information.
next to any configuration. Refer to our website for more information.
You can quickly perform commonly used actions in an existing configuration by expanding the burger icon  next to any configuration (see image below).

After starting the replication process, the service goes through the entire security model and checks all SharePoint document locations. This process is known as full replication iteration. After the initial full iteration, and while the replication process is running, only events occurred in Dynamics 365 will be processed. You can manually force full replication iteration at any time, by clicking on Force full iteration option.
|
In some cases, the full iteration can be started automatically during replication process if the algorithm evaluates that it is easier to run a full iteration rather than to perform all the changes. |
 NOTE:
NOTE:In case you want to delete the CB Replicator solution from Dynamics 365, when the replication process is stopped, and unregister SDK message processing steps by clicking on Clear Sdk message processing steps option.
To clear local SharePoint permission cache, click on Clear SharePoint permission cache option while the replication process is stopped. This action will force overwrite of SharePoint permissions even when there is no change from the Dynamics 365 side.
Alternatively, you may want to only clear SharePoint group cache. To do so, click on Clear SharePoint group cache option. This action will force check of SharePoint groups and memberships even when there is no change from the Dynamics 365 side.
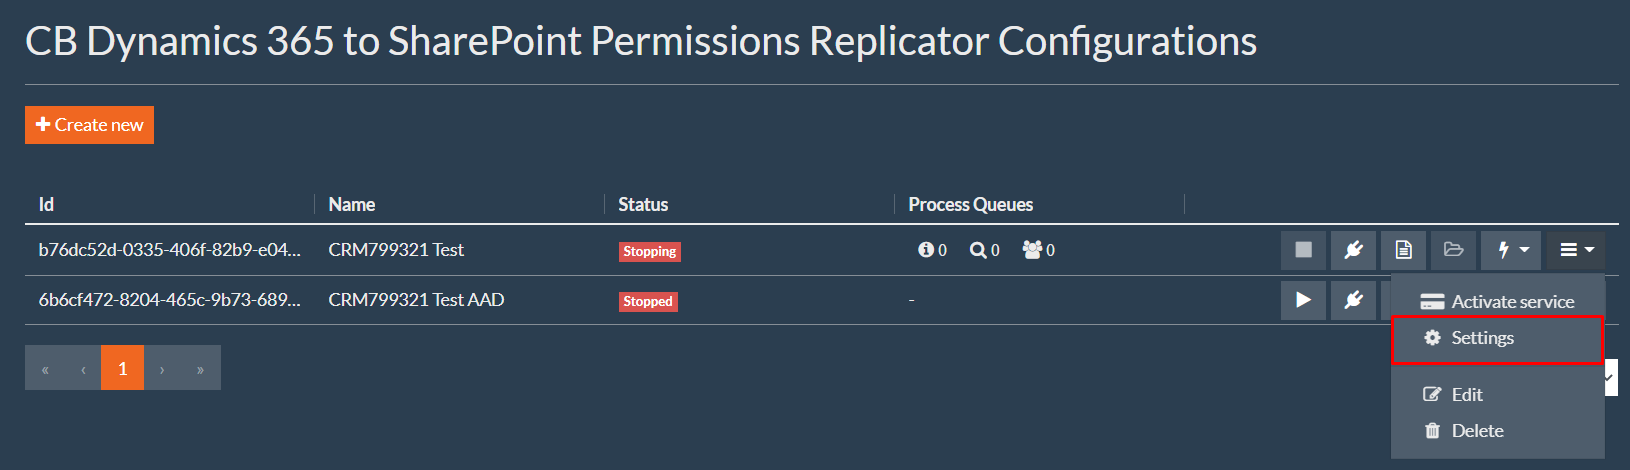
You can customize your configuration by expanding the burger icon  next to any configuration and then click on Settings option (see figure below). You will be redirected to the Settings page. Refer to section 11 for more information.
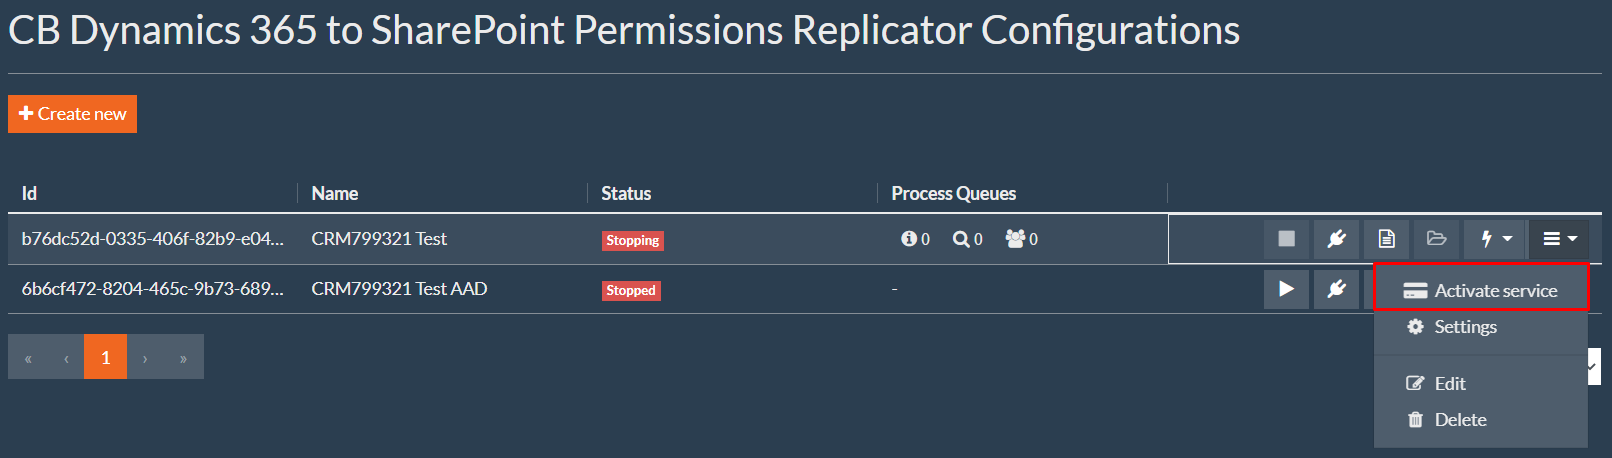
You can also activate/extend any configuration at any time by expanding the burger icon  next to any configuration and then click on Activate service option (see figure below). You will be prompted to enter your Activation Code.
9. Activate a configuration
To start replicating permissions, you need to activate the configuration via the activation code received after purchasing the service from the shop (https://test.connecting-software.com/dynamics-crm-sharepoint-permissions-replicator-pricing/).
If you already have the activation code, navigate to Configuration page, expand the burger icon  next to any configuration and then click on Activate service option. You will be prompted to enter your Activation Code.
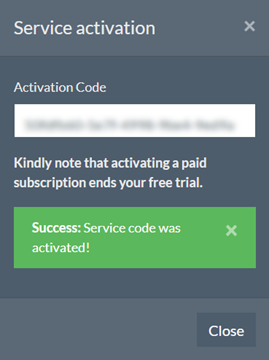
Paste the activation code into the Activation Code field in the Service Activation window and click on the Activate button (see figure below). The Activation Code has the following format: f305ca9c-4ee6-448c-8f34-aa9cacdbf307.

Once token is activated, a confirmation message will be displayed confirming that the service was activated successfully (see image below) and then you can close the Service Activation window.
10. Connections
Through the Connections page, you can add new connections or modify the connections that you have already created.
To access the Connections page, navigate to Configurations page and then click on the Connections icon  next to any configuration.
|
The connections can only be edited when the replication process is stopped by an authenticated tenant administrator. |
 WARNING:
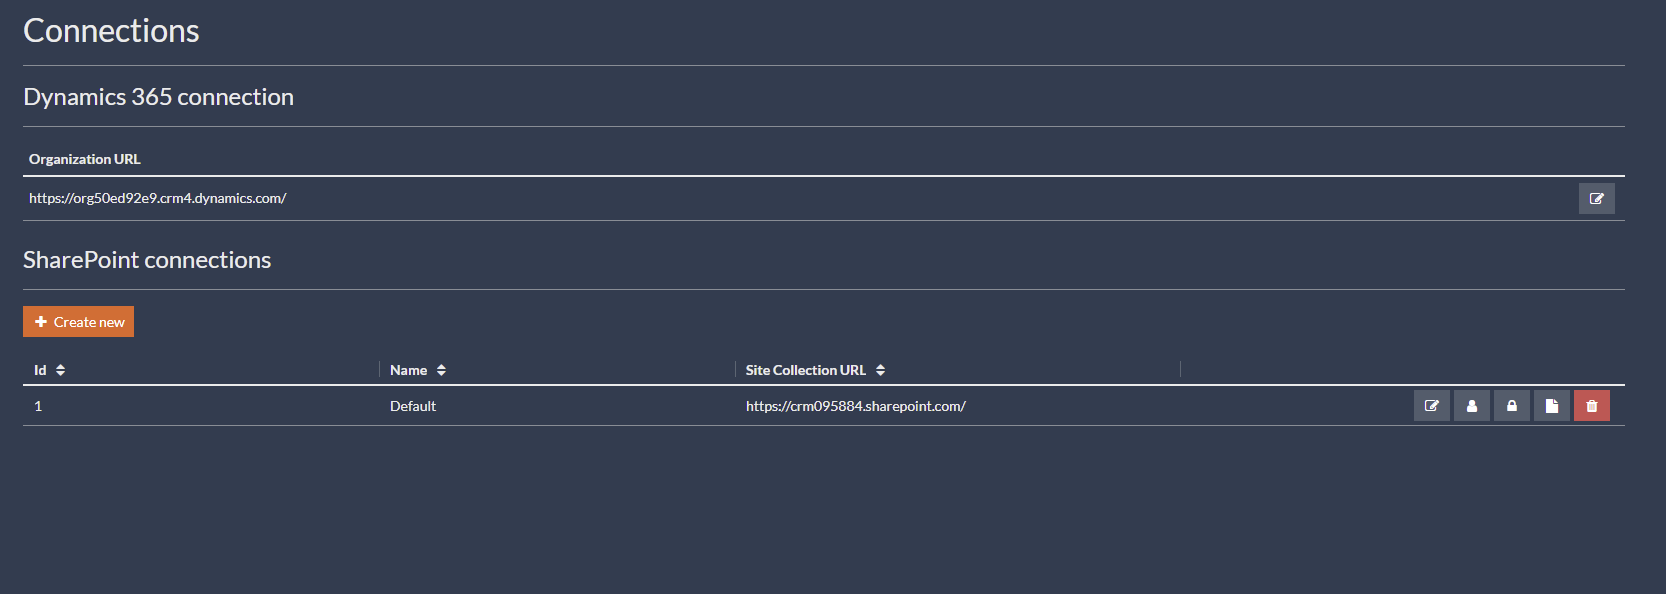
10.1 Dynamics 365 connection
Click on  to view details of your connection to Dynamics 365. You will be redirected to View Dynamics 365 connection page (see figure below).
Click on  to edit your connection to Dynamics 365. You will be redirected to Edit Dynamics 365 connection page (see image below). Refer to section 3.2 for more information about how to configure Dynamics 365 connection.

10.2 SharePoint connections
In case you have group storage set to SharePoint, you can configure multiple SharePoint connections. To do so, click on Create new and fill in the form. Refer to section 3.3 for more information about how to configure SharePoint connection.

Click on  to view/edit user mapping (see section 7).
Click on  to view/edit permission mapping (see section 8).
Click on  to view/edit explicit folder permissions (see section 6.3)
Click on  to delete a SharePoint site collection. You will be asked to confirm.
Click on  to edit a SharePoint connection. You will be redirected to Edit SharePoint connection page (see figure below).
10.3 Azure Active Directory connection
In case you have group storage set to Azure Active Directory, you need to configure a connection to Azure AD. Kindly note that you can only have a single SharePoint connection configured.
|
When using Azure AD as group storage, the AAD office group teams are not fully supported due to technical limitation in design of office groups. The office groups cannot be nested. |
 WARNING:
Click on the Configure button to configure a connection to Azure AD (see image below).
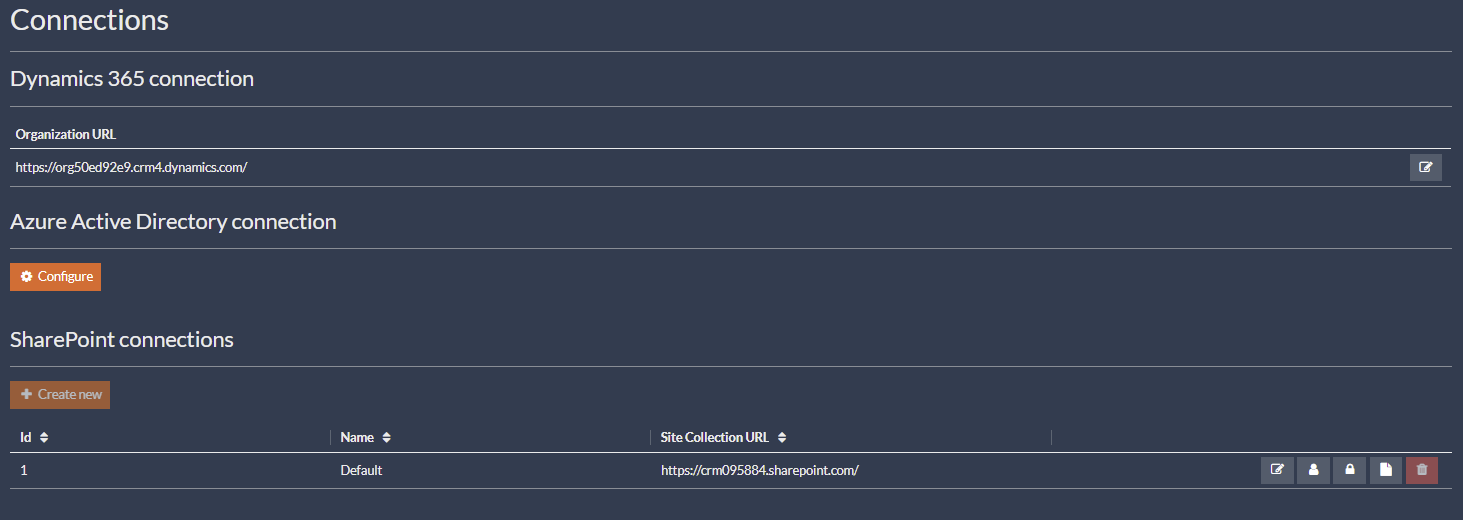
Fill in the form with the following (see figure below):
- Directory (Tenant) ID – The ID of your Azure AD instance.
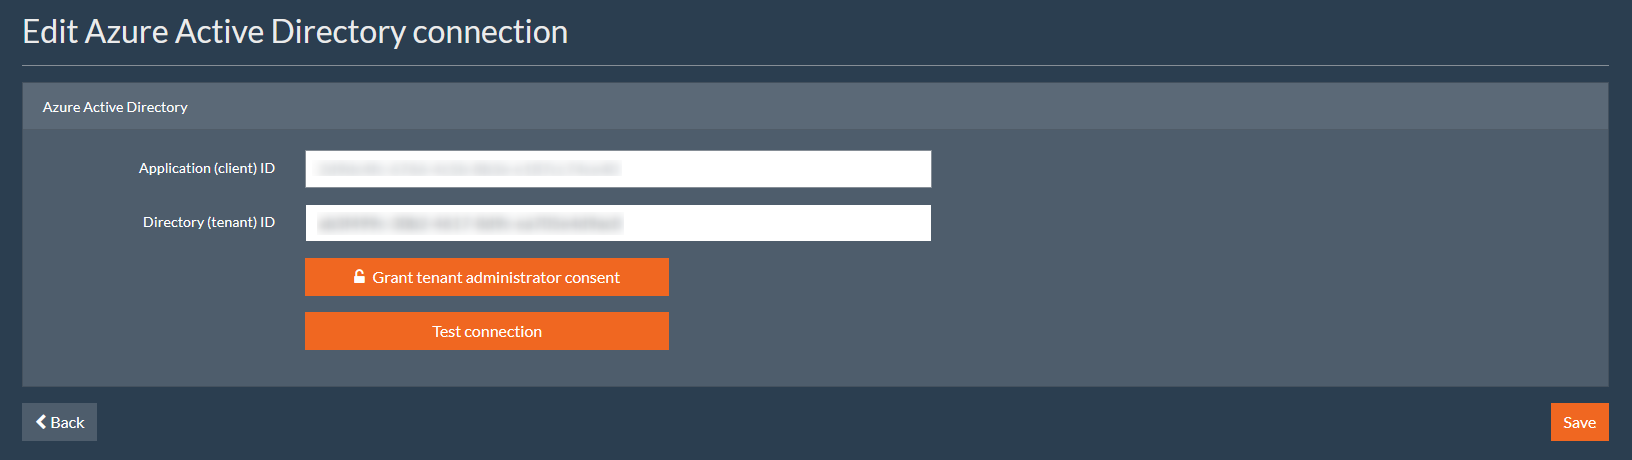
Click on the Grant tenant administrator consent button to grant admin consent to your application. This is only needed if you have not granted admin consent during the app registration or if your application is multi-tenant.
Click on the Test connection button to test your server connection.
11. User mapping (optional)
Use this page to view or modify the mapping of Dynamics 365 users to SharePoint users.
To access the User Mapping page, go to Configurations page, click on the Connections icon  next to any configuration and in the SharePoint connections table click on the User Mapping icon
  next to any connection. Each connection has its own user mapping.
In top box, you can see the number of user licenses required for your Dynamics 365 organization.
To modify default user mapping settings, click on the Settings button on the top right corner of the page. The User mapping settings dialog will open (see image below). You’re able to choose between Automatic and Manual user mapping mode. The default is automatic.

For automatic mode, an automated algorithm is in place to map (match) Dynamics 365 users to SharePoint users. The algorithm uses login name to map users and so it is important that Dynamics 365 and SharePoint are connected to the same Active Directory domain or Office 365 organization. In the User mapping settings dialog, you can set up the following properties:
- Auto-refresh – Indicates whether to automatically reload (refresh) the user mapping at a set interval
- Refresh interval – The interval of time (in seconds) between checks for users to be automatically mapped. This will make sure that new users will be mapped.
For manual mode, you’ll need to manually create the mapping. No user will be automatically mapped. Kindly note that when you change from automatic mode to manual mode, all existing mappings will be lost.
|
When using Azure Active Directory as group storage, you can only use automatic mode and you cannot edit any mapping. |
 NOTE:
NOTE: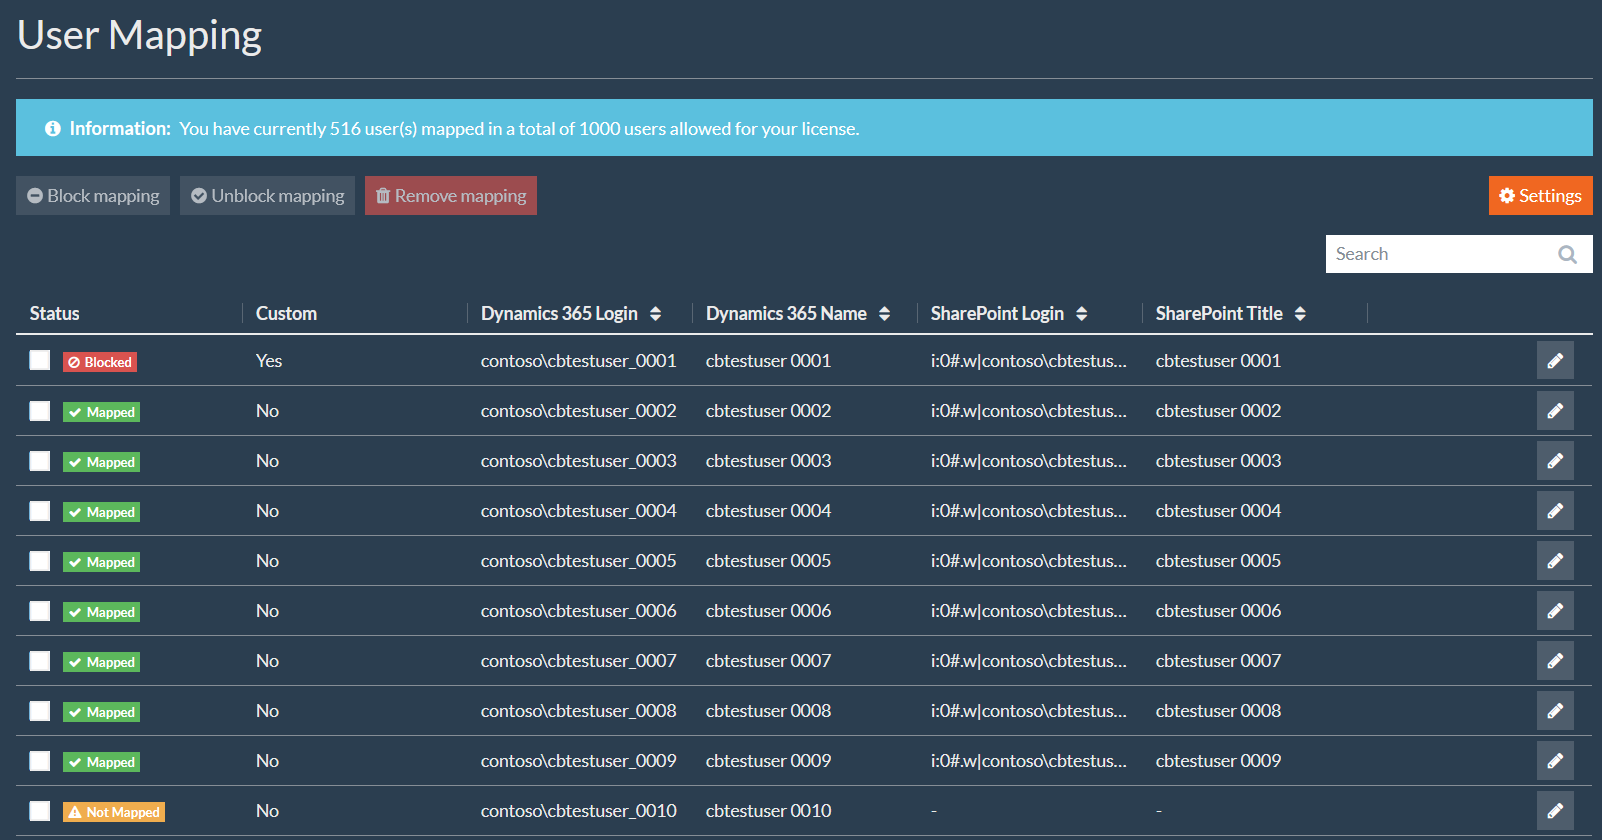
You can check as many checkboxes as you want, and then click on one of the following buttons:
- “Block mapping” to exclude all selected from automated mapping. Pick only mapped (no custom) mappings. Kindly note that blocked mappings do not contribute to your user license count.
- “Unblock mapping” to include all selected to automated mapping. Pick only blocked mappings.
- “Remove mapping” to remove all selected custom mappings. Pick only mapped (custom) mappings.
The Status column indicates the status of the mapping. The possible statuses are:
 Indicates that the user is mapped (automated mapping or custom).
 Indicates that the user has not been mapped.
 Indicates that the user is excluded from automated mapping (intentionally).
The Custom column indicates whether the mapping was automatically or manually created.
Click on the icon  to edit the mapping. The Custom user mapping dialog will open (see image below). You’re able to select one or more SharePoint users to be associated to a single Dynamics 365.

12. Permission mapping (optional)
Use this page to view or modify the mapping of Dynamics 365 access rights to SharePoint permissions.
To access the Permission Mapping page, go to Configurations page, click on the Connections icon  next to any configuration and in the SharePoint connections table click on the Permission Mapping icon
  next to any connection. Each connection has its own permission mapping.
As Dynamics 365 and SharePoint security models differ, a mapping between them needs to be established. To do so, the service automatically creates certain permission levels in SharePoint. Table 2 shows the default mapping between Dynamics 365 and SharePoint that should be suitable for most deployments.
Table 2: Mapping between Dynamics 365 and SharePoint
|
D365 access right |
SharePoint permission level |
SharePoint permissions |
|---|---|---|
|
ReadAccess |
cbreplicator_crm_ReadAccess |
ViewListItems; Open; OpenItems; ViewVersions; ViewFormPages; BrowseDirectories; BrowseUserInfo; UseClientIntegration; UseRemoteAPIs; CreateAlerts |
|
WriteAccess |
cbreplicator_crm_WriteAccess |
AddListItems; EditListItems; DeleteListItems; DeleteVersions |
To modify default permissions mapping settings, click on the Settings button on the top right corner of the page. The Permission mapping settings dialog will open (see image below). You’re able to choose between Automatic and Manual user mapping mode. The default is automatic.

You can check as many checkboxes as you want, and then click on the Remove button to delete a custom permission mapping (see image below). Only custom mappings can be removed. Look at the Custom column to identify if the mapping is manually created by the user or pre-configured by the application.

Click on the Add button to create a custom permission mapping. The Create mapping settings dialog will open.
For SharePoint as group storage, you will need to choose an appropriate Dynamics 365 Access Right, a SharePoint Permission Level and, optionally, an Entity filter. Finally click on the Save button.
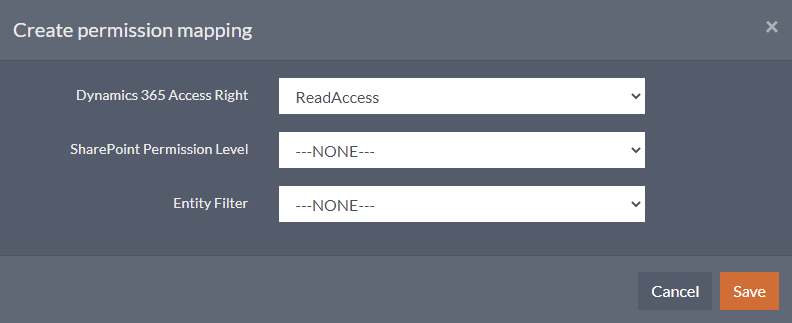
For Azure Active Directory as group storage, you will need to choose an appropriate Dynamics 365 Access Right and, optionally, an Entity filter, as well as type in a SharePoint Permission Level Name and, optionally, SharePoint Permissions to be assigned.

13. Explicit folder permissions (optional)
Use this page to add additional SharePoint permissions besides the ones calculated for the Dynamics 365 security roles. In Addition, you may want to grant access to SharePoint for users who do not belong to Dynamics 365.
To access the Explicit folder permissions page, go to Configurations page, click on the Connections icon  next to any configuration and in the SharePoint connections table click on the Permission Mapping icon
  next to any connection. Each connection has its own explicit folder permissions.
You can check as many checkboxes as you want, and then click on the Remove button to delete all selected explicit folder permissions (see image below).

Click on the Add button to create an explicit folder permission. The Create explicit folder permission dialog will open. In this dialog, you will need to choose an appropriate Filter Type, a Principal Type, a Principal Value and a Permission Level.

14. Replication logs
To help you with basic troubleshooting, the service keeps track of the replication process. To view activity log, navigate to Configurations page and then click on the icon  next to any configuration.
During replication process, the service generates a message (Log) for each step along the way. Each Log has a Log Type, which refers to how detailed the generated message is. The following log types are generated:
- Debug – Internal information that could be used to troubleshooting.
- Info – General information from the CB Replicator service.
- Warning – Warning messages
- Error – Error messages
- Event – Events received from Dynamics 365
- Permission Write – Permissions written to SharePoint
14.1 History logs
Use this page to view or monitor detailed logs of the activity.
|
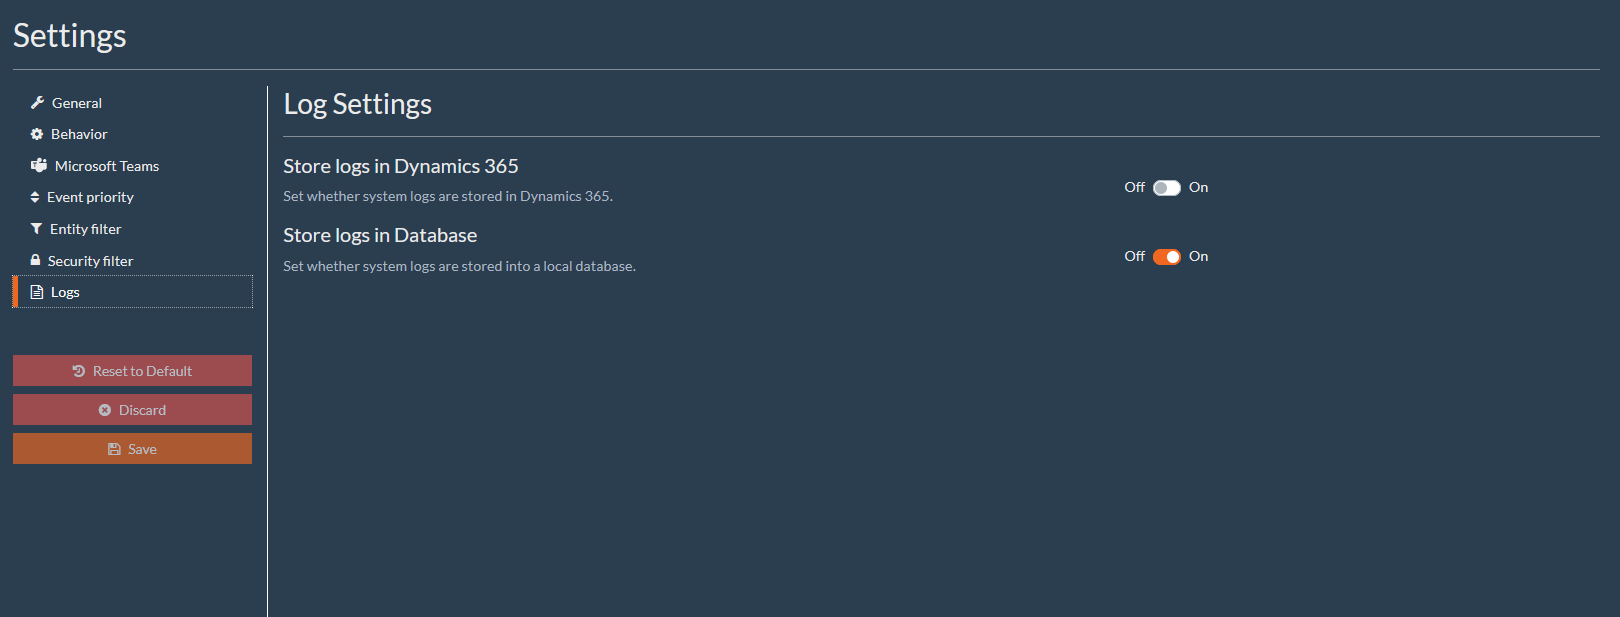
By default, activity logs are stored in a database. This can be configured via Settings > Logs in “Save the Replicator logs in the database” or “Save the Replicator logs in Dynamics 365” settings. |
 NOTE:
NOTE: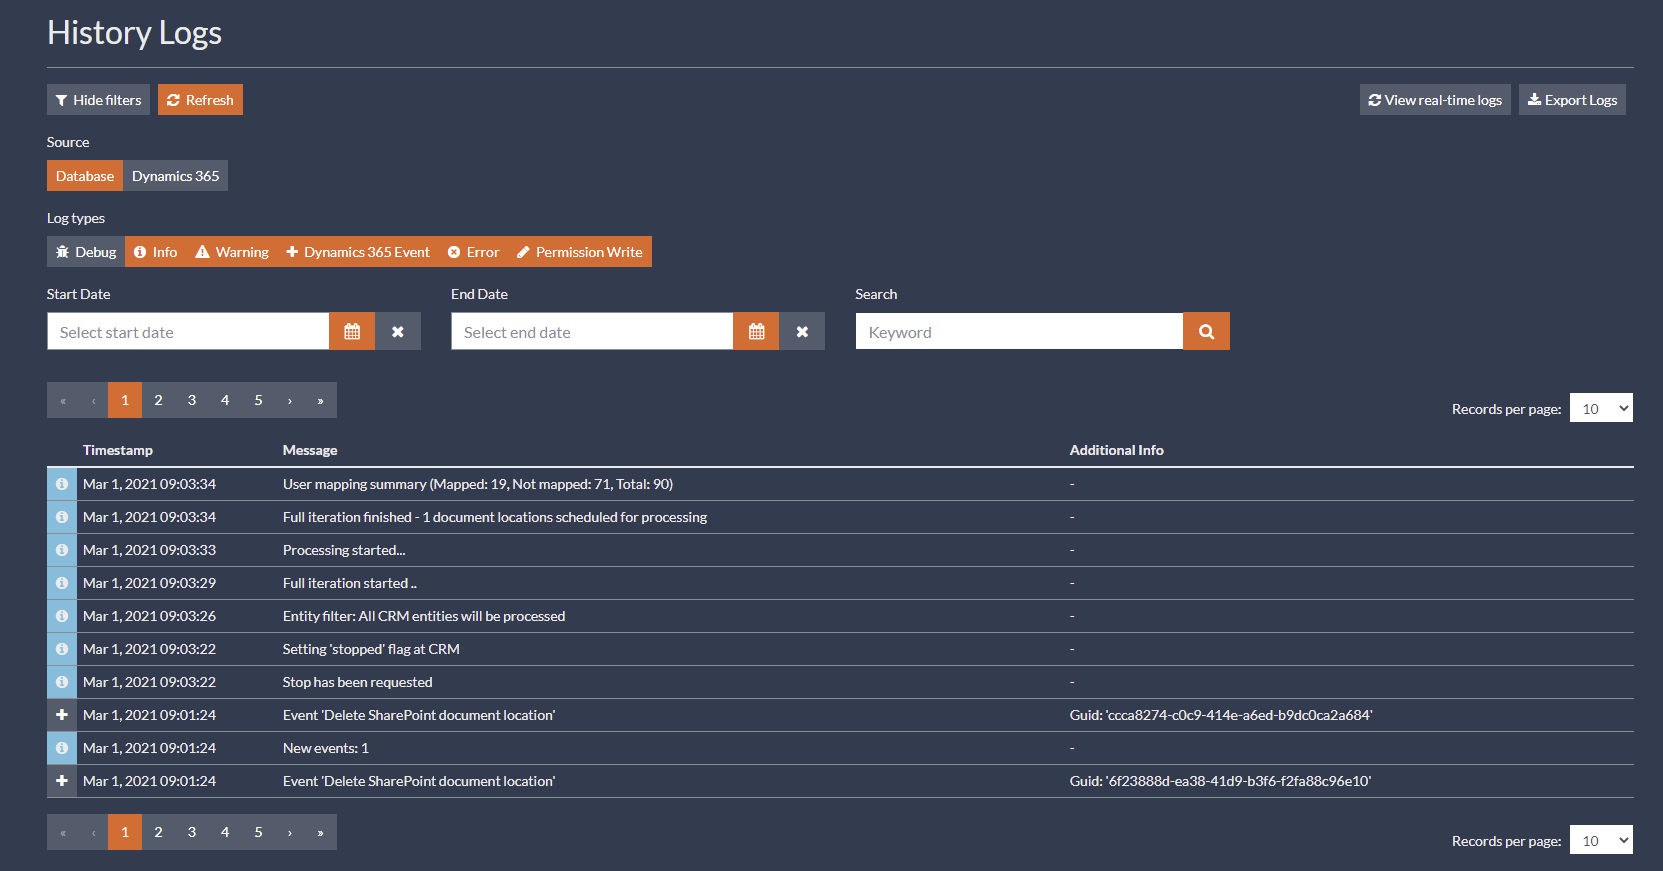
In this page, you can search for logs stored in a database or in Dynamics 365, filter logs by type or date, navigate to older pages and search for a specific text in Message or Additional Info columns.
|
Be aware that search in SQLite database is case-sensitive while for Microsoft SQL Server or Dynamics 365 is case-insensitive. |
|---|
 NOTE:
NOTE:|
You can delete logs from Dynamics 365 by using Bulk delete. |
 NOTE:
NOTE:15. Overwrite folder permissions
After permissions are set on a SharePoint document location based on Dynamics 365 access rights, the service will no longer modify them unless a change in Dynamics 365 security is made.
Use this page to manually overwrite permissions of any SharePoint document location.
To access Overwrite folder permissions, navigate to Configurations page and then click on the icon  next to any configuration.
|
This option is unavailable when the replication process is stopped. |
|---|
 NOTE:
NOTE:In this page, you can filter locations by entity and search for a specific text in URL, Location ID or Object ID columns as shown in figure below.

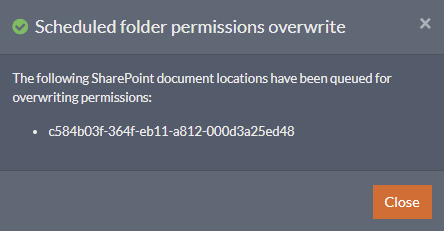
You can check as many checkboxes as you want, and then click on the Overwrite selected locations button. You will be prompted with a list of all SharePoint document locations queued for overwriting permissions as shown in figure below.
16. Settings
The Settings page allows you to easily customize your configuration’ default settings.
To access Settings, navigate to Configurations page, expand the burger icon  next to any configuration and then click on Settings option.
|
Some settings are only available via the XML configuration file. |
 NOTE:
NOTE:Click on the Save button to save all your changes for that page at once.
Click on the Discard button to discard all your changes for that page at once.
In current product version, you can only reset Event Priority settings to their original defaults. You will be asked to confirm. Kindly note that this action cannot be reversed.
16.1 General
This General Settings screen is the default screen in the Settings page and controls some of the most basic configuration settings for your configuration.

16.1.1 Group storage
Indicates the target system for creating and maintaining groups and memberships.
By default, SharePoint is used. In this case, groups are created on the SharePoint side.
Maintaining groups on the SharePoint side is a very time costly process especially when you use multiple SharePoint connections or site collections. For each SharePoint, a set of groups needs to be maintained, and a single Dynamics 365 operation might cause a great number of write operations at the SharePoint side.
Alternatively, you can select Azure Active Directory as group storage for creating and maintaining groups.
|
Be aware that when changing the target system, custom user mapping, permission mappings and explicit folder permissions will become invalid and will need to be removed. |
 NOTE:
NOTE:In this case, groups are created on the directory side. These groups only need to be adjusted once per operation to then be used in each affected SharePoint site collection. This can significantly improve performance in some scenarios.
|
AAD Office Group teams are not fully supported with group storage Azure Active Directory due to technical limitation in design of Office groups (the Office groups cannot be nested). |
 NOTE:
NOTE:16.1.2 Automatically delete events from Dynamics 365 after processing
Indicates whether events will be automatically deleted from the queue in Dynamics 365 after being processed.
16.2 Behavior
This Behavior Settings screen controls how the service behaves when replicating permissions. Only the first are visible in the figure below, for other options you will need to scroll down.
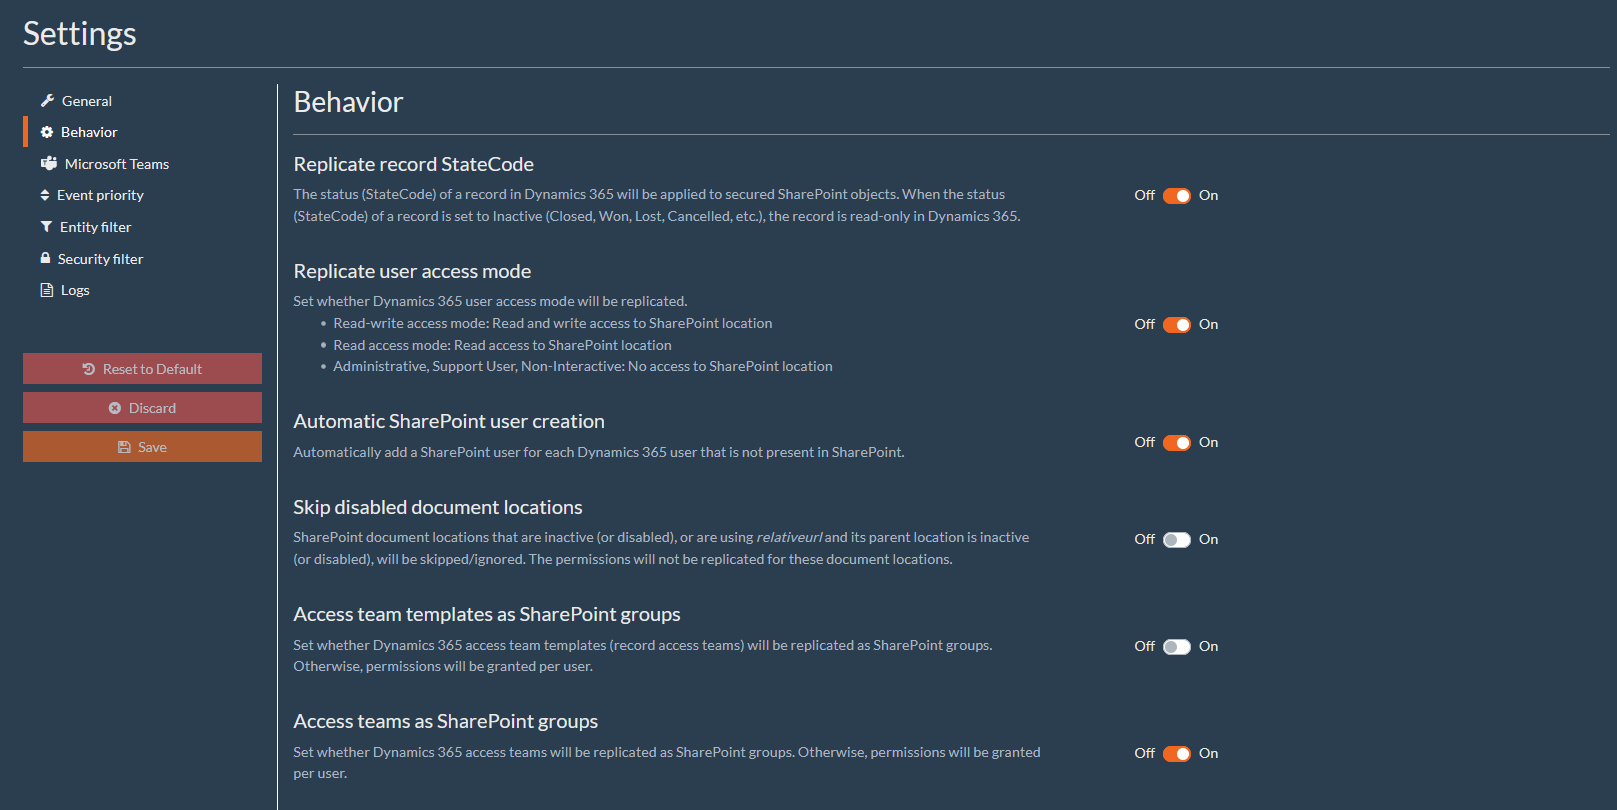
16.2.1 Replicate record state code
Indicates whether the status of a record in Dynamics 365 will be applied to secured SharePoint objects. When the status of a record is set to Inactive (Closed, Won, Lost, Cancelled, etc.), the record is read-only in Dynamics 365. If enabled (On), all the users will have read-only access in SharePoint as well. The default is disabled (Off).
16.2.2 Replicate user access mode
Indicates whether Dynamics 365 users access mode will be replicated. The default is disabled (Off).
- Read-write access mode – Read and write access to SharePoint location.
- Read access mode – Read access to SharePoint location.
- Administrative, Support User, Non-Interactive – No access to SharePoint location.
16.2.3 Automatic SharePoint user creation
Indicates whether a SharePoint user should be added for each Dynamics 365 user that is not present in SharePoint. To do so, the user must belong to Active Directory domain or Office 365 organization. No retries are made in case of error. The default is disabled (Off).
16.2.4 Skip disabled document locations
If enabled (On), SharePoint document locations that are inactive (or disabled) or are using relativeurl and its parent location is inactive (or disabled), will be skipped/ignored. The permissions will not be replicated for these document locations. The default is disabled (Off).
16.2.5 Access team templates as SharePoint groups
Indicates whether the Dynamics 365 access team templates (record access teams) will be replicated as SharePoint groups. Otherwise, permissions will be granted per user.
16.2.6 Access teams as SharePoint groups
Indicates whether Dynamics 365 access teams will be replicated as SharePoint groups. Otherwise, permissions will be granted per user.
16.2.7 Skip broken links
If enabled (On), when a SharePoint document location is identified as a broken link it will be remembered in the local database. There will be no more attempts to write permissions for this SharePoint document location.
You can clear the cache at any time by clicking on the Clear broken link cache button.
|
When using Azure Active Directory as group storage, any mention of SharePoint group will be applied to directory groups. |
 NOTE:
NOTE:16.2.8 Multiple link resolution type
Indicates the permission resolution type in case of multiple document locations pointing to same SharePoint object.
- None – No handling for this case.
- Oldest Wins – The permissions for oldest document location will be set.
- Newest Wins – The permissions for newest document location will be set.
- Logical And – The logical conjunction of all related permissions will be set.
- Logical Or – The logic disjunction of all related permissions will be set.
16.3 Microsoft Teams
|
Make sure you have enabled Microsoft Teams support in Dynamics 365. The following link contains more information about Microsoft Teams integration with Dynamics 365: https://docs.microsoft.com/en-us/dynamics365/teams-integration/teams-integration |
 WARNING:
Each Team has a pre-created SharePoint site where files are uploaded (via Teams or directly). For each channel a dedicated SharePoint folder is created. You can link one or multiple Dynamics 365 records for each team channel. When Dynamics 365 records are linked to some team channel, the team channel related documents are visible also in Dynamics 365.
The Dynamics 365 users can access files directly within the Dynamics 365 user interface. These files in SharePoint are accessible following the security permissions defined by the Team itself, however security is not matching with linked Dynamics 365 records. This is the out-of-the-box functionality that brings the described security issue.
CB Replicator deals with the security of files stored within Microsoft Teams. Technically, these files are stored in dedicated SharePoint site collections:
- 1 Microsoft Team = 1 SharePoint site collection (e.g. /sites/team)
- 1 Microsoft Team channel = 1 SharePoint folder within the mentioned site collection (e.g. /sites/team/Shared Documents/General)
CB Replicator secures just the folders referenced by Microsoft Teams location (e.g. /sites/team/Shared Documents/General). It does not secure the whole site collection.
By enabling Microsoft Teams support (Settings > Microsoft Teams > Enable Microsoft Teams support), the following behavior will be added to the default logic:
- Team files will get permissions based on linked Dynamics 365 record(s), when Append default permissions for Teams location is disabled
- Team files will get permissions based on linked Dynamics 365 record(s) + permission based on team, when Append default permissions for Teams location is enabled
If there are multiple Dynamics 365 records linked to a single team, the security logic in place is the one set in Settings > Behavior and in Multiple link resolution type setting.
The Microsoft Teams support can work in parallel with existing document locations and in combination with the standard Dynamics 365 – SharePoint integration.

16.3.1 Enable Microsoft Teams support
If enabled (On), it will ensure that Dynamics 365 security will be applied to files stored at related site based on linked Dynamics 365 record(s). Otherwise, Microsoft Teams document locations will be skipped.
16.3.2 Append default permissions for Teams locations
If enabled (On), the following permissions will be added to the location linked to the team:
- Team’s site Visitors – Read
- Team’s site Members – Edit
- Team’s site Owners – Full control
Otherwise, some users (in Teams) may not have access to files. This is to make sure that all owners/members (in Teams) have proper access to Microsoft Teams files.
|
If Microsoft Teams support is enabled, you must use Azure Active Directory as group storage. Go to Settings > Target System and then select Azure Active Directory (see section 0). Please note that a connection for Azure Active Directory must be configured. The reason behind this is that each Microsoft Teams is creating dedicated site collection in background and we need to use Azure Active Directory groups instead of SharePoint groups as internal group storage to reduce number of groups handled by our software. Azure Active Directory groups can be used across site collection, SharePoint groups cannot. |
 NOTE:
NOTE:|
Microsoft offers also Enhanced Collaboration Experience with Microsoft Teams. If enabled, you can create a Team directly from Dynamics 365, using the Collaborate button. However, in this case, the document location in Dynamics 365 is created, but not the folder in SharePoint. The SharePoint folder will be created on the first attempt to access the Files tab in Microsoft Teams. This behavior will lead to an expected warning. You should follow its indications: SharePoint folder '{name}’ was not found. Once the folder is created, our software will not recognize it automatically. You must force full iteration (Quick Actions > Force full iteration) or overwrite folder permission (Connections > SharePoint connection > Edit overwrite folder permissions). |
|---|
 NOTE:
NOTE:16.4 Event priority
This Event Priority screen allows you change the order in which events that are triggered from Dynamics 365 will be processed, as shown in the figure below.
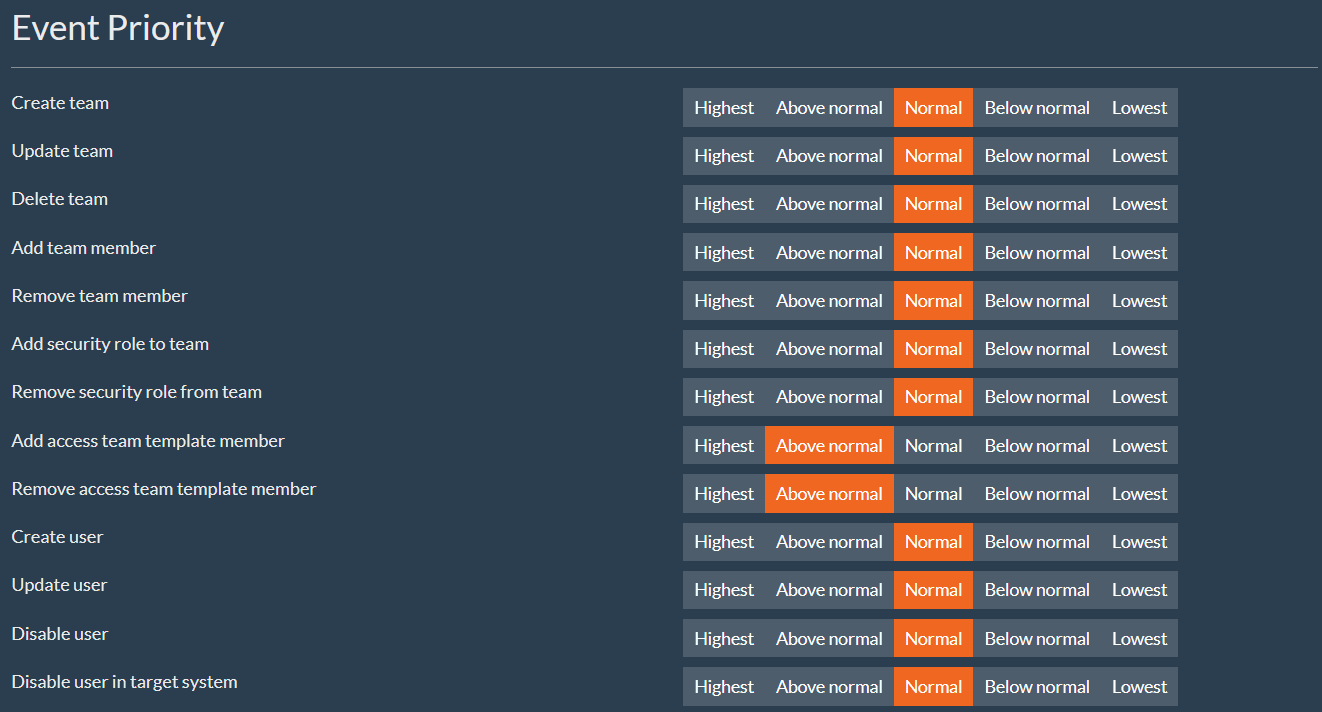
The events with higher priority will be processed before events with lower priority. The available priorities are: Highest, Above normal, Normal, Below normal, and Lowest. Do not set all events with a high priority, the goal is to indicate an order for event processing.
16.5 Entity Filter
This Event Priority screen allows you to select which Dynamics 365 entities you want to have permissions automatically replicated.
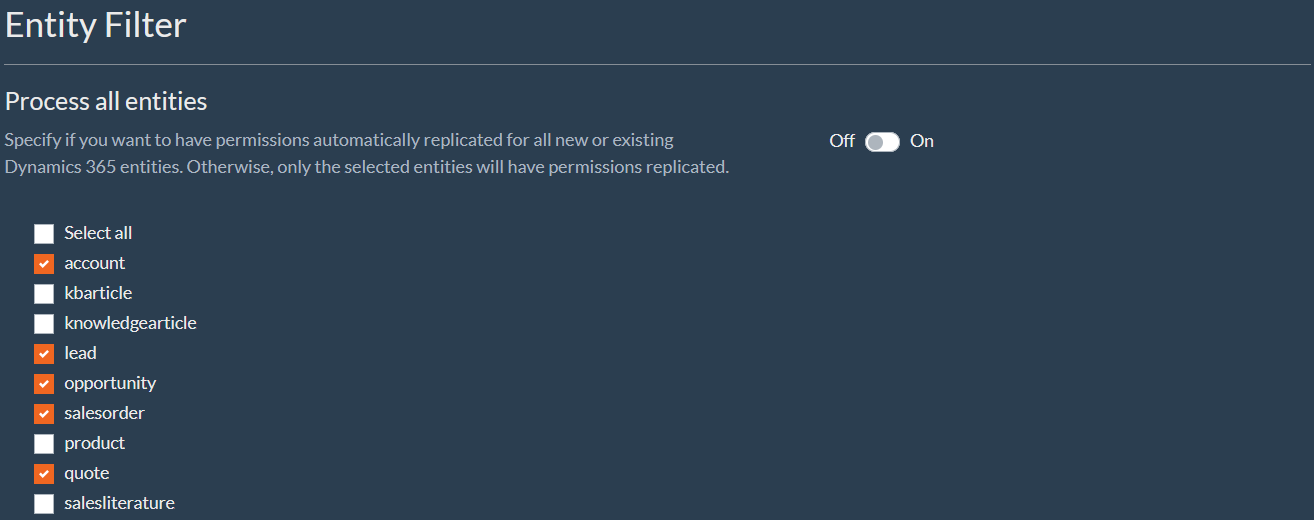
If Process all entities is enabled (On), all Dynamics 365 entities will be automatically replicated. Otherwise, only the selected entities will have permissions replicated.
|
Only entities with enabled Document Management will be listed. |
 NOTE:
NOTE:16.6 Security role filter
This Event Priority screen allows you to select which Dynamics 365 security roles are going to be replicated.
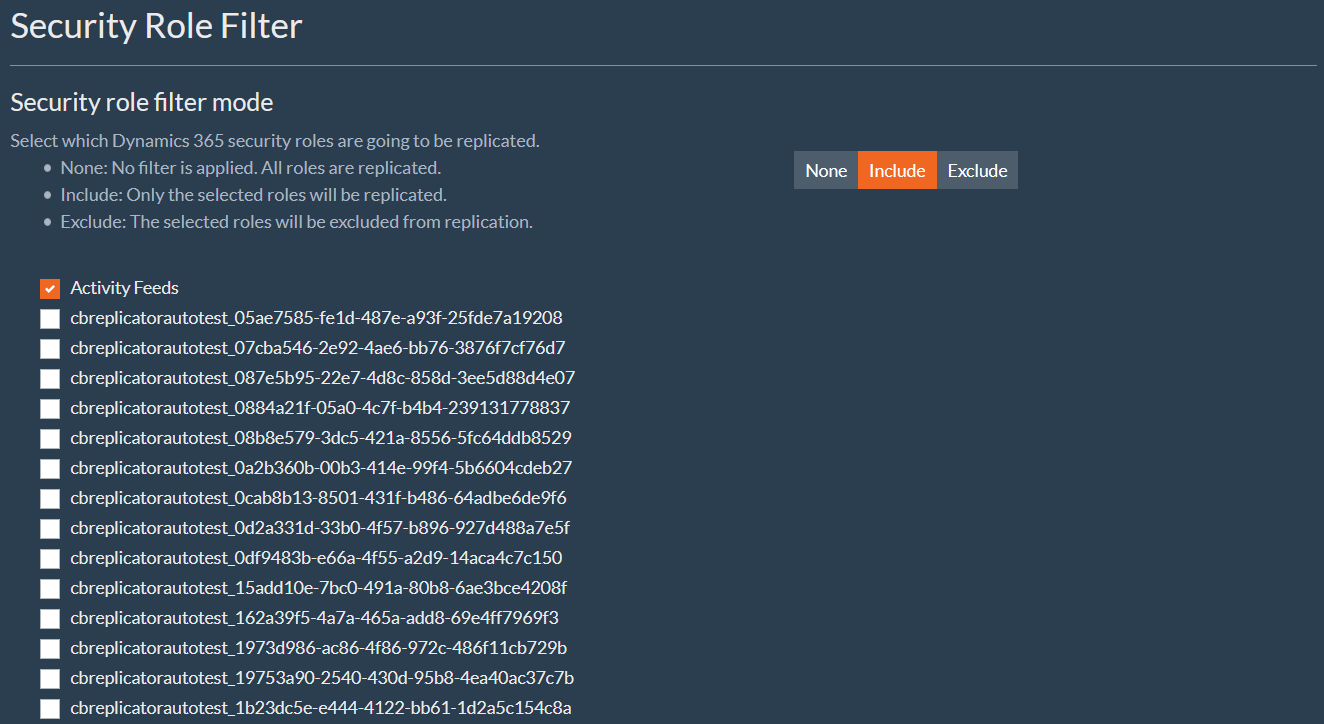
The behavior depends on what is set in the Security filter mode option:
- None: No filter is applied. All roles are replicated.
- Include: Only the selected roles will be replicated.
- Exclude: The selected roles will be excluded from replication.
16.7 Logs
This Logs screen allows you to define where logs will be stored in a database or Dynamics 365 or both.
17. Support and Troubleshooting
If you ever need help with your solutions or want to contact us, please navigate to our Customer Support Portal at https://portal.connecting-software.com. Once logged in, you can create a support case or search the Knowledge Base for articles pertaining to your support request. The majority of potential challenges with the necessary fixes are described in detail there.